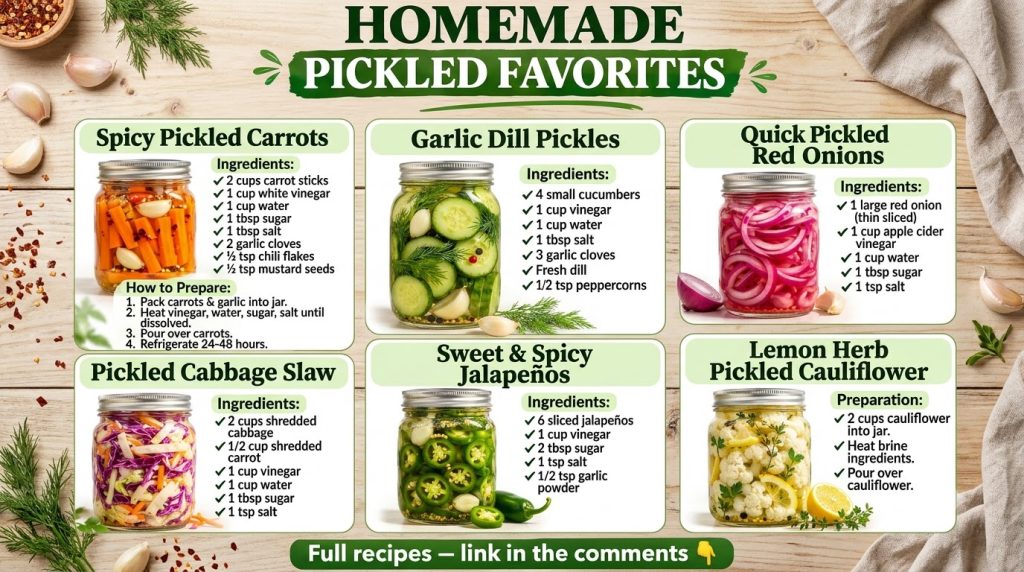
Transforming everyday vegetables into vibrant, tangy delights is easier than you think! Homemade pickles offer a delightful crunch and a burst of flavor that can elevate any meal. Beyond their delicious taste, pickling is a fantastic way to preserve the bounty of fresh produce, ensuring you always have a healthy, zesty snack or condiment on hand.
This guide dives deep into the art of making six distinct pickled vegetable recipes, inspired by the colorful creations often shared in wellness circles. From crisp cucumbers to fiery jalapeños, you’ll learn how to craft these tangy treats at home, complete with exact measurements and step-by-step instructions. Get ready to explore the exciting world of homemade pickles and add a homemade crunch to your culinary repertoire!
Why Pickle Your Own Vegetables?
Homemade pickles offer a wealth of benefits that go beyond just taste. When you pickle vegetables at home, you have complete control over the ingredients, allowing you to avoid artificial preservatives, excessive sodium, and unwanted sugars often found in store-bought varieties. They are a simple yet effective way to add a bright, acidic counterpoint to rich dishes, and many pickled vegetables are also rich in antioxidants and fiber.
- Boosts Flavor: Adds a tangy, savory, or spicy kick to meals.
- Extends Shelf Life: Preserves fresh produce for weeks or even months.
- Healthy Snack: A low-calorie, high-flavor alternative to processed snacks.
- Versatile Ingredient: Enhances sandwiches, salads, tacos, and more.
The Basic Art of Pickling: A Quick Guide
The foundation of any great pickle is a balanced brine. While specific flavorings vary, the general principle remains the same: a combination of vinegar, water, salt, and often sugar, heated to dissolve the solids and then poured over your chosen vegetables. Here’s a general overview before we dive into specific recipes:
Essential Pickling Ingredients:
- Vegetables: Fresh, firm, and blemish-free produce is key.
- Vinegar: Distilled white vinegar (5% acidity) is most common. Apple cider vinegar, rice vinegar, or white wine vinegar can also be used for different flavor profiles.
- Water: Filtered water is recommended.
- Salt: Pickling salt or kosher salt (without anti-caking agents) is best. Avoid iodized salt as it can make pickles cloudy.
- Sugar (Optional): Balances acidity and can contribute to a sweeter pickle.
- Spices & Aromatics: Garlic, dill, mustard seeds, peppercorns, chili flakes, bay leaves, and coriander seeds are popular choices.
Basic Pickling Method:
- Prepare Vegetables: Wash and slice/chop your vegetables as desired.
- Pack Jars: Tightly pack the prepared vegetables into clean, sterile glass jars, adding any desired aromatics or spices directly into the jar.
- Prepare Brine: In a saucepan, combine vinegar, water, salt, and sugar (if using). Bring to a boil, stirring until salt and sugar are fully dissolved.
- Pour Brine: Carefully pour the hot brine over the vegetables in the jars, ensuring they are fully submerged. Leave about ½ inch of headspace at the top.
- Seal & Chill: Securely seal the jars with lids. Allow them to cool to room temperature, then refrigerate for at least 24 hours (or up to a week for best flavor) before enjoying.
6 Vibrant Homemade Pickles to Elevate Your Meals
Ready to get started? Here are six detailed recipes to help you pickle your way to flavor!
1. Zesty Pickled Carrots: A Sweet & Tangy Crunch
These bright orange beauties offer a delightful snap and a balanced sweet-tangy flavor, perfect for snacking or adding to salads.
Ingredients:
- 1 pound carrots, peeled and sliced into ¼-inch rounds or sticks
- 2 cloves garlic, peeled and thinly sliced
- 1 teaspoon black peppercorns
- ½ teaspoon red pepper flakes (optional, for a kick)
- 1 cup distilled white vinegar
- 1 cup water
- 1 tablespoon pickling salt
- 1 tablespoon granulated sugar
Instructions:
- Wash and peel the carrots, then slice them into rounds or sticks.
- Sterilize a 1-pint (about 500ml) glass jar and lid.
- Place the sliced garlic, black peppercorns, and red pepper flakes (if using) at the bottom of the jar.
- Tightly pack the sliced carrots into the jar.
- In a small saucepan, combine the vinegar, water, pickling salt, and sugar. Bring the mixture to a boil over medium-high heat, stirring until the salt and sugar are fully dissolved.
- Carefully pour the hot brine over the carrots, ensuring they are completely submerged. Tap the jar gently to release any air bubbles. Leave about ½ inch of headspace.
- Seal the jar tightly with the lid. Let it cool to room temperature on the counter.
- Once cool, transfer the jar to the refrigerator. Allow the carrots to pickle for at least 2-3 days for optimal flavor development.
Usage Tips:
Serve as a side dish, add to grain bowls, or chop them for a crunchy addition to coleslaw.
2. Crisp Pickled Cucumbers: The Classic Reimagined
A classic for a reason, these crisp pickled cucumbers are a staple. Use small pickling cucumbers for the best texture.
Ingredients:
- 1 pound pickling cucumbers, sliced into ¼-inch rounds or spears
- 2 sprigs fresh dill
- 2 cloves garlic, peeled and smashed
- 1 teaspoon mustard seeds
- ½ teaspoon dill seeds
- 1 cup distilled white vinegar
- 1 cup water
- 1 ½ tablespoons pickling salt
- 1 teaspoon granulated sugar (optional)
Instructions:
- Wash the cucumbers thoroughly. Slice them into ¼-inch rounds or cut them into spears.
- Sterilize a 1-pint (about 500ml) glass jar and lid.
- Add the fresh dill sprigs, smashed garlic, mustard seeds, and dill seeds to the bottom of the jar.
- Tightly pack the cucumber slices or spears into the jar.
- In a small saucepan, combine the vinegar, water, pickling salt, and sugar (if using). Bring to a boil, stirring until the salt and sugar are dissolved.
- Pour the hot brine over the cucumbers, ensuring they are fully submerged. Tap the jar to remove air bubbles. Leave ½ inch of headspace.
- Seal the jar and let it cool to room temperature before refrigerating.
- Refrigerate for at least 5-7 days before serving to allow the flavors to meld.
Usage Tips:
Perfect on sandwiches, burgers, or enjoyed straight from the jar as a refreshing snack. Try them with your favorite healthy lunch ideas.
3. Vibrant Pickled Red Onions: A Flavorful Burst
These beautiful pink pickled onions add a pop of color and a tangy, slightly sweet bite to almost any dish.
Ingredients:
- 1 large red onion, thinly sliced into rings
- 1 bay leaf
- ½ teaspoon black peppercorns
- 1 cup apple cider vinegar
- 1 cup water
- 1 tablespoon pickling salt
- 2 tablespoons granulated sugar
Instructions:
- Peel and thinly slice the red onion into rings.
- Sterilize a 1-pint (about 500ml) glass jar and lid.
- Place the bay leaf and black peppercorns at the bottom of the jar.
- Pack the thinly sliced red onion rings into the jar, pressing down gently.
- In a small saucepan, combine the apple cider vinegar, water, pickling salt, and granulated sugar. Bring the mixture to a boil, stirring until the salt and sugar are fully dissolved.
- Carefully pour the hot brine over the red onions, making sure they are completely covered. Tap the jar to release air bubbles. Leave ½ inch of headspace.
- Seal the jar and let it cool completely to room temperature.
- Refrigerate for at least 1-2 hours, but they are best after 24 hours.
Usage Tips:
Fantastic on tacos, avocado toast, salads, or as a garnish for grilled meats and fish.
4. Tangy Pickled Cabbage: Versatile and Delicious
Pickled cabbage offers a wonderful tang and crunch, reminiscent of sauerkraut but with a quicker preparation time. Great for adding zest to heavier meals.
Ingredients:
- ½ head green cabbage (about 1 pound), thinly shredded
- 1 carrot, peeled and shredded (optional, for color and sweetness)
- 1 teaspoon coriander seeds
- ½ teaspoon caraway seeds
- 1 cup distilled white vinegar
- 1 cup water
- 1 tablespoon pickling salt
- 1 tablespoon granulated sugar
Instructions:
- Wash and thinly shred the green cabbage. If using, shred the carrot.
- Sterilize a 1-pint (about 500ml) glass jar and lid.
- Combine the shredded cabbage and carrot (if using) in a bowl. Gently massage with a pinch of salt to help soften it slightly, then pack it tightly into the jar, adding the coriander and caraway seeds as you layer.
- In a saucepan, combine the vinegar, water, pickling salt, and sugar. Bring to a boil, stirring until dissolved.
- Pour the hot brine over the cabbage mixture, ensuring it’s fully submerged. Tap the jar to remove air bubbles. Leave ½ inch of headspace.
- Seal the jar and allow it to cool before refrigerating.
- Refrigerate for at least 3-5 days before enjoying.
Usage Tips:
Ideal for topping hot dogs, pulled pork sandwiches, or as a tangy component in Asian-inspired dishes.
5. Fiery Pickled Jalapeños: Add a Spicy Kick
For those who love a bit of heat, these pickled jalapeños are incredibly versatile and easy to make at home.
Ingredients:
- ½ pound fresh jalapeños, washed and thinly sliced into rings (wear gloves!)
- 2 cloves garlic, thinly sliced
- ½ teaspoon dried oregano
- ¼ teaspoon turmeric (for color, optional)
- 1 cup distilled white vinegar
- 1 cup water
- 1 tablespoon pickling salt
- 1 tablespoon granulated sugar
Instructions:
- Wearing gloves, wash and thinly slice the jalapeños into rings.
- Sterilize a 1-pint (about 500ml) glass jar and lid.
- Place the sliced garlic, dried oregano, and turmeric (if using) at the bottom of the jar.
- Tightly pack the sliced jalapeños into the jar.
- In a small saucepan, combine the vinegar, water, pickling salt, and sugar. Bring the mixture to a boil, stirring until dissolved.
- Pour the hot brine over the jalapeños, ensuring they are completely submerged. Tap the jar to release air bubbles. Leave ½ inch of headspace.
- Seal the jar tightly and let it cool to room temperature.
- Refrigerate for at least 24 hours before using. The heat and flavor will intensify over time.
Usage Tips:
Add to nachos, chili, eggs, or blend into a spicy sauce for an extra kick. A great addition to high protein meals.
6. Crunchy Pickled Cauliflower: Unexpectedly Delightful
Pickled cauliflower florets offer a fantastic texture and absorb the tangy brine beautifully, making them a unique addition to any pickle platter.
Ingredients:
- 1 small head cauliflower (about 1 pound), cut into small florets
- 2 cloves garlic, peeled and quartered
- 1 teaspoon yellow mustard seeds
- ½ teaspoon celery seeds
- 1 cup distilled white vinegar
- 1 cup water
- 1 ½ tablespoons pickling salt
- 1 tablespoon granulated sugar
Instructions:
- Wash the cauliflower and cut it into bite-sized florets.
- Sterilize a 1-pint (about 500ml) glass jar and lid.
- Place the quartered garlic, mustard seeds, and celery seeds at the bottom of the jar.
- Tightly pack the cauliflower florets into the jar.
- In a small saucepan, combine the vinegar, water, pickling salt, and sugar. Bring the mixture to a boil, stirring until the salt and sugar are fully dissolved.
- Pour the hot brine over the cauliflower, ensuring the florets are completely submerged. Tap the jar to release air bubbles. Leave ½ inch of headspace.
- Seal the jar and let it cool to room temperature.
- Refrigerate for at least 3-5 days before enjoying, allowing the cauliflower to absorb the flavors.
Usage Tips:
Serve alongside a cheese board, in a crudité platter, or chopped into a hearty potato salad.
Creative Ways to Enjoy Your Homemade Pickles
Homemade pickles aren’t just for sandwiches. Their bright acidity and crunch can enhance a wide array of dishes:
- Salad Topper: Add a tangy kick to green salads, potato salads, or pasta salads.
- Garnish: Elevate tacos, burgers, hot dogs, and grain bowls.
- Snack: Enjoy them straight from the jar as a refreshing, low-calorie treat.
- Ingredient: Chop them into dips, spreads, or relishes.
- Charcuterie Boards: A must-have on any charcuterie or cheese platter.
Storage Tips for Lasting Freshness
Once made, your homemade pickled vegetables should be stored in the refrigerator. While they can typically last for several weeks, or even a couple of months, their crispness and flavor are best within 2-4 weeks. Always ensure the vegetables remain submerged in the brine; if they float, you can use a small glass weight or a piece of plastic wrap to keep them down. Discard if you notice any mold or off-smells.
Final Thoughts
Embracing the world of homemade pickles is a rewarding experience that brings fresh, vibrant flavors to your table. These six recipes are just the beginning of a culinary adventure, offering a simple way to preserve vegetables, enhance meals, and impress your taste buds. So grab your favorite vegetables, gather your pickling essentials, and start pickling your way to flavor today!
Medical Disclaimer
The information provided in this article is for general knowledge and informational purposes only, and does not constitute medical advice. Always consult with a qualified healthcare professional before making any decisions about your health or diet. Individual results may vary, and the nutritional content of homemade pickles can differ based on ingredients and preparation methods.