There is something deeply satisfying about watching a healthy stem sprout white roots in a glass of water. With a few clippings, a jar, and some patience, you can grow new plants from the ones you already love, saving money and filling your beds, containers, and windowsills without buying a single new start. The method is simple, but a few details make the difference between a jar full of rotted stems and a row of sturdy young plants. In this guide, you will learn how to choose and take cuttings, how to set up your water jars, and how to care for each cutting so it can move into soil successfully.
Why Water Rooting Works, and Where It Falls Short
Many flowering plants form roots from the nodes, the small bumps where leaves attach to the stem. When a cutting is placed in water, those nodes can develop new root tissue as long as the cutting still has enough stored energy and healthy leaves to support the process. Water is an easy way to watch this happen because you can see roots forming.
Water-grown roots are not the same as soil-grown roots, however. Roots that form in water are thinner and more delicate, and they must adjust to dense, oxygen-poor soil. Think of water rooting as the first stage of propagation, not the finished product. Once roots are about an inch or two long and branching, the cutting should be transferred gently into a moist, airy potting mix.
Choosing and Taking Healthy Cuttings
Start with a vigorous stem from a healthy, well-watered plant. Look for firm stems, bright green or healthy woody color depending on the species, and no signs of pests, mildew, or leaf spot. Use clean, sharp pruners or a sterilized knife. Cut just below a node, then remove the lower leaves so that at least one or two nodes sit underwater without foliage. Leave two to four leaves at the top to keep the cutting photosynthesizing.
Cutting length matters. For most soft-stemmed flowers, a piece about four to six inches long works well. Take cuttings in the morning, when stems are fully hydrated, and place them in water right away to reduce wilting.
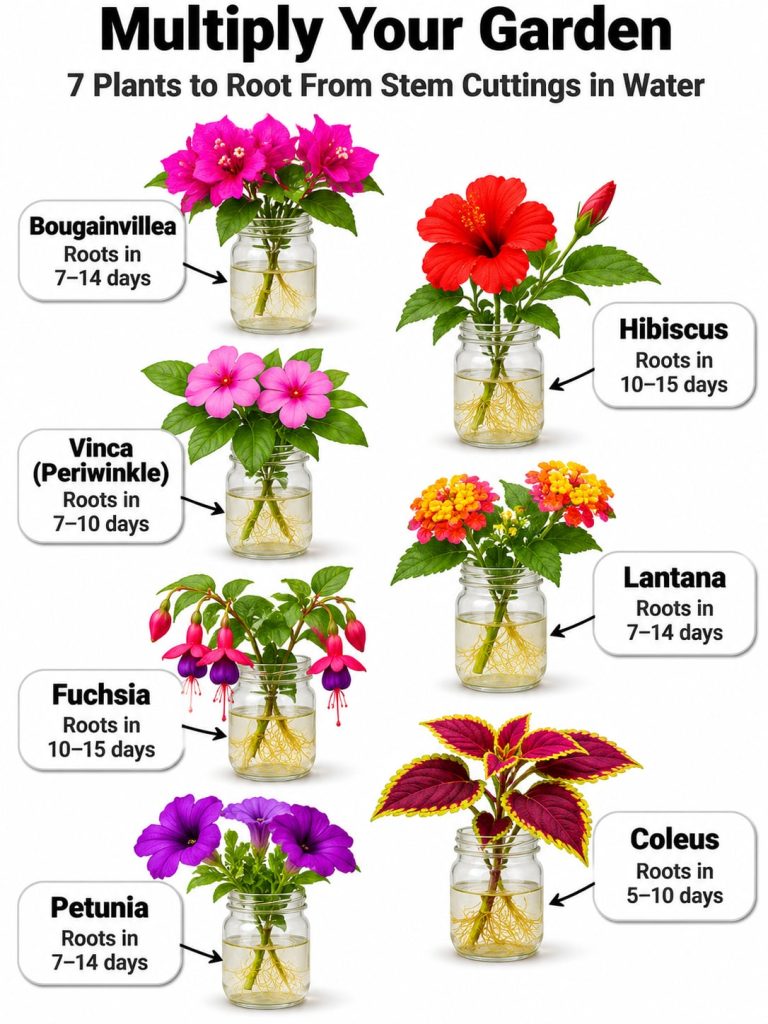
Bougainvillea
Bougainvillea is a woody vine or shrub grown for its colorful bracts, the papery structures that surround its small white flowers. It is hardy only in USDA zones 10 through 11, and in cooler zones it is typically grown as a container plant that is moved indoors before frost. Bougainvillea roots more slowly than soft-stemmed flowers, so expect several weeks to a couple of months under suitable warmth. Use semi-hardwood cuttings, which are partly firm and partly flexible, about six inches long, taken in late spring or early summer. Remove most leaves and keep the cutting in bright, indirect light at a warm room temperature. Wear gloves, because the thorns can scratch and the sap can irritate sensitive skin.
Hibiscus
Tropical hibiscus, Hibiscus rosa-sinensis, is a showy shrub that is perennial only in USDA zones 9 through 11. Gardeners farther north usually grow it in containers and bring it indoors for winter. Hardy hibiscus, Hibiscus moscheutos, is a different plant and is hardy in zones 4 through 9, so check the botanical name before taking cuttings. Both root well from softwood or semi-hardwood tips in water. Choose a tip with two or three nodes, cut it just below a node, and keep it out of direct harsh midday sun until roots appear, usually within a few weeks under warm conditions. Hibiscus is not known for being unusually tolerant of waterlogging in its mature form, so change the water every few days and keep the jar in a warm, bright spot.
Petunia
Petunia is a tender perennial grown as an annual in most of the United States, where it is usually hardy only in zones 9 through 11. It is one of the easiest flowers to root. Take four-inch tip cuttings from non-flowering shoots, remove the lower leaves, and place the nodes in water. Roots often appear within one to two weeks under suitable warmth and light. Petunias are fast growers, so once you transplant them, pinch the tips to encourage bushier plants and more blooms.
Setting Up Your Water Jars
Use clean glass jars or bottles, and place no more than three or four cuttings in each container so they do not crowd or shade one another. Fill the container with room-temperature water, and keep the leaves above the waterline. Change the water every two to three days, or whenever it looks cloudy. Rinse the jars between uses to reduce bacteria that can rot stems.
Place the jars in bright, indirect light, such as an east-facing window or a spot a few feet from a south window. Direct midday sun can heat the water and stress the cuttings. If your room is cool, a warm location around 70 to 80 degrees Fahrenheit helps roots form. A steady temperature matters more than a perfect spot.
Watch for signs of success and trouble. Healthy cuttings stay firm, keep their leaves, and gradually grow white or pale roots. Yellowing leaves, slimy stems, or a foul smell signal rot, so remove the affected cutting and refresh the water. If leaves wilt even though the stem is in water, the cutting may be losing more moisture than it can absorb, so move it to a less sunny spot and keep the leaf count low.
Moving Cuttings Into Soil
When roots are one to two inches long and show some branching, pot each cutting into a small container with a well-draining potting mix. Keep the mix slightly moist, not soggy. Water in gently, then place the cutting in a bright spot out of harsh sun for about a week to help it adjust. Gradually introduce more light over the next two weeks. Expect a brief pause in growth as the plant transitions, which is normal.
Common Mistakes and How to Avoid Them
- Taking cuttings from weak, stressed, or flowering-heavy stems. Choose healthy, vigorous growth.
- Leaving too many leaves below the waterline, which causes rot. Strip the lower leaves cleanly.
- Letting water stay stagnant. Change it every few days.
- Expecting water roots to survive unchanged in soil. Transition gradually.
- Using direct, hot sun on a jar. Choose bright, indirect light.
Regional Tips for U.S. Gardeners
Propagation timing depends on your local climate more than the calendar. In USDA zones 9 through 11, you can often take cuttings almost year-round, though spring and early summer usually give the fastest results. In zones 5 through 8, take cuttings in late spring or early summer when plants are actively growing, and keep rooted cuttings indoors until nights stay warm. Remember that USDA zones measure winter cold tolerance, not summer heat, humidity, or light intensity. Your local cooperative extension office can give you frost dates and advice tailored to your area.
Start Your Propagation Journey Today
Water rooting is one of the most rewarding skills a gardener can learn. Begin with one healthy petunia cutting, then try a hibiscus tip, and work up to bougainvillea once you are comfortable with the process. Each success teaches you to read your plants more closely, and each new plant brings more color to your garden for free. Take your first cutting this week, place it in a clean jar of water, and watch what happens next. Save this guide so you can return to it the next time you are ready to multiply your garden.