There is a special kind of satisfaction in pulling a crisp carrot or a firm apple from storage in the middle of January. You worked hard all season, and now you want that bounty to last well past the first frost. A root cellar makes that possible without a refrigerator or any electricity at all. It uses the steady coolness of the ground and a little careful airflow to slow down spoilage, so your harvest keeps for months instead of weeks.
The idea is simpler than it sounds. You are creating a space that stays cool, moist, dark, and well ventilated. Get those four conditions roughly right, sort your produce properly, and check on it regularly, and you can stretch your garden well into winter. In this guide, you will learn the core principles, how to set up a basic cellar, which crops store best, and the mistakes that cause most storage losses.
The Core Principle: Cool, Moist, Dark, and Breathing
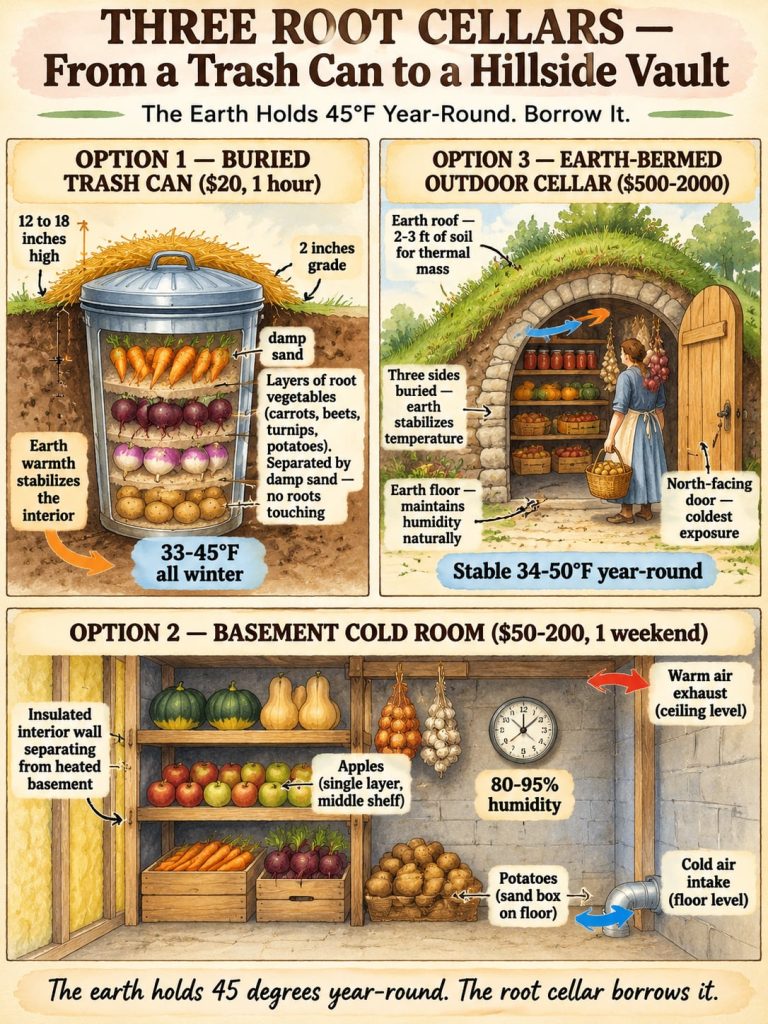
Most root crops and hardy fruits last longest at temperatures just above freezing. For many vegetables, the target range is about 32 to 40°F (0 to 4°C). Some crops prefer a bit more warmth. Potatoes keep best around 40 to 45°F, and winter squash, pumpkins, and sweet potatoes usually need 50 to 55°F, which is warmer than most root cellars can naturally maintain. Keep that in mind before you store everything in one spot.
Humidity matters just as much as temperature. Most root vegetables such as carrots, beets, parsnips, and turnips need high humidity, roughly 90 to 95 percent, to avoid shriveling. Onions and garlic prefer drier air, around 60 to 70 percent, and need good airflow so their skins can cure and stay papery. A cellar that is too dry will wilt your carrots, while one that is too wet will invite rot and mold.
Ventilation is the piece many beginners overlook. Fresh produce gives off moisture, carbon dioxide, and in the case of apples and pears, a natural gas called ethylene that speeds ripening in nearby vegetables. A simple vent system keeps the air moving without letting in warm outside air. Low intake vents and a higher exhaust vent work well because cool air sinks and warm air rises.
How to Set Up a Basic Root Cellar
Start by choosing a location that stays cool. A north-facing slope, a partially underground corner of a basement, or a insulated space built into a hillside all work well. Avoid spots next to a furnace, water heater, or any heat source. If you are building from scratch, use concrete block or stone walls, a packed earth or gravel floor for drainage, and insulation on the ceiling and walls to reduce temperature swings.
Install two vent pipes, each about 3 to 4 inches in diameter. Place the intake pipe near the floor and the exhaust pipe near the ceiling on the opposite wall. Add a removable cap or damper so you can close the vents during extreme cold snaps. Then place a thermometer and a hygrometer where you can read them easily from the doorway. Check both at least once a week, and more often during early fall when temperatures change fast.
Shelving should be made of slatted wood rather than solid boards, so air can circulate around the produce. Keep shelves at least 12 inches off the floor. For carrots, beets, and parsnips, pack clean, slightly damp sand or sawdust into wooden crates, leaving the crowns exposed. This traps moisture around the roots. Store onions and garlic in mesh bags or single layers on open racks once they have cured in a warm, dry, shaded place for two to three weeks.
Which Crops Store Best
Carrots, Beets, and Parsnips
These root crops thrive in cold, humid conditions. Harvest them after a light frost has sweetened the flavor, but before the ground freezes hard. Trim the leaves to about an inch above the crown, brush off loose soil without washing, and let them dry for a few hours. Store them in sand or sawdust in a single layer, and check every few weeks for soft spots.
Potatoes
Potatoes need darkness, because light turns their skin green and produces solanine, a compound that tastes bitter and is unsafe in large amounts. Cure freshly dug potatoes in a dark, humid spot at about 50 to 60°F for one to two weeks, then move them to a cooler, dark bin. Avoid storing potatoes near onions, since onions can cause potatoes to sprout faster. Check carefully for bruised or damaged tubers, which rot quickly and can spread problems to healthy ones.
Apples and Pears
Apples and pears keep well near freezing, but they release ethylene, which can cause carrots and potatoes to sprout or soften. Store fruit in its own section, or in a separate bin with good airflow. Choose firm, unbruised fruit, and store it in single layers, wrapped in paper if you want to slow moisture loss. Cultivar matters here, so late-season varieties such as many winter apples generally store longer than early ones.
Cabbage and Winter Radishes
Hard cabbages and winter radishes store well for several weeks when kept cold and moist. Remove loose outer leaves, avoid damaging the heads, and hang or shelve them so air can move around each one. Check often, because cabbage rot can spread quickly once it starts.
Common Mistakes and How to Avoid Them
The most frequent problem is storing produce that was already damaged. Bruises, cuts, and cracked skins become entry points for rot, so use the best produce first and eat anything marked or soft. Another common error is washing root vegetables before storage. Water left on the skin encourages mold, so brush off dirt and let produce dry instead.
Many gardeners also let the cellar get too warm in late fall or too cold and dry in deep winter. Use your thermometer and hygrometer to spot these shifts early. If the air is too dry, place a shallow pan of water or damp sand on the floor. If it is too humid and moldy, open the vents on a cold night and improve airflow. Finally, remember that crops do not all belong together. Keep apples apart from potatoes, and keep onions away from anything that sprouts easily.
Regional Tips Across the United States
Root cellars work best in colder climates where the ground stays near freezing for much of the winter. In USDA zones 3 through 6, outdoor soil temperatures and winter air are usually cold enough to make passive storage very effective. In zones 7 and warmer, winters are milder, so a root cellar may need extra insulation, more careful venting, or a shaded, below-ground location to stay cool enough. Remember that USDA zones measure average winter cold, not summer heat, humidity, or local microclimates. Your own cellar’s temperature is what truly matters, so measure it rather than assuming. Your local cooperative extension office can also advise on frost dates, soil conditions, and crop storage recommendations for your area.
Start Small and Build Your Confidence
You do not need a large underground vault to get started. A cool basement corner, an insulated crawl space, or a simple cold room with a vent can store a surprising amount of produce. Begin with one or two crops, learn how they behave, and expand as you gain experience. Each season will teach you something new about your space, your climate, and your harvest.
Take an hour this fall to measure your storage space, buy a thermometer and hygrometer, and sort your harvest by storage needs. With a little planning and regular checks, your garden can keep feeding your table long after the snow arrives. Share your results in the comments, and let us know which crops you are storing this winter.