Are you dreaming of an endless supply of fresh herbs, but hesitant about buying new plants every season? What if we told you there’s a super simple, incredibly satisfying way to multiply your favorite herbs right from your kitchen counter? Welcome to the wonderful world of water rooting!
Propagating herbs in water is one of the easiest and most rewarding gardening projects you can undertake. It requires minimal tools, little space, and offers a front-row seat to the magic of nature as you watch new roots emerge. Whether you’re a seasoned gardener or just starting your green journey, this guide will help you turn a single cutting into a thriving new plant.
Why Choose Water Rooting for Herbs?
Water rooting is a fantastic method for several reasons:
- Simplicity: No special equipment or complicated steps are needed.
- Visibility: You can literally watch the roots grow, which is incredibly encouraging and educational.
- Cost-Effective: Turn one plant into many without spending a dime on new seedlings.
- Quick Results: Many herbs root relatively quickly in water, giving you almost instant gratification.
- Pest Control: Starting in water reduces the risk of soil-borne pests and diseases in the initial stages.
What You’ll Need
- Healthy Herb Plant: Choose a plant that is actively growing and free from pests or diseases.
- Sharp Scissors or Pruners: Clean tools ensure a clean cut, preventing damage and disease.
- Clean Glass Jars or Vases: Clear containers are best so you can monitor root growth.
- Fresh Water: Tap water is usually fine, but filtered water can sometimes be better if your tap water is heavily chlorinated.
Step-by-Step Water Rooting Method
1. Take Your Cuttings
- Look for a healthy stem on your herb plant, ideally one that hasn’t flowered yet.
- Measure about 4-6 inches from the tip of the stem.
- Using your sharp, clean scissors or pruners, make a clean cut just below a leaf node (the point where leaves grow from the stem). This is where new roots are most likely to emerge.
- Remove any leaves that would be submerged in water. Leaves left in water can rot and contaminate the water, hindering root development.
2. Prepare Your Jars
- Fill your clean glass jars with fresh water.
- Place your prepared cuttings into the jars, ensuring that at least one leaf node is submerged in the water.
3. Find the Perfect Spot
- Place your jars in a bright location that receives indirect sunlight. A windowsill is often ideal.
- Avoid direct, intense sunlight, which can overheat the water and stress the cuttings.
4. Routine Care
- Change the Water Regularly: Every 2-3 days, or whenever it looks cloudy, replace the water with fresh water. This prevents bacterial growth and provides oxygen to the developing roots.
- Monitor Root Growth: Be patient! Different herbs root at different rates. You should start seeing small white roots emerge from the submerged nodes within 1-4 weeks.
Herbs That Love to Root in Water
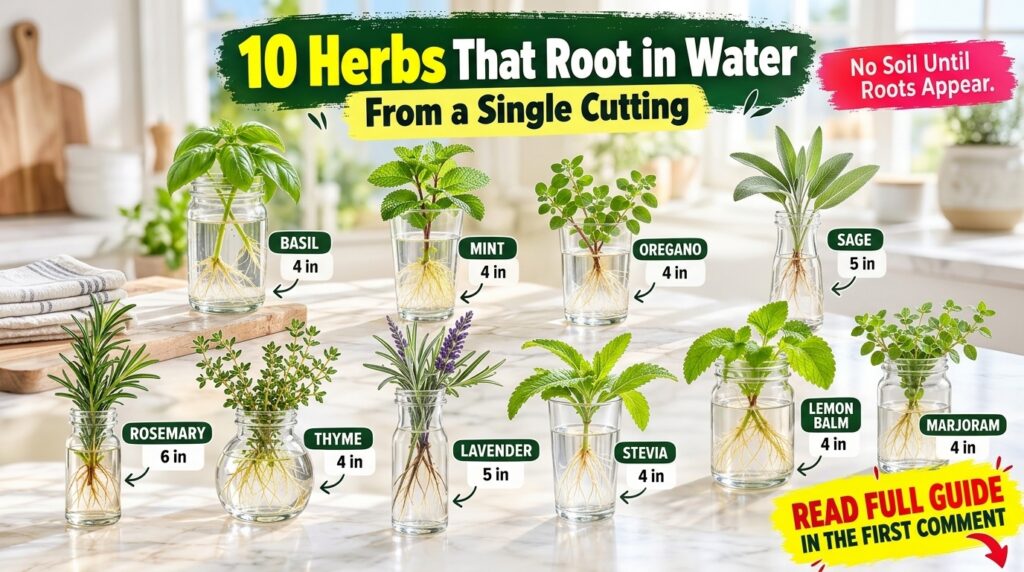
Many popular herbs are excellent candidates for water propagation. Based on our experience, and what you see with the lovely herbs in the image, these are some of the stars:
- Basil: Roots quickly and easily.
- Mint: A vigorous grower, mint roots readily.
- Oregano: Aromatic and simple to propagate.
- Sage: Takes a little longer but is very successful.
- Rosemary: Can be a bit slower but definitely worth the wait for fresh rosemary.
- Thyme: Delicate but forms roots nicely.
- Lavender: A beautiful choice for fragrant new plants.
- Stevia: Great for creating more natural sweeteners.
- Lemon Balm: Known for its soothing properties and ease of rooting.
- Marjoram: Similar to oregano, it’s a great candidate.
Bonus Tip for Woody Herbs like Rosemary and Sage:
For more woody stems, you can gently scrape a small section of the outer layer of the stem at the submerged end. This can encourage root growth by exposing more of the cambium layer.
Transitioning Your Rooted Cuttings to Soil
Once your roots are about 1-2 inches long, it’s time to move your new plants to soil. This transition is crucial for their long-term health:
- Prepare Your Pots: Choose small pots (around 4-6 inches) with good drainage holes. Fill them with a high-quality potting mix.
- Plant Carefully: Make a small hole in the center of the soil. Gently place your rooted cutting into the hole, ensuring the roots are fully covered. Firm the soil lightly around the base of the plant.
- Water Thoroughly: Water your newly potted herb until water drains from the bottom of the pot.
- Acclimatize: For the first week or two, keep your new plants in a slightly shadier spot than their permanent home. This helps them adjust to the soil environment without being stressed by too much sun. Gradually move them to their sunnier location.
Enjoy Your Home Harvest!
There’s immense satisfaction in growing your own herbs, and even more so when you’ve propagated them yourself. Water rooting is a simple, effective, and visually delightful way to expand your herb garden and enjoy fresh flavors all year round. So grab some cuttings, a few jars, and get ready to watch the magic happen!
Have you tried water rooting? Share your favorite herbs to propagate in the comments below!