Imagine stepping into your garden or kitchen and snipping fresh, fragrant rosemary whenever you need it. What if we told you it’s incredibly easy to make this a reality, even if you’re a beginner gardener? Rosemary, a beloved aromatic herb, is not only fantastic for cooking but also beautiful in your garden. The best part? You can easily grow new plants from existing ones using a simple method: water propagation!
Here at Garden – L. Quyên, we love sharing accessible gardening tips that help you cultivate a greener lifestyle. Propagating rosemary through water is a rewarding project that costs next to nothing and gives you an endless supply of this wonderful herb. Let’s dive in!
Why Propagate Rosemary?
There are many reasons to try your hand at rosemary propagation:
- Cost-Effective: Save money by turning one plant into many, instead of buying new ones.
- Fresh Supply: Always have fresh rosemary on hand for your culinary adventures.
- Share the Love: Grow extra plants to gift to friends and family.
- Rewarding Experience: There’s immense satisfaction in watching new life sprout from a simple cutting.
- Expand Your Garden: Easily fill your herb garden, containers, or even indoor spaces with more rosemary.
What You’ll Need
The beauty of water propagation is its simplicity. You likely already have most of these items:
- A healthy rosemary plant (for cuttings)
- Clean, sharp pruning shears or scissors
- A clear glass jar or container
- Clean water (tap water is usually fine)
- (Optional) Rooting hormone – though rosemary often roots well without it
- (Later) Small pots and potting mix
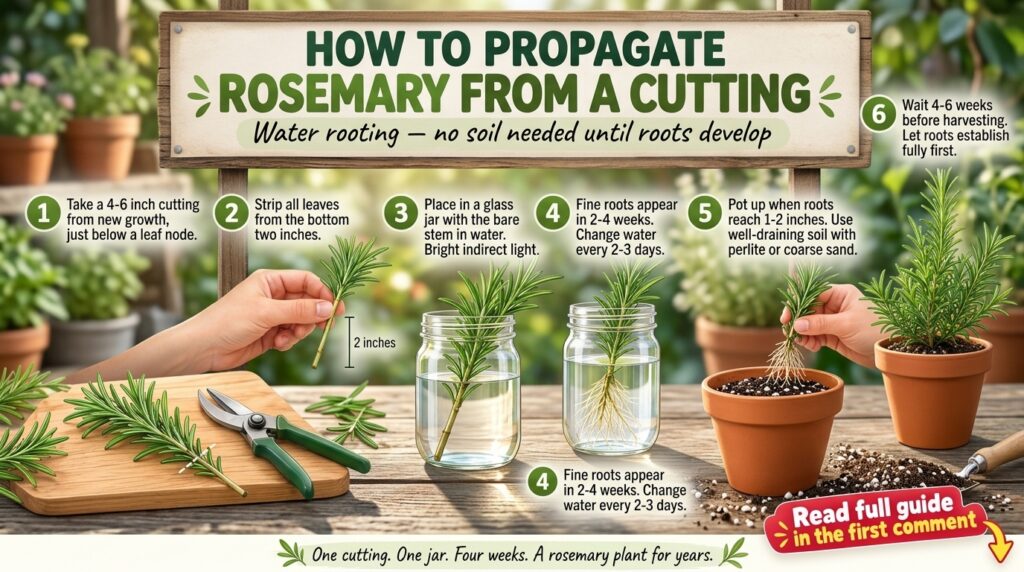
Step-by-Step Guide to Water Propagating Rosemary
1. Taking Your Cuttings
Choose a healthy, non-flowering stem from an established rosemary plant. Look for new growth that is firm but not woody, about 4-6 inches long. Using your clean, sharp shears, cut just below a leaf node (the point where leaves attach to the stem). This area contains cells that are ready to develop into roots.
2. Preparing the Cuttings
Carefully strip off the leaves from the bottom 2-3 inches of each cutting. This prevents the leaves from rotting in the water, which can contaminate your rooting environment. If using rooting hormone, dip the stripped end of the cutting into the hormone powder or gel.
3. Setting Up for Rooting
Place your prepared cuttings into a clear glass jar. Ensure that the bottom, leafless portion of the stem is submerged in water, but no leaves are touching the water. You can place several cuttings in one jar, but don’t overcrowd them. Place the jar in a spot with bright, indirect light – a windowsill is often perfect. Avoid direct, harsh sunlight, which can overheat the water.
4. Patience is Key
Now comes the waiting game! Change the water every few days to keep it fresh and prevent bacterial growth. Within 2-4 weeks, you should start to see tiny white roots emerging from the nodes. Some cuttings might take a bit longer, so don’t get discouraged if you don’t see immediate results. Continue to refresh the water until the roots are about 1-2 inches long.
5. Potting Your Rooted Cuttings
Once the roots are well-developed (around 1-2 inches), your rosemary cuttings are ready for their new home in soil. Prepare small pots with a well-draining potting mix. Make a small hole in the center of the soil and gently place the rooted cutting into it, burying the roots completely. Gently firm the soil around the cutting.
6. Aftercare
Water your newly potted rosemary thoroughly. For the first week or two, keep the soil consistently moist but not waterlogged, as the plant adjusts from water to soil. Gradually reduce watering frequency as the plant establishes itself. Continue to provide bright, indirect light, slowly acclimatizing it to more sunlight if it will be moved outdoors. Soon, you’ll have a thriving new rosemary plant!
Tips for Success
- Light: Bright, indirect light is crucial during the rooting phase.
- Temperature: Warm room temperatures (65-75°F or 18-24°C) are ideal.
- Water Quality: Use clean water and change it regularly to prevent fungal issues.
- Humidity: High humidity can help, especially if your indoor air is dry. A clear plastic bag loosely placed over the jar (not touching the cuttings) can create a mini-greenhouse effect.
- Avoid Over-Handling: Try not to disturb the cuttings too much once they’re in the water.
Uses for Your Homegrown Rosemary
Once your rosemary plants are established, the possibilities are endless! Use fresh sprigs for:
- Roasting vegetables or meats
- Flavoring olive oil or vinegar
- Making aromatic teas
- Creating homemade potpourri or sachets
- Adding beauty to floral arrangements
Growing rosemary from cuttings is a truly rewarding experience that connects you more deeply with nature and provides a continuous supply of this versatile herb. Give it a try, and watch your garden (and kitchen!) flourish.
Have you tried propagating rosemary before? Share your tips and experiences with us in the comments below!