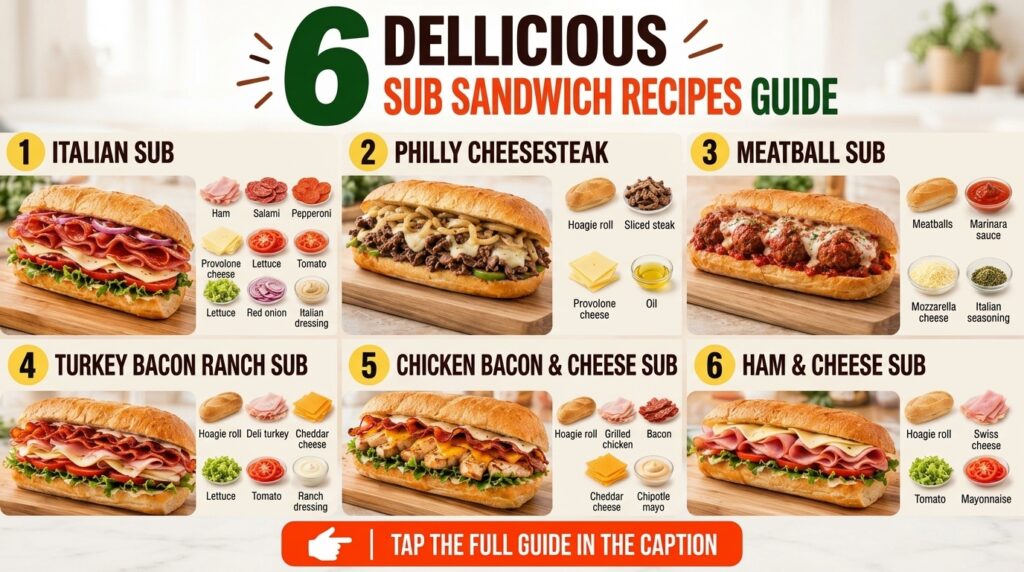
Tired of the same old lunch routine? Craving a hearty, satisfying meal that’s bursting with flavor? Look no further than the humble yet mighty sub sandwich! Making subs at home isn’t just a cost-effective alternative to takeout; it’s an opportunity to craft your perfect sandwich, tailored exactly to your tastes. From classic Italian to fresh veggie creations, homemade sub sandwiches are incredibly versatile, easy to assemble, and guaranteed to please everyone at the table. Get ready to ditch the deli line and become a sub-building master!
Why You’ll Love This Homemade Sub Sandwich Guide
-
Completely Customizable: This guide empowers you to mix and match ingredients to create your dream sub every time.
-
Easy & Quick Preparation: Most subs require minimal cooking, making them perfect for busy weeknights or quick lunches.
-
Family-Friendly Fun: Setting up a ‘sub bar’ allows everyone to build their own, ensuring happy eaters.
-
Budget-Friendly: Making subs at home is often much more economical than buying them pre-made.
-
Versatile for Any Occasion: Great for picnics, parties, game day, or a simple, satisfying meal at home.
The Essential Components of a Great Sub
A truly great sub is built on a foundation of quality ingredients. Here’s what you’ll need to consider:
1. The Bread
The bread is the backbone of your sub. Look for fresh, crusty sub rolls, hoagie rolls, or hero bread. A good roll should be soft enough to bite through easily but sturdy enough to hold all your fillings without becoming soggy. Look for rolls about 6-12 inches (15-30 cm) long.
2. The Protein
This is where much of the flavor comes from. Choose from:
- Deli Meats: Turkey, ham, roast beef, salami, pepperoni, capicola, bologna.
- Cooked Meats: Grilled chicken, shredded pork (pulled pork), meatballs.
- Seafood: Tuna salad, shrimp salad.
- Vegetarian Options: Hummus, falafel, grilled vegetables, hearty cheeses.
3. The Cheese
Cheese adds creaminess and another layer of flavor. Popular choices include:
- Provolone
- Swiss
- Cheddar
- Mozzarella
- Pepper Jack
4. The Veggies
Fresh vegetables add crunch, freshness, and vital nutrients.
- Lettuce (iceberg, romaine)
- Tomatoes (sliced)
- Onions (red, white, or sweet, thinly sliced)
- Pickles (dill, sweet)
- Bell Peppers (sliced)
- Olives (black, green)
- Jalapeños (fresh or pickled)
- Cucumber (sliced)
- Banana Peppers
5. The Condiments & Sauces
These tie all the flavors together.
- Mayonnaise
- Mustard (Dijon, yellow, honey)
- Oil & Vinegar (often olive oil and red wine vinegar)
- Pesto
- Hot Sauce
- Ranch Dressing
- Marinara (for hot subs)
Equipment You’ll Need
- Sharp bread knife
- Cutting board
- Measuring spoons/cups (for condiments)
How to Assemble Your Ultimate Sub Sandwich
Building a great sub is an art, but it’s a simple one. Follow these steps for a perfectly balanced and delicious sandwich:

-
Prepare Your Ingredients: Before you start assembling, have all your chosen proteins, cheeses, vegetables, and condiments sliced, chopped, and ready to go. This makes the assembly process smooth and efficient.
-
Slice the Roll: Take your sub roll and slice it lengthwise, but be careful not to cut all the way through. You want to create a hinge that will keep your sandwich together and contain the fillings. If desired, you can lightly toast the roll at this stage for added texture.
-
Layer the Foundation (Optional): Some people like to spread a thin layer of condiment (like mayo or pesto) on the inside of both sides of the bread before adding other ingredients. This can act as a barrier to prevent sogginess.
-
Add Proteins and Cheese: Begin layering your chosen meats and cheese. For deli meats, fan them out slightly for better coverage. If using a hot filling like meatballs or grilled chicken, place them on the bottom layer of the roll.
-
Pile on the Veggies: Next, add your fresh vegetables. Start with larger, flatter items like lettuce and tomato, then add smaller items like onions, pickles, and peppers. Don’t be shy, but don’t overstuff it so much that it won’t close!
-
Finish with Condiments: Drizzle or spread your remaining condiments over the vegetables and proteins. This ensures even distribution of flavor. For oil and vinegar, apply sparingly to avoid sogginess.
-
Close and Enjoy: Gently close your sub sandwich, pressing down slightly to compress the fillings. If your sub is large, you might want to cut it in half for easier handling. Serve immediately and savor your homemade creation!
Pro Tips for the Best Results
-
Choose Fresh Bread: The quality of your sub starts with fresh, good-quality bread. Visit a local bakery if possible.
-
Don’t Overstuff: While tempting, too many fillings can make a sub impossible to eat and cause the bread to tear.
-
Layer Strategically: Place sturdier ingredients like meat and cheese first, then add lighter veggies. Wet ingredients like tomatoes should be placed between drier ones if possible, or added closer to serving time.
-
Toast Your Roll: A lightly toasted roll adds fantastic texture and can prevent sogginess, especially for hot fillings.
-
Drain Wet Ingredients: If using very juicy tomatoes or pickles, gently pat them dry with a paper towel before adding them to your sub.
-
Season Simply: A pinch of salt and black pepper can enhance the flavor of your vegetables.
Common Mistakes to Avoid
-
Soggy Bread: This is the arch-nemesis of a good sub. Avoid it by toasting bread, draining wet ingredients, and adding liquid condiments last or closer to serving.
-
Unbalanced Flavors: Don’t let one ingredient overpower the others. Aim for a harmonious blend of savory, tangy, and fresh.
-
Too Many Fillings: While generous, an overly stuffed sub becomes difficult to eat and can break apart.
-
Cutting All the Way Through: For traditional subs, leaving a ‘hinge’ makes for easier eating and keeps contents contained.
-
Using Stale Ingredients: Freshness is key. Ensure your bread, deli meats, and vegetables are at their best.
Variations & Substitutions
The beauty of homemade sub sandwiches is the endless customization! Here are some ideas to inspire your next creation:
-
Classic Italian Sub: Salami, pepperoni, ham, provolone, lettuce, tomato, onion, oil, vinegar, oregano.
-
Turkey & Provolone: Sliced turkey breast, provolone, lettuce, tomato, mayo, mustard.
-
Philly Cheesesteak Inspired: Thinly sliced cooked steak (or deli roast beef), sautéed onions and bell peppers, provolone or American cheese (melted).
-
Meatball Sub: Warm meatballs, marinara sauce, melted mozzarella or provolone cheese.
-
Veggie Delight: Hummus, cucumber, bell peppers, spinach, tomato, red onion, olives, feta cheese, balsamic glaze.
-
Chicken Caesar Sub: Grilled chicken, romaine lettuce, Parmesan cheese, Caesar dressing.
-
Spicy Kick: Add jalapeños, banana peppers, or a drizzle of hot sauce to any sub.
-
Bread Swaps: Experiment with different types of rolls, or even wraps for a lighter option.
Serving Suggestions
Sub sandwiches are a meal in themselves, but they pair wonderfully with simple sides:
- A bag of your favorite potato chips or pretzels.
- A fresh green salad with a light vinaigrette.
- Coleslaw or potato salad.
- Soup for a hearty combo (e.g., tomato soup with a grilled cheese sub).
- Fresh fruit like grapes or apple slices.
- Pickles or a side of pickled vegetables.
Storage & Reheating
Sub sandwiches are best enjoyed fresh, as soon as they’re assembled, especially if they contain wet ingredients like tomatoes or watery dressings.
-
Refrigerator Storage: If you must store a sub, wrap it tightly in plastic wrap or foil and place it in an airtight container. It can be stored in the refrigerator for up to 1 day. Keep wet ingredients separate and add them just before serving if possible.
-
Freezer Suitability: Most fully assembled subs do not freeze well due to bread sogginess and texture changes in vegetables.
-
Reheating: Cold subs are not typically reheated. Hot subs (like meatball or cheesesteak) can be gently reheated in an oven or toaster oven at 300°F (150°C) until warmed through, about 10-15 minutes, or until the cheese is melted.

FAQ
Can I make sub sandwiches ahead of time for a party?
For best results, assemble subs just before serving. If you need to prep ahead, prepare all ingredients (slice meats, chop veggies) and store them separately. Assemble the subs no more than 1-2 hours before serving, especially if using wet ingredients.
What kind of bread is best for subs?
Look for fresh, crusty-on-the-outside, soft-on-the-inside sub rolls, hoagie rolls, or hero bread. The key is a roll that can hold its shape and your fillings.
How do I prevent my sub from getting soggy?
Toast your bread lightly, drain excess liquid from wet vegetables (like tomatoes or pickles), and apply liquid condiments (like oil and vinegar) sparingly or closer to serving time. You can also create a barrier with a slice of cheese or a layer of sturdy greens.
What are some good vegetarian sub ideas?
Hummus and veggie subs, grilled portobello mushroom subs, caprese subs (mozzarella, tomato, basil, balsamic glaze), or falafel subs are all excellent vegetarian options.
Can I use different types of cheese?
Absolutely! The type of cheese is entirely up to your preference. Provolone, Swiss, cheddar, mozzarella, and pepper jack are all popular choices.
Should I heat my sub?
It depends on the sub! Cold cuts and fresh veggie subs are typically served cold. Subs with cooked ingredients like meatballs, grilled chicken, or steak are often served warm, with cheese melted over the fillings.
What is the ideal ratio of ingredients for a sub?
There’s no strict rule, but aim for a balance. You want enough protein and cheese to be satisfying, enough vegetables for crunch and freshness, and enough condiment to tie it all together without making it messy.
Can I use different seasonings on my sub?
Yes, simple additions like dried oregano, Italian seasoning, garlic powder, or red pepper flakes can elevate the flavor profile of your sub. Experiment to find your favorites!
Recipe Card: Customizable Homemade Sub Sandwich
Recipe Name: Customizable Homemade Sub Sandwich
Short Description: Build your perfect sub with endless possibilities using this flexible guide.
Prep Time: 15 minutes
Cook Time: 0 minutes
Total Time: 15 minutes
Servings: 1 (easily scalable)
Course: Main Course, Lunch
Cuisine: American
Cooking Method: Assembly
Ingredients:
- 1 sub roll (6-12 inches / 15-30 cm)
- Protein of choice (e.g., 4-6 slices deli meat, 1/2 cup cooked chicken, 1/2 cup tuna salad)
- Cheese of choice (e.g., 2 slices provolone, Swiss, or cheddar)
- Vegetables (e.g., 1/4 cup shredded lettuce, 2-3 slices tomato, 2-3 slices onion, 3-4 pickle slices, 1/4 cup bell peppers)
- Condiments (e.g., 1-2 tbsp mayonnaise, mustard, oil, or vinegar)
Instructions:
- Prepare Ingredients: Gather and prepare all your chosen sub fillings, slicing vegetables and having condiments ready.
- Slice Roll: Carefully slice the sub roll lengthwise, ensuring you do not cut completely through, leaving a hinge on one side.
- Layer Proteins & Cheese: Arrange your preferred protein(s) and cheese inside the sliced sub roll.
- Add Vegetables: Layer your desired fresh vegetables over the protein and cheese.
- Apply Condiments: Drizzle or spread your chosen condiments over the fillings.
- Close & Serve: Gently close the sub sandwich, press slightly, and enjoy immediately. Cut in half if desired for easier eating.
Notes:
This recipe serves as a template for creating your ultimate sub sandwich. Feel free to experiment with ingredient combinations, quantities, and types to perfectly match your taste and dietary preferences. For hot subs, warm your protein and melt cheese before adding cold vegetables.
Storage:
Best enjoyed fresh. Leftovers can be stored tightly wrapped in plastic or foil in an airtight container in the refrigerator for up to 1 day. To maintain freshness, consider storing wet ingredients separately and adding them just before eating.
Nutrition:
Nutrition information is an estimate and may vary depending on the ingredients and brands used.