In the whirlwind of daily life, the question, “What’s for dinner?” can often feel like the most daunting challenge. Between work, errands, and family commitments, finding the time and energy to whip up a wholesome, delicious meal can seem impossible. But what if we told you that the secret to effortless weeknight dinners is likely sitting right in your pantry?
Welcome to the magic of jarred sauces! These culinary heroes are not just shortcuts; they’re your ticket to less stress, more flavor, and surprisingly creative meals without breaking the bank or spending hours in the kitchen. At The Balanced Bowl, we’re all about smart solutions that simplify your life, and these “done-for-you” sauces are truly a game-changer.
Inspired by the brilliant idea of transforming simple jarred sauces into dinner triumphs, we’ve put together a comprehensive guide. Get ready to explore eight fantastic ways to turn those jars into mouth-watering meals that taste homemade, even on your busiest evenings!
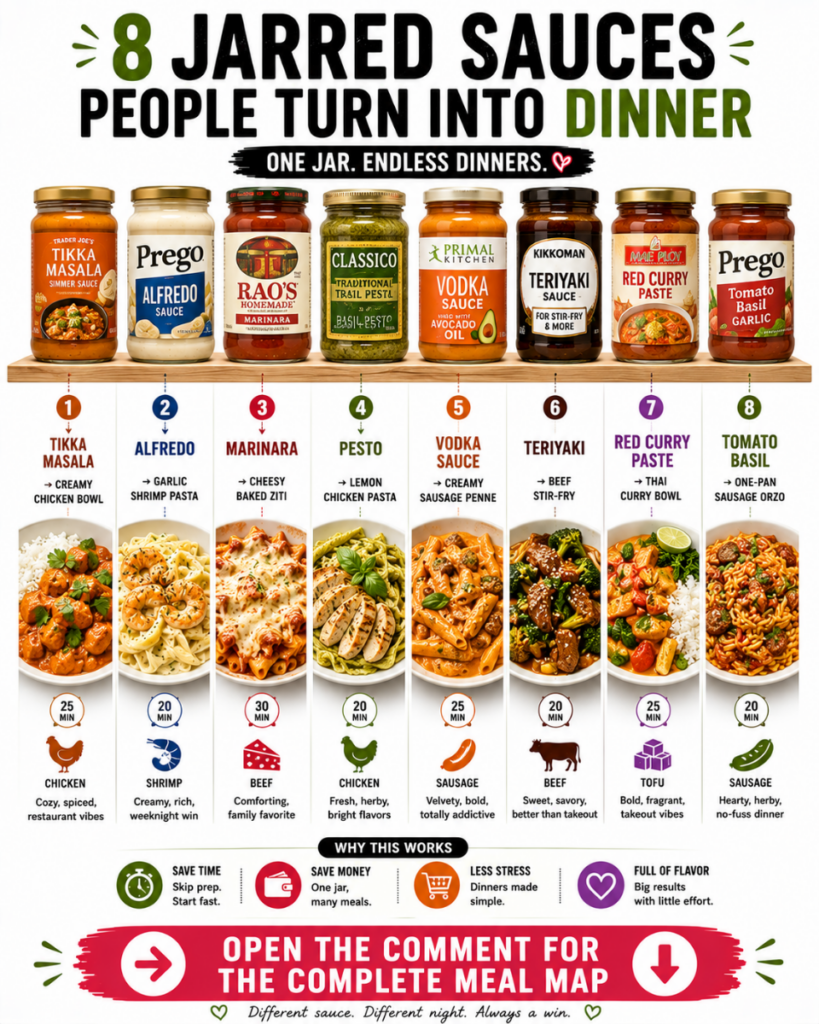 Discover how jarred sauces can be your secret weapon for quick, delicious, and stress-free weeknight dinners.
1. Trader Joe’s Red Pepper, Garlic & Parmesan Pasta Sauce: Pasta with Chicken Sausage
This flavorful sauce from Trader Joe’s is rich, creamy, and bursting with savory notes, making it perfect for a comforting pasta dish.
Ingredients:
- 1 jar (16 oz) Trader Joe’s Red Pepper, Garlic & Parmesan Pasta Sauce
- 1 lb pasta (e.g., penne, rotini), cooked according to package directions
- 12 oz cooked chicken sausage, sliced
- 2 cups fresh spinach
- ¼ cup grated Parmesan cheese, plus extra for serving
- 1 tbsp olive oil
Instructions:
- Heat olive oil in a large skillet over medium heat. Add sliced chicken sausage and cook until lightly browned.
- Pour in the Trader Joe’s sauce and bring to a gentle simmer.
- Stir in the fresh spinach, cooking until it wilts.
- Add the cooked pasta and ¼ cup Parmesan cheese to the skillet. Toss until everything is well combined and heated through.
- Serve immediately, garnished with extra Parmesan.
Prep & Pro Tips:
- Speed It Up: Use pre-cooked chicken sausage to cut down on cooking time.
- Add More Veggies: Frozen peas or chopped bell peppers can be added with the sauce.
- Spice It Up: A pinch of red pepper flakes adds a nice kick.
Storage Suggestions:
Store leftovers in an airtight container in the refrigerator for up to 3-4 days. Reheat gently on the stovetop or in the microwave.
Serving Ideas:
Pair with a crisp green salad and a slice of garlic bread for a complete meal.
2. Prego Traditional Pasta Sauce: Hearty Meatball Sub Skillet
Prego’s classic tomato flavor is the perfect base for a comforting, family-friendly meatball sub skillet that’s ready in a flash.
Ingredients:
- 1 jar (24 oz) Prego Traditional Pasta Sauce
- 1 lb frozen cooked meatballs
- 4 sub rolls or hoagie buns
- 1 ½ cups shredded mozzarella cheese
- 1 tbsp dried oregano or Italian seasoning
- Optional: ¼ cup chopped fresh basil or parsley for garnish
Instructions:
- Preheat oven to 375°F (190°C).
- In an oven-safe skillet (cast iron works great!), combine Prego sauce, frozen meatballs, and dried oregano. Bring to a simmer over medium heat, stirring occasionally, until meatballs are heated through, about 10-12 minutes.
- Slice sub rolls lengthwise, being careful not to cut all the way through. Place them on a baking sheet or directly into the skillet with the meatballs.
- Spoon the meatball mixture into the sub rolls. Top generously with mozzarella cheese.
- Bake for 5-7 minutes, or until the cheese is melted and bubbly and the rolls are lightly toasted.
- Garnish with fresh herbs if desired and serve warm.
Prep & Pro Tips:
- Quick Toast: You can quickly toast the sub rolls under the broiler before filling for extra crispness.
- Add Flavor: A sprinkle of garlic powder in the sauce enhances the taste.
- Kid-Friendly: Offer extra cheese for picky eaters!
Storage Suggestions:
Store leftover meatball mixture in an airtight container in the refrigerator for up to 3 days. Reassemble subs fresh for best results.
Serving Ideas:
Serve with a side of potato chips, a simple green salad, or a refreshing coleslaw.
3. Rao’s Homemade Marinara Sauce: Classic Chicken Parmesan
Rao’s marinara is known for its rich, authentic flavor, making it the ideal choice for an elevated classic like Chicken Parmesan.
Ingredients:
- 1 jar (24 oz) Rao’s Homemade Marinara Sauce
- 4 boneless, skinless chicken cutlets (about 1 ½ lbs total)
- ½ cup all-purpose flour
- 2 large eggs, beaten
- 1 cup seasoned breadcrumbs
- 1 cup shredded mozzarella cheese
- ¼ cup grated Parmesan cheese
- 2 tbsp olive oil
- Salt and freshly ground black pepper to taste
- Optional: Cooked spaghetti for serving
Instructions:
- Preheat oven to 400°F (200°C).
- Season chicken cutlets with salt and pepper. Set up a breading station: one shallow dish with flour, one with beaten eggs, and one with breadcrumbs.
- Dredge each chicken cutlet in flour, shake off excess, then dip in egg, and finally coat thoroughly in breadcrumbs.
- Heat olive oil in a large oven-safe skillet over medium-high heat. Pan-fry chicken cutlets for 3-4 minutes per side, until golden brown and cooked through.
- Pour about half of the Rao’s marinara sauce into the bottom of the skillet. Place the cooked chicken cutlets over the sauce.
- Spoon remaining sauce over the chicken, then top with mozzarella and Parmesan cheeses.
- Bake for 10-15 minutes, or until cheese is melted and bubbly and the sauce is heated through.
- Serve immediately, optionally with cooked spaghetti.
Prep & Pro Tips:
- Time Saver: For ultimate convenience, use pre-breaded frozen chicken tenders or cutlets and simply bake them before adding sauce and cheese.
- Flavor Boost: A sprinkle of fresh basil or a pinch of garlic powder over the chicken before breading adds extra aroma.
Storage Suggestions:
Store leftover chicken parm in an airtight container in the refrigerator for up to 3 days. Reheat in the oven for best texture.
Serving Ideas:
Serve over a bed of spaghetti or alongside steamed green beans and a crusty baguette.
4. Classico Basil Pesto: Speedy Pesto Shrimp & Veggies
Classico’s vibrant basil pesto is a quick way to infuse Mediterranean flavors into a light and healthy meal with minimal effort.
Ingredients:
- 1 jar (8.1 oz) Classico Basil Pesto
- 1 lb large shrimp, peeled and deveined
- 1 tbsp olive oil
- 1 pint cherry tomatoes, halved
- 2 small zucchini, chopped
- ½ cup vegetable broth or white wine
- Optional: Cooked pasta or zucchini noodles for serving
- Optional: Lemon wedges and fresh basil for garnish
Instructions:
- Heat olive oil in a large skillet over medium-high heat. Add shrimp and cook for 2-3 minutes per side, until pink and opaque. Remove shrimp from skillet and set aside.
- Add chopped zucchini and halved cherry tomatoes to the same skillet. Sauté for 3-5 minutes, until vegetables are tender-crisp.
- Pour in the vegetable broth or white wine and bring to a simmer, scraping up any browned bits from the bottom of the skillet.
- Remove skillet from heat. Stir in the Classico Basil Pesto and cooked shrimp. Toss until everything is well coated.
- Serve immediately, optionally over cooked pasta or zucchini noodles, garnished with lemon wedges and fresh basil.
Prep & Pro Tips:
- Veggie Swaps: Bell peppers, asparagus, or broccoli florets are great substitutions for zucchini and tomatoes.
- Protein Power: Cooked chicken breast or cannellini beans can be used instead of or in addition to shrimp.
Storage Suggestions:
This dish is best enjoyed fresh. Leftovers can be stored in an airtight container for up to 2 days, but shrimp may become slightly tougher upon reheating.
Serving Ideas:
A simple side of crusty bread or a light Caprese salad complements this dish beautifully.
5. Primal Kitchen No-Dairy Alfredo Sauce: Creamy Lemon Chicken Pasta
For a dairy-free yet incredibly rich and creamy pasta experience, Primal Kitchen’s Alfredo sauce is a fantastic choice, especially when brightened with lemon.
Ingredients:
- 1 jar (16 oz) Primal Kitchen No-Dairy Alfredo Sauce
- 1 lb pasta (e.g., fettuccine, linguine), cooked according to package directions
- 1 ½ cups cooked chicken breast, shredded or diced (rotisserie chicken works great!)
- ½ cup frozen peas
- Zest of 1 lemon and 1 tbsp lemon juice
- ¼ cup chopped fresh parsley for garnish
- Salt and freshly ground black pepper to taste
Instructions:
- In a large saucepan or skillet, warm the Primal Kitchen No-Dairy Alfredo Sauce over medium-low heat.
- Add the cooked chicken and frozen peas to the sauce. Stir gently until heated through, about 5-7 minutes.
- Stir in the cooked pasta, lemon zest, and lemon juice. Toss to coat evenly.
- Season with salt and pepper to taste.
- Serve hot, garnished with fresh parsley.
Prep & Pro Tips:
- Ultimate Shortcut: A pre-cooked rotisserie chicken makes this meal come together in minutes.
- Veggie Boost: Add steamed broccoli florets or sautéed mushrooms for extra nutrients.
- Herb Love: A sprinkle of fresh dill or chives can also enhance the flavor.
Storage Suggestions:
Store leftovers in an airtight container in the refrigerator for up to 3 days. Reheat gently on the stovetop, adding a splash of broth or water if needed to restore creaminess.
Serving Ideas:
A simple green salad with a vinaigrette dressing provides a refreshing counterpoint to the creamy pasta.
6. Kikkoman Teriyaki Marinade & Sauce: Easy Teriyaki Salmon Bowls
Kikkoman’s classic teriyaki sauce brings a perfect balance of sweet and savory to a quick and healthy salmon dinner.
Ingredients:
- 4 (6 oz each) salmon fillets
- ½ cup Kikkoman Teriyaki Marinade & Sauce, plus extra for drizzling
- 2 cups cooked jasmine rice
- 2 cups steamed broccoli florets
- 1 tbsp sesame seeds for garnish
- Optional: Sliced green onions for garnish
Instructions:
- Place salmon fillets in a shallow dish. Pour ½ cup teriyaki sauce over them, ensuring all sides are coated. Marinate for at least 15 minutes, or up to 30 minutes in the refrigerator.
- Preheat oven to 400°F (200°C) or heat a non-stick pan over medium-high heat.
- If baking: Place marinated salmon on a baking sheet lined with parchment paper. Bake for 12-15 minutes, or until salmon flakes easily with a fork.
- If pan-frying: Cook salmon, skin-side down first if applicable, for 4-5 minutes per side, or until cooked through.
- Assemble bowls: Divide cooked jasmine rice, steamed broccoli, and cooked salmon among four serving bowls.
- Drizzle a little extra teriyaki sauce over the salmon and broccoli. Garnish with sesame seeds and green onions, if using.
Prep & Pro Tips:
- Meal Prep Power: Cook a larger batch of rice and steam broccoli ahead of time for even quicker assembly.
- Veggie Variety: Steamed edamame, sautéed snap peas, or shredded carrots make great additions.
Storage Suggestions:
Store components separately in airtight containers in the refrigerator for up to 2 days. Best enjoyed fresh, as salmon can dry out when reheated.
Serving Ideas:
Serve with a side of pickled ginger or a sprinkle of nori (seaweed) for an authentic touch.
7. Maesri Thai Red Curry Paste: Quick Red Curry with Tofu
Maesri’s potent red curry paste is a shortcut to authentic Thai flavors. Combined with coconut milk, it creates a rich, aromatic curry in minutes.
Ingredients:
- 1 can (13.5 oz) full-fat coconut milk
- 2 tbsp Maesri Thai Red Curry Paste (adjust to taste for spice level)
- 1 block (14 oz) extra-firm tofu, pressed and cubed
- 1 red bell pepper, sliced
- 1 cup snow peas
- ½ small onion, thinly sliced
- 1 tbsp vegetable oil
- 1 tbsp fish sauce (or soy sauce for vegetarian option)
- 1 tsp brown sugar
- Cooked jasmine rice for serving
- Optional: Fresh cilantro, lime wedges for garnish
Instructions:
- Heat vegetable oil in a large pot or deep skillet over medium heat. Add red curry paste and cook for 1 minute, stirring constantly, until fragrant.
- Pour in coconut milk, stirring to combine with the paste. Bring to a gentle simmer.
- Add cubed tofu, sliced bell pepper, sliced onion, snow peas, fish sauce (or soy sauce), and brown sugar. Stir gently to combine.
- Simmer for 8-10 minutes, or until vegetables are tender-crisp and the curry has slightly thickened.
- Serve hot over jasmine rice, garnished with fresh cilantro and a squeeze of lime juice.
Prep & Pro Tips:
- Tofu Texture: Pressing your tofu for at least 30 minutes removes excess water, allowing it to absorb more flavor and achieve a better texture.
- Spice Level: Start with 1 tbsp of curry paste and add more to your preference.
- Protein Swaps: Chicken, shrimp, or chickpeas are excellent alternatives to tofu.
Storage Suggestions:
Store leftover curry in an airtight container in the refrigerator for up to 3-4 days. Flavors often deepen overnight. Reheat gently on the stovetop or in the microwave.
Serving Ideas:
Serve with a side of crispy spring rolls or a refreshing cucumber salad.
8. Store-bought Salsa: Speedy Salsa Chicken Tacos
Don’t underestimate the power of a good jar of salsa! It’s not just for dipping; it’s a fantastic base for quick, flavorful chicken tacos.
Ingredients:
- 1 lb boneless, skinless chicken breasts or thighs
- 1 jar (16 oz) store-bought salsa (mild, medium, or hot, your choice!)
- 1 tsp cumin powder
- ½ tsp chili powder
- 8-12 small flour or corn tortillas
- Optional Toppings: Shredded lettuce, shredded cheese, sour cream, diced avocado, chopped cilantro, lime wedges
Instructions:
- Place chicken breasts or thighs in a slow cooker or a large pot/skillet.
- Pour the jar of salsa over the chicken. Sprinkle with cumin and chili powder.
- Slow Cooker Method: Cook on low for 3-4 hours or on high for 2-3 hours, until chicken is easily shreddable.
- Stovetop Method: Bring to a simmer over medium heat, then reduce heat to low, cover, and cook for 20-25 minutes, flipping chicken once, until cooked through and easily shreddable.
- Once cooked, remove chicken from the salsa, shred it using two forks, then return it to the pot/skillet and stir it back into the salsa.
- Warm tortillas according to package directions.
- Assemble tacos with the salsa chicken and your favorite toppings.
Prep & Pro Tips:
- Rotisserie Chicken Shortcut: Use a pre-cooked rotisserie chicken! Shred the meat and heat it directly with the salsa and spices on the stovetop for 5-7 minutes.
- Extra Zest: A squeeze of fresh lime juice at the end brightens up the flavors.
Storage Suggestions:
Store leftover salsa chicken mixture in an airtight container in the refrigerator for up to 4 days. It’s excellent for meal prep!
Serving Ideas:
Serve with a side of black beans and rice or a fresh corn salad for a complete meal.
General Tips for Jarred Sauce Success
Read the Label:
- Not all jarred sauces are created equal. Check ingredients for added sugars, sodium, and preservatives. Opt for brands with whole, recognizable ingredients when possible.
Don’t Be Afraid to Customize:
- Jarred sauces are a base, not the final word. Add your favorite spices, fresh herbs, a squeeze of lemon, or a splash of broth to elevate the flavor profile to your liking.
Enhance with Freshness:
- Even the simplest jarred sauce benefits from fresh additions like chopped garlic, onions, bell peppers, or fresh basil.
Batch Cook Proteins:
- Cook a larger batch of chicken, ground beef, or roast vegetables at the start of the week. This makes assembly even faster on busy nights.
Frequently Asked Questions About Jarred Sauces
Q: Can I freeze leftover jarred sauce?
A: Unopened jarred sauces are shelf-stable. Once opened, it’s generally not recommended to freeze the entire jar for quality reasons (texture can change). However, you can freeze portions of opened sauce in ice cube trays or small airtight containers for up to 1-2 months. Thaw in the refrigerator before using.
Q: How can I make jarred sauces taste more homemade?
A: A few simple tricks: sauté fresh garlic and onions before adding the sauce, stir in a pat of butter at the end for richness, add a pinch of sugar to balance acidity, or simmer with fresh herbs like basil or oregano for a few minutes. A splash of red wine or vegetable broth can also deepen the flavor.
Q: Are jarred sauces a healthy option for dinner?
A: Many jarred sauces can be part of a healthy diet, especially when paired with lean proteins and plenty of vegetables. Look for brands that are lower in sodium and added sugars, and contain natural ingredients. They offer a convenient way to get a flavorful meal on the table without resorting to highly processed fast food.
 Transform your kitchen into a hub of effortless culinary creativity with the simple magic of jarred sauces.
Your Easy Dinner Revolution Starts Now!
See how simple it is to turn ordinary jarred sauces into extraordinary meals? These “lazy” dinners are anything but — they’re smart, efficient, and perfectly balanced for busy lifestyles. You’re not just saving time; you’re creating space for more joy, less stress, and more delicious moments around the table.
Ready to revolutionize your dinner routine and discover the joy of effortless, delicious meals? We hope this complete meal map empowers you to grab those jars and start cooking with confidence!