Restore Your Silver’s Shine with This Easy DIY Kitchen Hack!
Is your once-gleaming silver jewelry, flatware, or decorative items looking dull and tarnished? Don’t fret! Before you reach for harsh chemical cleaners, consider a simple, budget-friendly solution using common ingredients you likely already have in your kitchen. This ingenious DIY hack will bring your tarnished silver back to life, restoring its brilliant shine without any abrasive scrubbing or strong fumes.
Tarnish, that unsightly dark layer on silver, is a natural chemical reaction that occurs when silver is exposed to air and sulfur-containing compounds. While it’s inevitable, removing it doesn’t have to be a chore!
The Science Behind the Shine: How This Hack Works
This amazing silver cleaning method isn’t magic; it’s basic chemistry at play! The secret lies in creating a mild electrochemical reaction. Here’s how it breaks down:
- Aluminum Foil: When submerged in the hot solution, the aluminum foil acts as a sacrificial anode. The tarnish (silver sulfide) on your silver transfers its sulfur atoms to the aluminum, effectively reversing the tarnishing process.
- Baking Soda: Sodium bicarbonate (baking soda) creates an alkaline environment, which is crucial for facilitating the chemical reaction between the aluminum and the silver sulfide.
- Salt: Sodium chloride (table salt) acts as an electrolyte, helping to conduct the electric current needed for the reaction to occur efficiently in the hot water.
- Hot Water: The heat from the water speeds up the entire chemical process, allowing the tarnish to lift more quickly from your silver items.
Together, these ingredients create a tiny battery that lifts the tarnish right off your precious silver items and deposits it onto the aluminum foil. You’ll actually see the tarnish moving!
What You’ll Need: Ingredients & Supplies
Gather these simple household items to get started:
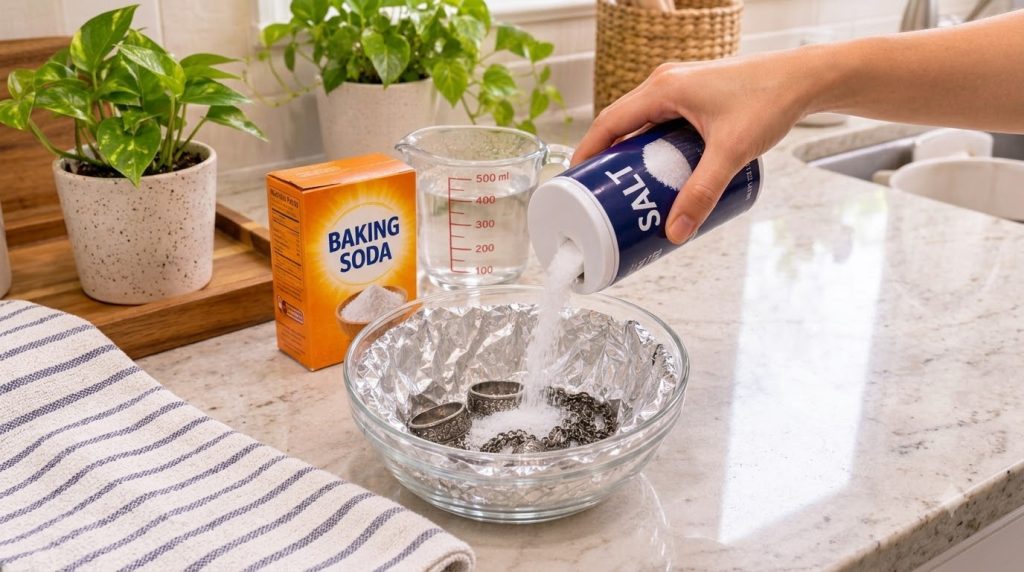
- Aluminum Foil: A sheet large enough to line your bowl.
- Baking Soda: 1/4 cup (about 4 tablespoons).
- Table Salt: 2 tablespoons.
- Hot Water: About 1-2 cups (enough to submerge your silver items). Make sure it’s hot, but not boiling.
- Heat-Safe Bowl: Glass or ceramic works best.
- Tongs or Spoon: For safely handling hot items.
- Soft Cloth: For polishing.
Step-by-Step Guide: Cleaning Tarnished Silver
Follow these easy steps to restore the sparkle to your silver:
-
Prepare Your Bowl
Line the bottom and sides of your heat-safe bowl with aluminum foil, ensuring the shiny side of the foil faces upwards. Make sure the silver items will be in direct contact with the foil.
-
Add the Dry Ingredients
Place your tarnished silver items directly on top of the aluminum foil in the bowl. Sprinkle the baking soda evenly over the silver items and the foil, followed by the table salt.
-
Pour in Hot Water
Carefully pour enough hot (but not boiling) water into the bowl to completely cover all your silver items. You should immediately see a fizzy reaction and potentially notice the tarnish beginning to lift, appearing as yellowish flakes or discoloration on the aluminum foil.
-
Let It Soak
Allow the silver to soak for 5 to 10 minutes, depending on the level of tarnish. For heavily tarnished items, you might let it sit a bit longer, up to 15 minutes. Watch as the tarnish seems to disappear before your eyes!
-
Rinse and Dry
Using tongs, carefully remove the silver items from the hot solution. Rinse them thoroughly under cool running water to remove any residue. Pat them dry immediately with a soft, clean cloth to prevent water spots.
-
Polish to Perfection
For an extra gleam, gently buff the clean, dry silver with a soft polishing cloth. You’ll be amazed at how shiny they become!
Tips for Best Results
- Direct Contact: Ensure your silver items are in direct contact with the aluminum foil for the electrochemical reaction to work effectively.
- Hot Water is Key: The hotter the water (without being boiling), the faster and more effective the reaction will be.
- Don’t Over-Soak: While effective, very prolonged soaking isn’t necessary and could potentially dull some finishes.
- Clean Foil: Use fresh aluminum foil each time for optimal results.
Important Precautions and When Not to Use This Method
While this method is fantastic for many silver items, it’s not suitable for everything:
- Oxidized Silver: Some modern silver jewelry is intentionally oxidized (darkened) in recesses to create a specific design aesthetic. This method will remove that intentional oxidation, so avoid using it on such pieces.
- Items with Gemstones or Porous Materials: Avoid using this method on silver pieces that contain porous gemstones (like pearls, opals, turquoise, amber), costume jewelry, or items with glues, as the hot water and chemicals can damage them.
- Food Safety: If cleaning silver flatware, ensure you rinse thoroughly to remove all salt and baking soda residue before use.
- Handle with Care: Always use tongs when handling items from the hot water.
Keeping Your Silver Shiny Longer
Once your silver is sparkling clean, a little preventative care can keep it that way:
- Store Properly: Store silver in anti-tarnish bags, flannel cloths, or airtight containers.
- Avoid Exposure: Limit exposure to humidity, direct sunlight, and household chemicals like bleach or ammonia.
- Wear Often: Believe it or not, wearing your silver jewelry frequently can actually help prevent tarnish, as the natural oils from your skin can create a protective barrier.
With this simple kitchen hack, you can say goodbye to tarnished silver and hello to brilliant shine, all without breaking the bank or using harsh chemicals. Give it a try and enjoy your sparkling treasures!