Rich, crumbly soil is the secret behind almost every healthy garden. If your plants keep struggling, or your beds feel tired season after season, a simple worm tower may be exactly what your garden needs. This easy DIY project turns everyday kitchen scraps into nutrient-rich food for your soil while red wiggler worms do the hard work for you.
What Is a Worm Tower?
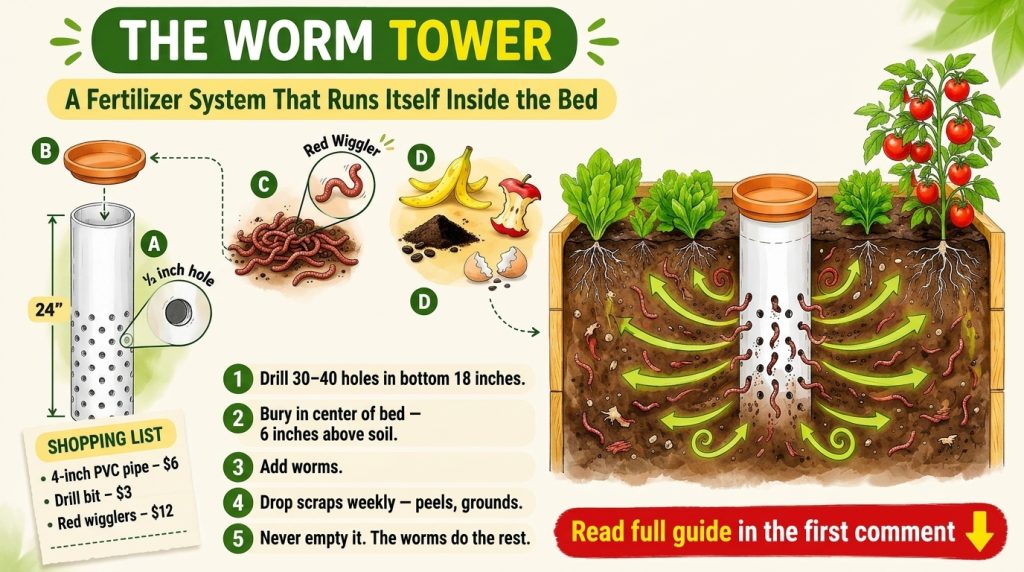
A worm tower is a vertical tube, usually made from perforated PVC pipe, that sits in the soil of a garden bed. You add food scraps to the top, and worms move through the openings to eat them. As they feed, they produce worm castings, a gentle and nutrient-rich fertilizer that flows out into the surrounding soil and reaches plant roots.
Because the worms live right where the plants grow, the process is simple and continuous. You do not need a separate compost bin or a large pile to maintain.
Why Gardeners Love This Method
- It recycles kitchen scraps into useful plant food.
- It improves soil structure, helping water and air move through the bed.
- It feeds plants gradually instead of with a single heavy dose.
- It works well in small raised beds, containers, and larger vegetable plots.
- It supports a more organic and sustainable approach to gardening.
What You Will Need
Building a worm tower is inexpensive and beginner friendly. Gather these basic materials before you start:
- A length of PVC pipe, around 4 inches wide and 12 to 18 inches long
- A drill with a small bit for making holes
- A lid or cap for the top of the pipe
- A small handful of red wiggler worms, which are better suited to composting than common garden earthworms
- Kitchen scraps such as vegetable peelings, coffee grounds, and crushed eggshells
- Dry leaves or shredded cardboard for bedding
Step-by-Step: Building Your Worm Tower
Step 1: Prepare the Pipe
Drill rows of small holes along the sides and bottom of the pipe. The holes allow worms to enter and castings to leave the tower. Smooth any sharp edges so the worms are not harmed as they move through.
Step 2: Place the Tower in the Bed
Dig a hole in your garden bed deep enough to set the pipe firmly in the soil. Position it near the roots of plants that feed heavily, such as tomatoes or peppers, so the nutrients reach where they are needed most.
Step 3: Add Bedding and Worms
Fill the tower with dry leaves or shredded cardboard, moistened lightly like a wrung-out sponge. Add your red wiggler worms and let them settle for a day or two before adding food.
Step 4: Feed the Worms Regularly
Add small amounts of kitchen scraps every week or so. Chop them into small pieces to speed up decomposition. Avoid meat, dairy, oily foods, and large amounts of citrus or onion, as these can attract pests or upset the worms.
Step 5: Cover and Maintain
Place the lid on top to keep light out and moisture in. Check occasionally that the bedding stays damp but never soggy, and that the worms are active and healthy.
Tips for Success
- Bury scraps under the bedding rather than leaving them exposed on the surface.
- Keep the tower moist during hot, dry weather.
- Start with a small amount of food and increase slowly as the worm population grows.
- Water the surrounding soil as usual so nutrients can move outward to plant roots.
Common Questions
Will a worm tower smell?
A well-balanced worm tower should have a mild, earthy smell. If it smells sour or rotten, add more dry bedding and reduce the amount of food you add.
How long before I see results?
Results vary with climate, soil, and how much food you add. Many gardeners notice healthier soil and plant growth over a few months, but patience is important.
Bringing a Greener Garden to Life
A worm tower is a gentle, practical way to turn leftover scraps into garden gold. With a little time and care, you can build healthier soil, support stronger plants, and enjoy a more sustainable garden all year round. Give it a try in your next planting season, and watch your garden thrive from the roots up.