There’s something truly special about a homemade dessert. The aroma filling your kitchen, the satisfaction of creating something from scratch, and most importantly, the peace of mind that comes from knowing exactly what ingredients are going into your food. This is especially true for beloved classics like cheesecake.
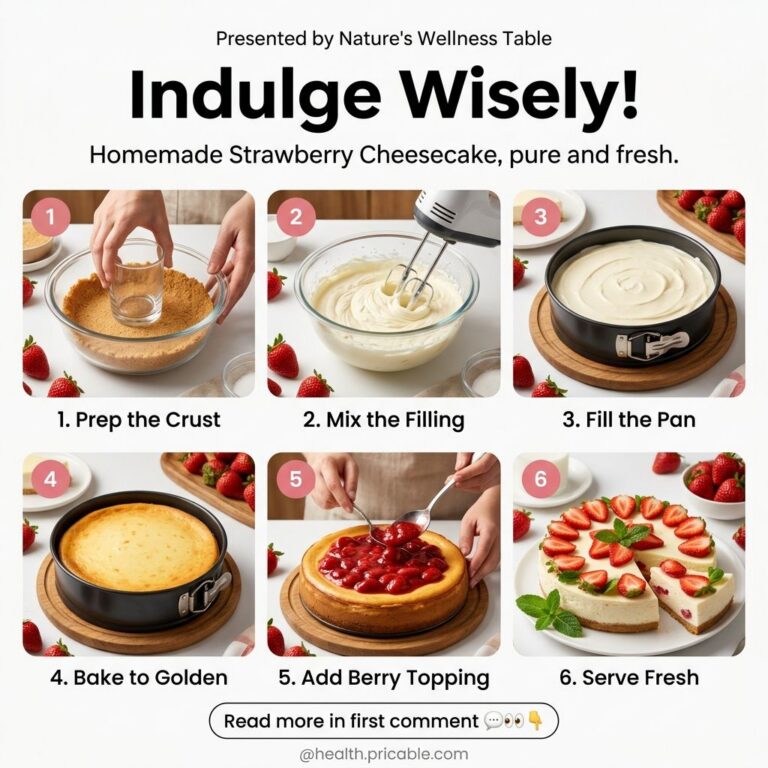
While store-bought cheesecakes can be tempting, they often come with a hidden list of artificial flavors, preservatives, and excessive sugars that can detract from their natural goodness. But what if we told you that making a delicious, fresh strawberry cheesecake at home is much easier than you think? It’s time to indulge wisely with our step-by-step guide to a pure and fresh homemade strawberry cheesecake.
Why Choose Homemade Strawberry Cheesecake?
Opting for a homemade cheesecake goes beyond just the joy of baking. It’s a conscious choice for better health and flavor:
- Control Over Ingredients: You decide what goes in. No high-fructose corn syrup, artificial colors, or unnecessary preservatives.
- Freshness You Can Taste: Store-bought options often sit on shelves. Homemade means peak freshness, especially when using seasonal fruits like strawberries.
- Customization: Adjust sweetness levels, crust type, or even the fruit topping to your personal preference.
- Wholesome Goodness: Using real ingredients like fresh cream cheese, eggs, and fruit ensures a richer, more authentic flavor and a treat you can feel good about sharing.
Ingredients You’ll Need
Gathering your ingredients is the first step to a delightful cheesecake. Here’s what you’ll need for this pure and fresh strawberry cheesecake:
For the Crust:
- 1 ½ cups graham cracker crumbs (about 10-12 full crackers)
- ¼ cup granulated sugar
- 6 tablespoons unsalted butter, melted
For the Filling:
- 24 oz (3 blocks) cream cheese, softened at room temperature
- 1 cup granulated sugar
- 1 teaspoon vanilla extract
- 3 large eggs
- ¼ cup sour cream or heavy cream
For the Strawberry Topping:
- 2 cups fresh strawberries, hulled and sliced
- ¼ cup granulated sugar (adjust to taste)
- 1 tablespoon lemon juice
- 1 tablespoon cornstarch mixed with 2 tablespoons cold water (slurry)
Step-by-Step Recipe: Homemade Strawberry Cheesecake
Let’s get baking! This recipe is broken down into simple steps, making it easy for even novice bakers to create a masterpiece.
Step 1: Prepare the Crust
- Preheat your oven to 350°F (175°C).
- In a medium bowl, combine the graham cracker crumbs, ¼ cup sugar, and melted butter. Mix until well combined and the crumbs are moistened.
- Press the mixture evenly into the bottom of a 9-inch springform pan. Use the bottom of a glass or your fingers to create a firm, even layer.
- Bake for 8-10 minutes, or until lightly golden. Remove from oven and let cool slightly while you prepare the filling. Reduce oven temperature to 325°F (160°C).
Step 2: Create the Creamy Filling
- In a large bowl, using an electric mixer, beat the softened cream cheese on medium speed until smooth and creamy, about 2-3 minutes.
- Gradually add the 1 cup granulated sugar, beating until fully incorporated and no lumps remain.
- Beat in the vanilla extract.
- Add the eggs one at a time, beating just until combined after each addition. Be careful not to overmix, as this can introduce too much air, leading to cracks.
- Stir in the sour cream (or heavy cream) until just blended.
Step 3: Bake the Cheesecake
- Pour the cream cheese mixture over the cooled crust in the springform pan.
- For best results and to prevent cracks, you can bake the cheesecake in a water bath (bain-marie). Wrap the bottom of your springform pan tightly with aluminum foil to prevent water from seeping in. Place the springform pan into a larger roasting pan. Pour hot water into the roasting pan until it comes about halfway up the sides of the springform pan.
- Carefully transfer the roasting pan to the preheated oven.
- Bake for 60-75 minutes, or until the edges are set but the center still jiggles slightly when gently shaken.
Step 4: Cool and Chill
- Once baked, turn off the oven and prop the oven door open slightly with a wooden spoon. Let the cheesecake cool in the oven for 1 hour. This slow cooling helps prevent cracking.
- Remove the cheesecake from the water bath (if using) and remove the foil. Let it cool completely on a wire rack at room temperature.
- Once fully cooled, cover the cheesecake with plastic wrap and refrigerate for at least 4-6 hours, or preferably overnight, to allow it to set completely.
Step 5: Prepare the Strawberry Topping
- In a small saucepan, combine the sliced fresh strawberries, ¼ cup sugar, and lemon juice.
- Cook over medium heat, stirring occasionally, until the strawberries soften and release their juices, about 5-7 minutes.
- In a separate small bowl, whisk together the cornstarch and cold water to create a slurry.
- Pour the cornstarch slurry into the simmering strawberry mixture, stirring constantly. Cook for another 1-2 minutes, until the sauce thickens.
- Remove from heat and let the strawberry topping cool completely before using.
Step 6: Assemble and Serve
- Once the cheesecake is thoroughly chilled and the strawberry topping is cool, carefully run a thin knife around the edge of the springform pan before releasing the sides.
- Spoon the strawberry topping evenly over the top of the cheesecake.
- Slice and serve! Garnish with extra fresh strawberries if desired.
Tips for a Perfect Cheesecake
- Room Temperature Ingredients: Ensure your cream cheese and eggs are at room temperature for a smooth, lump-free batter.
- Don’t Overmix: Overmixing the cheesecake batter can incorporate too much air, which expands during baking and then collapses, causing cracks.
- Water Bath is Your Friend: While optional, a water bath provides a moist baking environment, ensuring even cooking and greatly reducing the risk of cracks.
- Slow Cooling: Allowing the cheesecake to cool gradually in the oven after baking is crucial for preventing temperature shock and subsequent cracking.
There you have it! A truly indulgent yet wholesome homemade strawberry cheesecake. This recipe allows you to enjoy a classic sweet treat with confidence, knowing every ingredient is pure and fresh. So go ahead, whip up this delight, and savor every bite of your homemade creation!
Happy baking!