Imagine turning everyday kitchen waste into a thriving mini-garden. Sounds like a dream, right? Well, it’s a reality within your reach! Growing plants from kitchen scraps is not just an incredibly rewarding and budget-friendly way to expand your green thumb, but it’s also a fantastic step towards a more sustainable lifestyle. At Garden – L. Quyên, we’re all about making gardening accessible and fun, and this DIY method is perfect for anyone looking to add more greenery to their life without breaking the bank or harming the planet.
Today, we’re going to dive into the wonderful world of water germination, a simple yet effective technique that allows you to sprout seeds from fruits and vegetables you’d normally toss away. Get ready to embark on a sustainable gardening adventure right from your kitchen counter!
Why Grow from Kitchen Scraps?
There are countless reasons to give scrap gardening a try. It’s more than just a hobby; it’s a statement about mindful living and resourcefulness:
- Sustainability: Reduce food waste and give new life to parts of plants you’d usually discard.
- Cost-Effective: You’re literally growing plants for free using materials you already have.
- Educational: It’s a fantastic learning experience for all ages, teaching about plant life cycles and growth.
- Fresh Produce: Enjoy fresh herbs, vegetables, and even fruits grown right in your home.
- Indoor Greenery: Many scraps can grow into beautiful houseplants, adding a touch of nature to your indoor space.
What You Can Grow: Fruit Seeds Edition
While many vegetables can be regrown from scraps (think celery bottoms, green onions, lettuce hearts), today we’re focusing on the exciting potential of fruit seeds through water germination. Here are some popular choices to get you started:
- Avocado: The most famous candidate! A single pit can grow into a beautiful foliage plant.
- Lemon/Orange: Citrus seeds germinate easily and can grow into attractive, fragrant small trees.
- Apple: While growing a fruiting apple tree from seed takes a very long time and specific conditions, the journey of growing an apple seedling is still fun and educational.
- Mango: A tropical delight, mango seeds can sprout into lovely houseplants.
- Lychee: These exotic seeds can also be germinated to produce unique indoor plants.
The Magic of Water Germination: A Step-by-Step Guide
Water germination is a simple process that gives seeds the moisture and warmth they need to sprout. Here’s how to do it, especially for fruit seeds:
Step 1: Prepare Your Seeds
First, clean your fruit seeds thoroughly. Remove all fruit pulp, as it can cause mold. Some seeds, like avocado pits, benefit from having their outer brown skin gently peeled off, though it’s not strictly necessary for germination. For citrus and mango seeds, just ensure they are clean.
Step 2: Set Up for Success
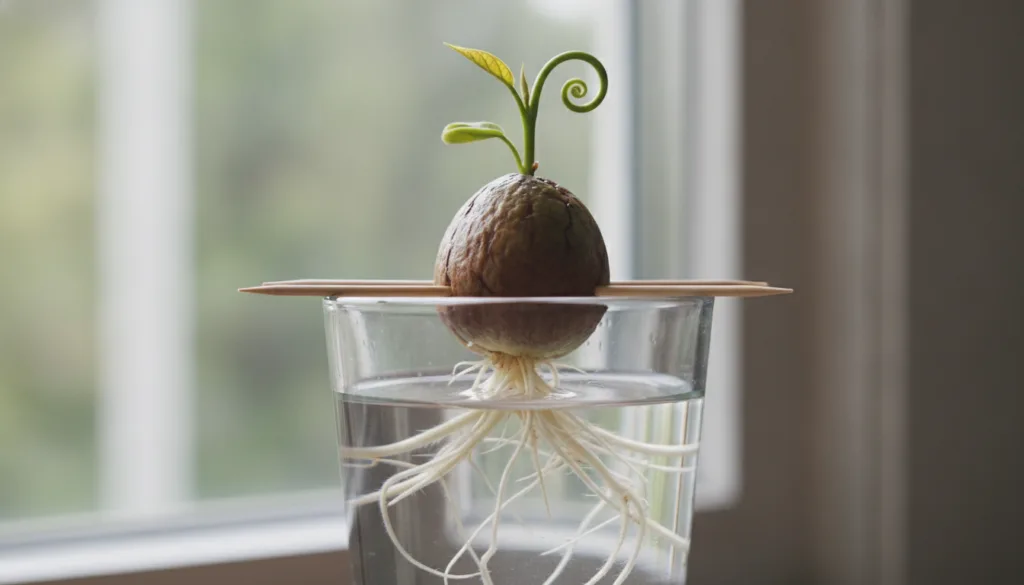
For larger seeds like avocado pits, use the toothpick method: insert three or four toothpicks evenly around the middle of the pit. Suspend the pit broad-end down over a glass of water, ensuring the bottom third of the pit is submerged. For smaller seeds like citrus, place them directly into a shallow dish or small glass of water.
Step 3: Find the Right Spot
Place your glass or dish in a warm spot with indirect sunlight. A windowsill is often ideal. Consistent warmth is key for germination. Avoid direct, harsh sunlight, which can dry out the water too quickly or overheat the seeds.
Step 4: Patience and Regular Water Changes
This is where patience comes in! Germination times vary widely. Avocado pits can take anywhere from 2-6 weeks (or even longer!) to sprout roots and a stem. Smaller seeds might sprout faster, within 1-3 weeks. Change the water every few days to prevent mold and ensure the water is oxygenated. Keep the water level consistent.
Step 5: Watch for Growth!
Soon, you’ll start to see roots emerging from the bottom of the seed, followed by a sprout from the top. It’s a truly magical moment to witness life springing from what was once destined for the compost bin!
Tips for Success
- Warmth is Key: Ensure a consistently warm environment.
- Cleanliness: Always clean seeds thoroughly to prevent mold and rot.
- Fresh Water: Regular water changes are crucial.
- Don’t Give Up: Some seeds take longer than others. If one doesn’t sprout, try another!
- Experiment: Try different fruit seeds and see what works best for you.
From Water to Soil: The Next Step
Once your sprouted seed has a healthy root system (typically a few inches long) and a visible stem with a few leaves, it’s time to transfer it to soil. Choose a small pot with drainage holes and fill it with well-draining potting mix. Plant the sprouted seed so that the roots are covered and the base of the stem (or the top half of the avocado pit) is just above the soil line.
Water thoroughly after planting and place your new plant in a spot where it can continue to receive indirect light. Keep the soil consistently moist but not waterlogged.
Start Your Sustainable Garden Today!
Growing a garden from kitchen scraps is an empowering and sustainable way to connect with nature and enjoy fresh greenery. Water germination is an easy entry point, especially for fruit seeds, offering a rewarding experience as you watch new life emerge. So, the next time you finish a delicious fruit, think twice before tossing that seed! You might just be holding the beginning of your next beautiful plant.
Have you tried growing plants from kitchen scraps? Share your successes and tips in the comments below! We’d love to hear about your sustainable gardening adventures.