Do you dream of biting into a sweet, juicy homegrown watermelon, but worry you don’t have enough garden space? Watermelon vines are notorious for sprawling, often taking over an entire garden bed. But what if there was a simple solution that allowed you to harvest big, healthy watermelons even in a compact area? The secret lies in vertical gardening, and a DIY A-frame trellis is your ticket to a bountiful, space-saving harvest. This guide will walk you through building your own sturdy A-frame trellis and reveal the essential plant care tips for growing delicious watermelons vertically.
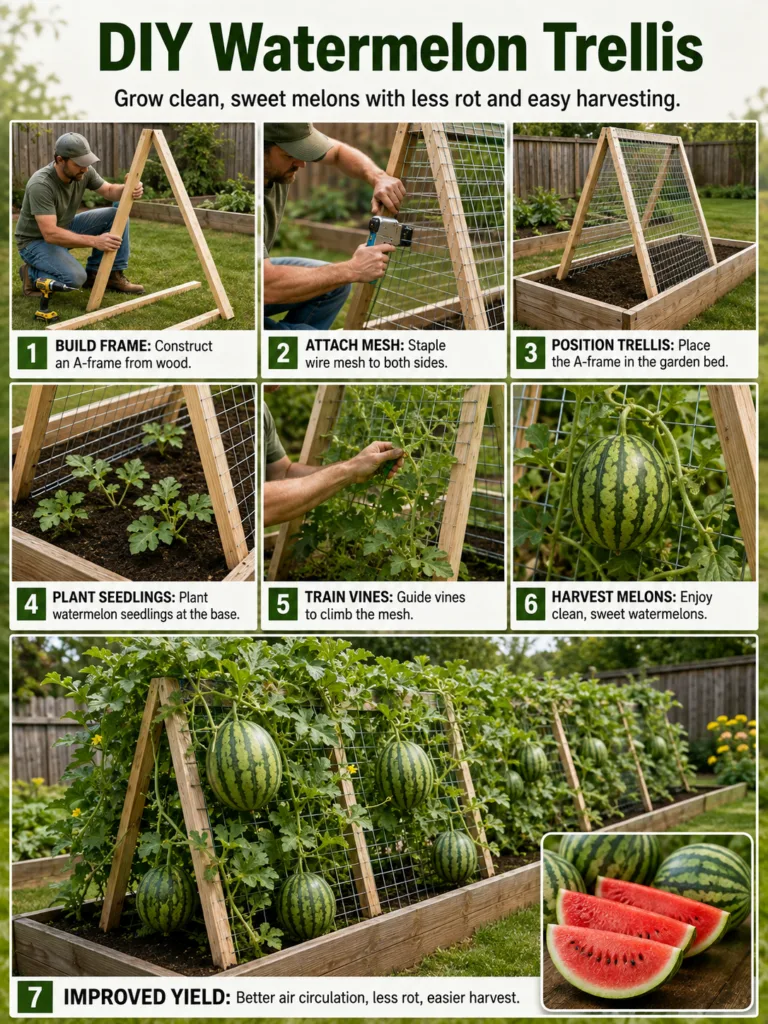
Why Grow Watermelons Vertically?
Moving watermelon vines off the ground isn’t just about saving space; it offers several significant advantages for plant health and fruit quality:
- Space Efficiency: A single watermelon plant can spread 10 to 20 feet or more. A vertical trellis directs this growth upwards, freeing up valuable ground space for other crops.
- Improved Air Circulation: Elevating vines allows for better airflow around the foliage. This reduces humidity around the leaves, which is crucial for preventing common fungal diseases like powdery mildew.
- Pest Reduction: Keeping fruit off the damp soil minimizes contact with ground-dwelling pests like slugs, snails, and squash bugs, and reduces the risk of soil-borne diseases.
- Cleaner Fruit: Watermelons grown off the ground stay cleaner and are less prone to rot from sitting on wet soil.
- Easier Harvesting: No more bending and searching through dense foliage on the ground! Your ripe watermelons will be hanging at a more convenient height, making them easier to spot and pick.
Building Your A-Frame Watermelon Trellis
A sturdy A-frame trellis provides excellent support and is relatively easy to construct. Here’s a step-by-step guide to building your own:
Materials You’ll Need:
- Lumber: Four 2x2s or 1x2s (approximately 6-8 feet long for the main legs) and several shorter pieces for cross-braces (2-3 feet long, depending on your desired width). Treated lumber or naturally rot-resistant wood like cedar or redwood is ideal for outdoor use.
- Tools: Saw (hand saw or power saw), drill, wood screws or nails, measuring tape, pencil, safety glasses, and work gloves.
- Hardware: Hinges (optional, but make for easy folding and storage), or rope/zip ties to secure the top.
Step-by-Step Construction:
1. Cut Your Lumber
Start by cutting your main leg pieces to your desired height (e.g., 6 feet). Then, cut your cross-braces to create the width you need at the bottom of the ‘A’ (e.g., 2.5-3 feet). Having two cross-braces per A-frame side, one near the top and one lower down, adds significant stability.
2. Assemble the A-Frame Sides
Lay two main legs on a flat surface in an ‘A’ shape. Position your cross-braces between them. For stronger joints, you can cut a small notch into the legs where the cross-braces sit. Securely fasten the cross-braces to the legs using screws or nails. Repeat this process to create a second identical A-frame side.
3. Join the A-Frames
Stand both A-frame sides upright. You can join them at the top in a few ways:
- Hinges: For a collapsible trellis, attach heavy-duty outdoor hinges at the very top of each pair of legs.
- Rope/Zip Ties: Simply cross the tops of the legs and lash them securely together with strong rope or heavy-duty zip ties.
- Connecting Bar: You can also add a longer horizontal piece of wood along the top to connect the two A-frames, increasing rigidity.
4. Add Horizontal Support (If Needed)
Depending on how far apart you place your two A-frames, you may want to add one or more long horizontal bars connecting the two frames. This creates a sturdy ladder-like structure for the vines to climb. You can attach these using screws or by drilling holes and threading rope or wire through them.
5. Install in Your Garden
Place your A-frame trellis in its desired location in your garden bed. Ensure it’s stable and won’t tip over once laden with fruit. You might need to gently push the legs a few inches into the soil for extra stability, or even stake the base to the ground if your area experiences strong winds.
Cultivating Watermelons on Your Trellis
Once your trellis is in place, it’s time to get planting!
Ideal Growing Conditions:
- Sunlight: Watermelons are sun-lovers, requiring a minimum of 6-8 hours of direct sunlight per day, but ideally 8-10 hours for the sweetest fruit.
- Soil: They thrive in rich, well-draining soil with a pH between 6.0 and 6.8. Amend your garden beds with plenty of compost or aged manure to provide essential nutrients and improve soil structure.
- Watering: Consistent moisture is key, especially during flowering and fruit development. Water deeply and regularly, aiming for 1-2 inches of water per week. Reduce watering as fruits approach maturity to concentrate sugars.
- Hardiness: Watermelons (Citrullus lanatus) are warm-season annuals. They are extremely sensitive to frost and should only be planted after all danger of frost has passed and soil temperatures consistently reach 65-70°F (18-21°C). This typically means late spring to early summer across most of the U.S.
Planting and Training Your Vines:
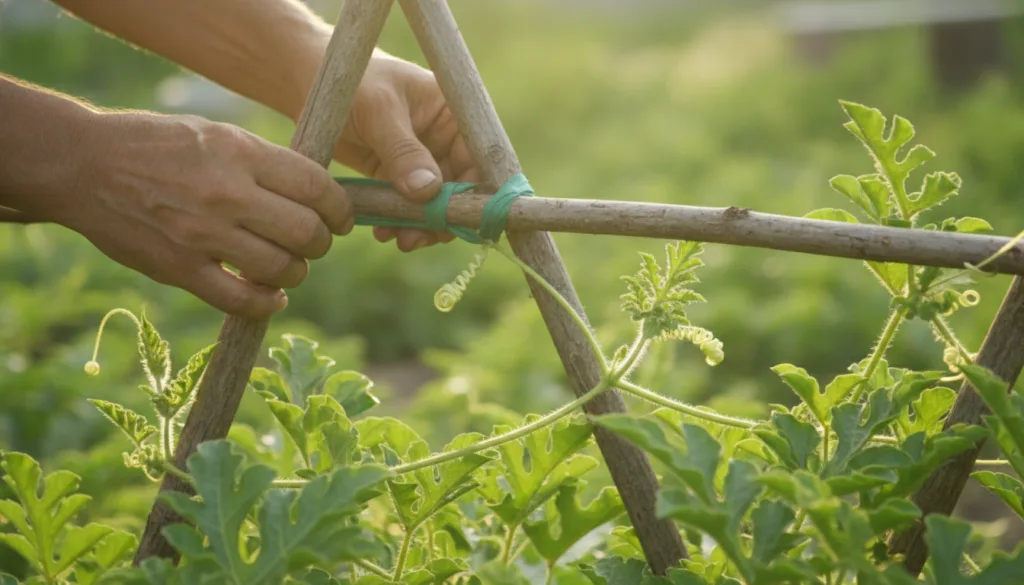
Plant your watermelon seedlings at the base of your A-frame trellis, typically one plant per side. As the vines begin to grow, gently guide them to climb the trellis. You can use soft plant ties or garden clips to loosely attach the main stems to the trellis rungs. Watermelon tendrils will naturally grasp the structure, but a little initial guidance goes a long way.
Supporting Developing Fruit:
As your watermelons grow, they can become quite heavy. To prevent them from breaking off the vine, you’ll need to create slings to support them. You can use old nylon stockings, mesh produce bags, or strips of old fabric. Simply cradle each developing watermelon in a sling and attach the ends of the sling securely to the trellis structure. This distributes the weight and protects your precious fruit.
Pruning and Pest Management:
Pruning isn’t strictly necessary for watermelons but can be beneficial. You can pinch off some lateral (side) shoots to direct the plant’s energy into fewer, stronger fruits. Remove any yellowing or diseased leaves to improve air circulation and reduce disease spread. Regularly inspect your plants for common pests like aphids or squash bugs. Good airflow from vertical growing naturally deters many issues, but if pests appear, use organic solutions like insecticidal soap or hand-picking.
Common Mistakes to Avoid
- Planting Too Early: Watermelons need consistent warmth. Planting when temperatures are still cool can stunt growth or even kill young plants.
- Insufficient Water: Drought stress can lead to bitter fruit or blossom end rot. Keep the soil consistently moist, especially during fruit development.
- Lack of Fruit Support: Failing to sling heavy watermelons will almost certainly result in dropped, damaged fruit.
- Poor Trellis Stability: A flimsy trellis can collapse under the weight of mature vines and fruit. Ensure your construction is sturdy and anchored.
- Not Enough Sun: Shady conditions lead to smaller fruits and lower sugar content.
Regional Considerations for U.S. Gardeners
Watermelon cultivation across the United States largely depends on your last frost date and the length of your growing season. Most varieties require 80-100 days to maturity.
- Zones 3-5 (Northern US): Choose fast-maturing varieties (e.g., ‘Sugar Baby’, ‘Blacktail Mountain’). Start seeds indoors 3-4 weeks before the last frost to get a head start. Ensure full sun exposure and well-draining soil.
- Zones 6-8 (Mid-Atlantic, Midwest): You have a longer window for planting. Direct sow seeds after the last frost or transplant seedlings. Consider mid-season varieties.
- Zones 9-11 (Southern US, Southwest, Pacific Coast): Long, hot summers are ideal for watermelons. You can often plant multiple successions. Ensure consistent watering, especially in hot, dry climates, and consider some afternoon shade in extreme heat.
Always check your local extension service for recommended planting dates and varieties best suited to your microclimate.
Harvesting Your Sweet Rewards
Knowing when to harvest a watermelon can be tricky! Look for these signs:
- The tendril closest to the fruit stem turns brown and dries up.
- The bottom of the watermelon (where it rests on the sling) turns a creamy yellow.
- The rind develops a dull, rather than shiny, appearance.
- A thumping sound when gently tapped changes from a hollow echo to a deeper, more muffled thud.
With careful planning and a sturdy A-frame trellis, you’ll be enjoying your own homegrown, sweet watermelons faster than you think, all while maximizing your garden’s potential.
Ready to try vertical gardening? Share your favorite watermelon varieties or your trellis-building tips in the comments below!