Imagine biting into a juicy, sun-ripened tomato, picked fresh from your own garden. The flavor is incomparable, the satisfaction immense. Many new gardeners might think growing tomatoes is a complicated affair, but what if we told you there’s an incredibly simple and rewarding method to start your tomato patch from something you likely already have in your kitchen?
Yes, you read that right! You can grow delicious, garden-fresh tomatoes from a single slice. This method is not only fun and educational but also incredibly cost-effective. Let’s dive into how you can turn a humble tomato slice into a thriving plant brimming with homegrown goodness.
Why Grow Tomatoes from a Slice?
This ingenious method is fantastic for several reasons:
- Simplicity: It’s one of the easiest ways to start tomato plants, perfect for beginners or those looking for a fun project.
- Cost-Effective: You’re essentially using a portion of a tomato you might otherwise discard, saving money on seeds or starter plants.
- Educational: It’s a wonderful way to observe the germination process firsthand, making it a great activity for families.
- Variety: You can try this with different types of ripe, healthy tomatoes from your grocery store or farmer’s market, exploring new flavors.
What You’ll Need
Gathering your supplies is the first step to a successful tomato harvest. You’ll need just a few basic items:
- A Ripe Tomato: Choose a healthy, ripe tomato from your kitchen. Organic tomatoes are often recommended as their seeds are more likely to be viable.
- Potting Mix: A good quality, well-draining potting mix is crucial.
- A Pot or Container: A pot about 6-8 inches in diameter with drainage holes is ideal for starting. You can transplant to a larger container or garden bed later.
- Water: For moistening the soil.
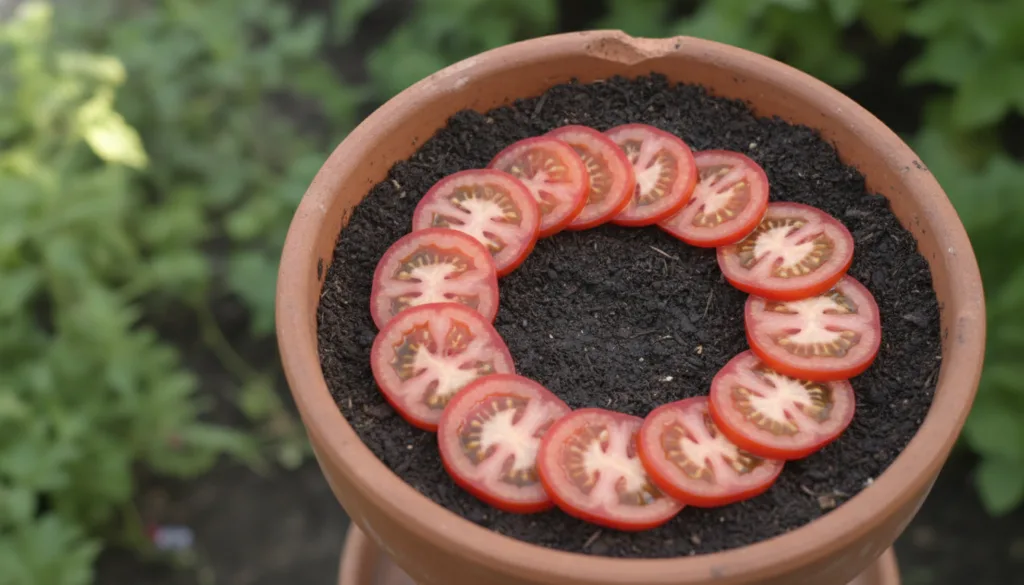
Step-by-Step Guide: Growing Tomatoes from a Single Slice
1. Choose Your Tomato Wisely
Select a ripe, healthy tomato. Heirloom varieties or ‘beefsteak’ tomatoes often yield good results. Avoid hybrid tomatoes if you want the plants to be true to the parent, as hybrids don’t always grow true from seed. Slice the tomato into ¼ to ½ inch thick rounds.
2. Prepare Your Pot
Fill your chosen pot with a good quality potting mix, leaving about an inch of space from the rim. Gently moisten the soil; it should be damp but not waterlogged.
3. Place the Slices
Lay 2-3 tomato slices flat on top of the moistened potting mix. Don’t worry about spacing them perfectly at this stage, as you’ll thin them out later.
4. Cover and Water
Cover the tomato slices with about ½ inch of additional potting mix. Gently mist the top layer of soil to ensure it’s moist. Avoid heavy watering that might dislodge the slices.
5. Create a Mini-Greenhouse (Optional but Recommended)
For faster germination, you can cover the pot with plastic wrap or a clear plastic dome. This creates a humid environment, mimicking a greenhouse. Make sure to poke a few small holes for air circulation.
6. Wait for Germination
Place your pot in a warm spot, ideally receiving plenty of indirect sunlight. Keep the soil consistently moist. In about 7-14 days, you should start seeing tiny green sprouts emerging!
7. Thin Your Seedlings
Once your seedlings are a few inches tall and have developed their first true leaves (not the initial seed leaves), it’s time to thin them. Carefully choose the strongest 1-2 seedlings per pot and snip the others at the soil line. This ensures your remaining plants have enough space and nutrients to thrive.
Caring for Your Young Tomato Plants
Once your tomato plants have sprouted and been thinned, they’ll need consistent care to grow strong and produce fruit.
Sunlight
Tomatoes are sun-loving plants! They need at least 6-8 hours of direct sunlight per day. If growing indoors, place them near a south-facing window or use grow lights.
Watering
Keep the soil consistently moist, but avoid overwatering. Water deeply when the top inch of soil feels dry to the touch. Inconsistent watering can lead to problems like blossom end rot.
Fertilizing
Once your plants are established and about 6-8 inches tall, you can start feeding them with a balanced liquid fertilizer or one specifically formulated for tomatoes. Follow the product instructions for application rates and frequency.
Staking or Support
As your tomato plants grow taller, they will need support to prevent them from falling over, especially once they start bearing fruit. Use stakes, cages, or trellises to provide adequate support.
Pest and Disease Control
Keep an eye out for common tomato pests like aphids, hornworms, and whiteflies. Address any issues promptly with organic pest control methods like neem oil or insecticidal soap. Ensure good air circulation to prevent fungal diseases.
Harvesting Your Homegrown Bounty
The best part of growing tomatoes is, of course, the harvest! Depending on the variety, tomatoes are typically ready for harvest 60-85 days after transplanting.
- When to Harvest: Pick tomatoes when they are fully colored, firm, and easily detach from the vine with a gentle twist.
- How to Harvest: Support the vine with one hand and gently twist the tomato stem with the other. Avoid pulling roughly, which can damage the plant.
Enjoy your garden-fresh tomatoes in salads, sandwiches, sauces, or simply sliced with a sprinkle of salt. There’s nothing quite like the taste of a tomato you’ve grown yourself!
Start Your Tomato Journey Today!
Growing tomatoes from a slice is a fun, easy, and incredibly rewarding way to enjoy fresh, delicious produce right from your own home. So next time you’re in the kitchen, grab a ripe tomato and give this method a try. You’ll be amazed at the green thumb you discover!
Happy gardening!