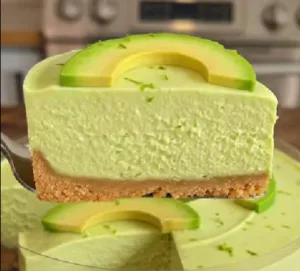
Creamy, fresh, naturally green, and actually easy to make at home
If you’ve only ever used avocado for toast or salads, this No-Bake Avocado Cheesecake is a fun way to turn it into dessert.
The filling is rich and creamy from avocado and cream cheese, lightly tangy from Greek yogurt and fresh lime, and gently sweetened with honey. A simple biscuit crust adds crunch underneath.
For a real-life version that slices cleanly, I recommend using a small amount of gelatin. Without it, the cheesecake will still taste delicious, but the filling may be too soft to hold a neat slice.
Ingredients
For the crust
- 1 cup graham cracker crumbs or crushed digestive biscuits
- 3 tablespoons melted unsalted butter
- 1 tablespoon honey or sugar, optional
- Small pinch of salt
For the avocado cheesecake filling
- 2 medium ripe avocados
- 8 oz / 225 g cream cheese, softened
- ½ cup thick Greek yogurt
- ¼ cup honey or maple syrup
- 2 tablespoons fresh lime juice
- 1 teaspoon finely grated lime zest
- 1 teaspoon vanilla extract
- Pinch of salt
To help it set
- 1½ teaspoons unflavored gelatin
- 2 tablespoons cold water
For decorating
- Thin avocado slices
- Fresh lime zest
- Lime slices
- Chopped pistachios, optional
- Fresh mint, optional
- A drizzle of honey, optional
Equipment
You’ll need:
- Blender or food processor
- 6-inch / 15-cm springform pan
- Mixing bowl
- Small microwave-safe bowl
- Spatula
- Parchment paper
A 6-inch pan gives you a taller, prettier cheesecake. You can use a 7-inch pan, but the cake will be slightly thinner.
Step 1: Prepare the pan
Line the bottom of your springform pan with parchment paper.
You can also lightly grease the sides with a very thin layer of neutral oil or butter.
This helps the cheesecake release more cleanly once chilled.
Step 2: Make the biscuit crust
Crush the graham crackers or digestive biscuits into fine crumbs.
You can do this in a food processor or place them inside a zip-top bag and crush them with a rolling pin.
Transfer the crumbs to a bowl.
Add:
- melted butter
- optional honey or sugar
- small pinch of salt
Mix until the crumbs resemble wet sand.
If you squeeze some between your fingers, they should hold together.
Step 3: Press the crust into the pan
Transfer the crumb mixture into the prepared springform pan.
Use the bottom of a glass or measuring cup to firmly press it into an even layer.
Pay extra attention around the edges so the crust doesn’t crumble when you slice the cheesecake later.
Place the crust in the refrigerator for about 15–20 minutes while you prepare the filling.
Step 4: Bloom the gelatin
Place 1½ teaspoons unflavored gelatin in a small bowl.
Pour over 2 tablespoons cold water.
Let it sit for about 5 minutes.
The gelatin will absorb the water and become thick and spongy.
This is called blooming.
Step 5: Dissolve the gelatin
Once bloomed, gently warm the gelatin.
You can microwave it for only a few seconds at a time until it becomes completely liquid.
Do not boil it.
Stir and set aside briefly.
It should stay liquid while you prepare the filling.
Step 6: Prepare the avocados
Cut both avocados in half.
Remove the pits and scoop the flesh into your blender.
For the best cheesecake, use avocados that are fully ripe, creamy, and bright green inside.
Avoid avocados with large brown areas because they can affect both the color and flavor of the finished cake.
Step 7: Add the cheesecake ingredients
Into the blender, add:
- avocado
- softened cream cheese
- Greek yogurt
- honey or maple syrup
- fresh lime juice
- lime zest
- vanilla
- pinch of salt
Make sure the cream cheese has softened at room temperature first.
Cold cream cheese can leave little white lumps in the filling.
Step 8: Blend until completely smooth
Blend until the mixture becomes silky and creamy.
Stop and scrape down the sides of the blender as needed.
Continue blending until there are no visible pieces of avocado or cream cheese.
The filling should be:
- thick
- glossy
- creamy
- pale natural green
- smooth enough to pour slowly
Taste the mixture.
If you want it sweeter, add another tablespoon of honey.
If you want more brightness, add a little extra lime zest rather than lots of extra juice.
Step 9: Add the gelatin
With the blender running on low speed, slowly pour in the dissolved gelatin.
Blend for only another 10–15 seconds, just until incorporated.
Do not overblend.
The gelatin will help the filling hold its shape after chilling without making it feel rubbery.
Step 10: Pour over the crust
Remove the chilled crust from the refrigerator.
Pour the avocado cheesecake filling over the biscuit base.
Use a spatula to scrape every bit of filling from the blender.
Gently spread the surface until smooth.
Tap the pan against the countertop a few times to release any large air bubbles.
Step 11: Chill the cheesecake
Cover the pan and refrigerate for at least 5–6 hours.
For the best texture, chill it overnight.
Do not try to remove the cheesecake from the pan too early.
The center should feel completely set before unmolding.
Step 12: Remove from the mold
Once thoroughly chilled, carefully run a thin knife around the inner edge of the pan.
Release the springform ring slowly.
Transfer the cheesecake onto a serving plate.
The cake should remain stable while still looking creamy and soft.
Step 13: Decorate
For a simple finish, add:
- several thin avocado slices
- fresh lime zest
- a couple of lime wedges
- mint leaves
You can also sprinkle chopped pistachios around the edge for extra crunch.
Decorate the cake shortly before serving, especially if using fresh avocado on top, because exposed avocado can brown.
Step 14: Slice
For clean slices, place a sharp knife in hot water for a few seconds.
Dry the blade completely.
Cut one slice, then wipe and warm the knife again before the next cut.
This gives you those clean cheesecake-style edges.
What the Texture Should Be Like
The finished avocado cheesecake should have a clear contrast between the two layers:
Bottom: firm, buttery, crunchy biscuit crust.
Top: thick, pale-green cheesecake that holds its shape but remains creamy when you bite into it.
It should not feel like firm jelly.
If it is rubbery, too much gelatin was used.
If it collapses after removing the mold, it either needs more chilling time or the filling contained too much liquid.
How to Keep Avocado Cheesecake Green 🥑
Avocado naturally darkens when exposed to air.
Fresh lime juice helps slow this process, which is another reason it works so well in this recipe.
For the best appearance:
- use fresh ripe avocado
- add lime juice immediately
- keep the cheesecake covered while chilling
- decorate with avocado slices only shortly before serving
- keep the cake refrigerated
A slight darkening after a day or two is normal.
Can I Make It Without Gelatin?
Yes, but the texture will be softer.
For a gelatin-free version, increase the cream cheese to around 10–12 oz / 280–340 g and reduce the yogurt slightly.
Chill overnight before serving.
You’ll get more of a soft cheesecake-pie texture rather than clean, firm slices.
Vegetarian Option
Instead of gelatin, you can use agar-agar.
However, agar behaves differently from gelatin and normally needs to be heated to activate.
Follow the quantity and preparation directions on your agar package rather than replacing gelatin in a 1:1 ratio.
Flavor Variations
🥥 Avocado Coconut Cheesecake
Replace the Greek yogurt with thick coconut yogurt and top with toasted coconut.
🍋 Avocado Lemon Cheesecake
Replace lime juice and zest with fresh lemon.
🥭 Avocado Mango Cheesecake
Blend about ½ cup ripe mango into the avocado filling for a sweeter tropical version.
🍫 Chocolate Avocado Cheesecake
Add cocoa powder and a little extra sweetener for a rich chocolate-avocado filling.
Storage
Keep the cheesecake covered in the refrigerator for up to 3 days.
For the freshest color and texture, it’s best within the first 1–2 days.
Avoid leaving it at room temperature for long periods because it contains cream cheese and yogurt.
You can also freeze individual slices, but the texture may become slightly firmer after thawing.
Thaw frozen slices overnight in the refrigerator.
Real-Life Tips for Success
Use ripe avocado: This is the biggest factor in getting a truly creamy filling.
Soften the cream cheese: It prevents lumps.
Use thick Greek yogurt: Thin yogurt adds unnecessary water.
Measure the lime juice: Too much can make the filling loose and overpower the avocado.
Bloom the gelatin properly: Never dump dry gelatin directly into the blender.
Give it enough chilling time: Overnight chilling gives the best slices.
Don’t oversweeten it: Avocado has a mild flavor, so too much honey can overwhelm the fresh lime and creamy cheesecake taste.
Final Thoughts 🥑🍰
This No-Bake Avocado Cheesecake is surprisingly simple to make in a real home kitchen.
The process is basically:
make the crust → blend the avocado filling → add gelatin → pour → chill → decorate → slice.
You get a crunchy buttery base and a silky, creamy avocado-lime cheesecake layer that looks beautiful and tastes fresh rather than overly heavy.
Avocado + cream cheese + lime might sound unusual, but together they make an incredibly creamy dessert. 🥑✨