Budget-Friendly Garden Path Ideas That Elevate Your Backyard’s Style
Dreaming of a garden that feels like a tranquil retreat, complete with inviting pathways that guide you through lush plantings? Many gardeners believe that creating beautiful, functional paths requires a significant investment, putting such projects out of reach for those on a budget. However, that couldn’t be further from the truth! With a little creativity and resourcefulness, you can design and install stunning garden paths that not only enhance the beauty and accessibility of your outdoor space but also make it feel far more organized and expensive than it actually cost. This guide will walk you through ingenious, budget-friendly ideas to transform your backyard into a truly enchanting haven.
Why Garden Paths Matter for Your Outdoor Space
Garden paths are more than just a way to get from point A to point B. They are the arteries of your garden, defining spaces, protecting plant beds, and inviting exploration. A well-designed path creates a sense of flow, leading the eye and the foot through different areas of your landscape. They reduce soil compaction around plants, minimize mud tracking into your home, and add a crucial layer of design and sophistication. Paths provide structure, making even the most exuberant garden feel intentionally cultivated and cared for.
Creative, Budget-Friendly Path Materials
The secret to an affordable garden path lies in selecting materials that are either inexpensive, recycled, or readily available. Let’s explore some top contenders.
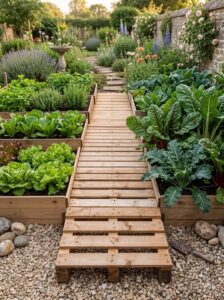
1. Reclaimed Pallet Paths
Wooden pallets are a fantastic resource for budget-conscious DIYers. They offer a rustic, organized look and can be sourced for free or very cheaply from local businesses, construction sites, or online marketplaces. When choosing pallets, always look for those stamped with an ‘HT’ (Heat Treated) mark, ensuring they haven’t been treated with toxic chemicals (avoid ‘MB’ for Methyl Bromide).
- Preparation: Disassemble the pallets carefully, removing all nails. Sand any rough edges to prevent splinters. Consider applying a weather-resistant stain or sealant to prolong their life, especially in humid or rainy climates.
- Installation: Level the ground where your path will be. You can lay the pallet boards directly on a prepared base of sand or gravel for drainage. For a more formal look, cut boards to uniform lengths and arrange them in a pattern. For a rustic feel, you might lay larger sections of disassembled pallets as stepping stones. Ensure the surface is as even as possible to prevent tripping hazards.
- Maintenance: Periodically check for loose boards or splinters. Reapply sealant every few years. Pallet wood can eventually rot, especially if in constant contact with moist soil, so plan for eventual replacement or consider elevating the boards slightly.
- Practical Tip: Before laying, place a weed barrier fabric beneath the path to prevent grass and weeds from growing up between the boards.
2. Gravel Paths
Gravel is a classic and versatile choice for garden paths, offering excellent drainage and a satisfying crunch underfoot. It’s relatively inexpensive, easy to install, and comes in various colors and sizes to match your garden’s aesthetic.
- Preparation: Dig a shallow trench (4-6 inches deep) along your desired path route. Line the trench with heavy-duty landscape fabric to suppress weeds. Install an edging material (such as metal, plastic, or timber) along both sides of the path to contain the gravel.
- Installation: Spread a layer of crushed rock or coarse gravel as a base, compacting it well. Then, add a top layer of decorative gravel (e.g., pea gravel, decomposed granite, or river rock) about 2-3 inches deep. Rake evenly.
- Maintenance: Rake occasionally to redistribute gravel and remove any debris. Top up with new gravel every few years as needed. Weeds can still sprout; pull them by hand or use a weed burner.
- Practical Tip: Decomposed granite packs down more firmly than pea gravel, creating a more stable surface, especially for wheelbarrows or strollers.
3. Wood Chip or Mulch Paths
For a soft, natural, and highly budget-friendly path, wood chips or other organic mulches are an excellent choice. They offer a comfortable walking surface and can even improve soil over time as they break down.
- Preparation: Clear the path area of weeds and debris. You can often get wood chips for free from local arborists or utility companies. Define your path edges with a shovel or flexible edging.
- Installation: Lay down a thick layer (4-6 inches) of wood chips or mulch directly on the cleared ground. This depth helps suppress weeds and provides a soft cushion.
- Maintenance: Rake occasionally to keep the path even. Replenish the mulch every 1-2 years as it decomposes. This decomposition is a benefit, enriching the surrounding soil, but means the material will compact and break down over time.
- Practical Tip: Avoid using dyed mulches that can leach color or materials like cypress mulch that are harvested unsustainably. Opt for natural, local wood chips.
4. Stepping Stone Paths (DIY or Salvaged)
Stepping stone paths create an informal, charming look. You can create your own unique stones or salvage them, making this a highly customizable and affordable option.
- DIY Stones: Use concrete mix poured into molds (old baking pans, plastic containers, or even large rhubarb leaves for a natural texture). Add color with concrete dye or embed pebbles or broken pottery for mosaic effects.
- Salvaged Stones: Look for discarded pavers, broken concrete slabs (often called ‘urbanite’), or large, flat rocks. Check free sections of online classifieds or ask local construction companies.
- Installation: Place stones directly on the ground, ensuring they are level and stable. Dig out a shallow depression for each stone so its top surface is flush with or slightly above the surrounding grade. This prevents tripping and makes mowing easier.
- Maintenance: Relevel any wobbly stones as needed. Keep the area between stones clear of weeds.
- Practical Tip: Space stepping stones at a comfortable stride length (typically 18-24 inches center-to-center) for a natural walking rhythm.
5. Brick or Paver Remnants
If you’re willing to hunt for materials, leftover bricks or pavers from construction sites, demolition projects, or online marketplaces can create stunning and durable paths at a fraction of the cost.
- Sourcing: Be diligent in searching for ‘free’ or ‘cheap’ brick/paver listings. Consistency in size and color can be a challenge, but a mixed-material path can also be charming.
- Installation: Prepare a level base, ideally a few inches of compacted gravel and sand, to ensure proper drainage and stability. Lay bricks or pavers in a desired pattern (basketweave, running bond, herringbone). Use a rubber mallet to tap them into place and ensure an even surface. Fill gaps with sand.
- Maintenance: Sweep regularly to keep joints clear. Periodically check for shifting or settling, and relevel as needed.
- Practical Tip: Even broken bricks or concrete pieces can be used to create a mosaic-style path or a rustic border for another path material.
Common Mistakes to Avoid in Path Construction
Even with budget-friendly materials, a poorly constructed path can be a source of frustration. Here’s how to avoid common pitfalls:
- Neglecting Drainage: Paths that hold water will quickly deteriorate and become slippery. Always ensure a slight slope or a permeable base (like gravel or sand) for water to drain away. In areas with heavy rainfall or clay soil, consider installing a French drain alongside the path.
- Insufficient Base Preparation: Laying materials directly on unprepared soil without a proper base or weed barrier leads to uneven surfaces, shifting materials, and rampant weed growth. Taking the time to prepare the base properly saves significant work later.
- Uneven Surfaces: A wobbly or uneven path is a tripping hazard. Use a level during installation to ensure a consistent grade. For gravel, proper compaction is key. For stepping stones, dig individual depressions for stability.
- Overlooking Edging: Without proper edging, path materials like gravel or mulch will migrate into your garden beds, creating a messy look and reducing the path’s integrity. Edging also provides a clean visual line.
- Not Considering Climate: In regions with freeze-thaw cycles (common in USDA Zones 3-6), solid materials like concrete or pavers need deeper, well-drained bases to prevent heaving. Wood paths can become slick with moss in damp, shady areas.
Embrace Your Inner Landscape Designer
Creating a beautiful garden path doesn’t require a professional landscaper or an unlimited budget. It requires vision, resourcefulness, and a willingness to get your hands dirty. By choosing materials wisely and focusing on proper installation techniques, you can design and build pathways that not only serve a practical purpose but also add immense character and value to your outdoor living space. Each step on your new path will be a testament to your creativity and dedication to your garden.