Are you tired of your plants wilting between waterings or constantly worrying if you’ve given them too much or too little water? Imagine a gardening solution that keeps your plants consistently hydrated, reduces water waste, and saves you time! Enter the self-watering planter, a game-changer for busy gardeners and plant enthusiasts alike. Even better, you can make one yourself using materials you likely already have around the house!
At Garden – L. Quyên, we love smart, sustainable, and simple gardening ideas. That’s why we’re thrilled to share this DIY guide to creating an upcycled bucket self-watering planter. It’s perfect for growing thriving vegetables, herbs, or flowers, whether you have a large garden or just a small balcony.
Why Choose a Self-Watering Planter?
Self-watering planters are ingenious systems designed to provide a consistent water supply to your plants, drawing moisture from a reservoir as needed. This method offers several fantastic benefits:
- Consistent Moisture: Plants receive a steady supply of water, preventing the stress of drying out or being overwatered.
- Water Conservation: Less water is lost to evaporation or runoff, making it an eco-friendly choice.
- Reduced Watering Frequency: You can go longer between waterings, perfect for busy schedules or short vacations.
- Healthier Roots: Plants develop stronger root systems as they naturally seek out water.
- Pest Control: Bottom-watering can help reduce certain soil-borne pests and diseases.
The Beauty of Upcycling
Our project takes sustainability a step further by using upcycled 5-gallon buckets. Not only does this reduce waste, but it also provides a sturdy and spacious container for your plants. It’s a fantastic way to give new life to old materials and grow greener at home.
What You’ll Need
Gathering your materials is the first step to a successful DIY project:
- Two 5-gallon plastic buckets (one with a lid, if possible)
- Drill with a ½-inch to 1-inch drill bit
- Utility knife or strong scissors
- Cotton rope, old T-shirt strips, or felt fabric for wicks
- Potting mix (high-quality, well-draining)
- Your chosen plants
- Optional: Landscape fabric or mesh screen
Step-by-Step Guide to Building Your Self-Watering Planter
Step 1: Prepare Your Buckets
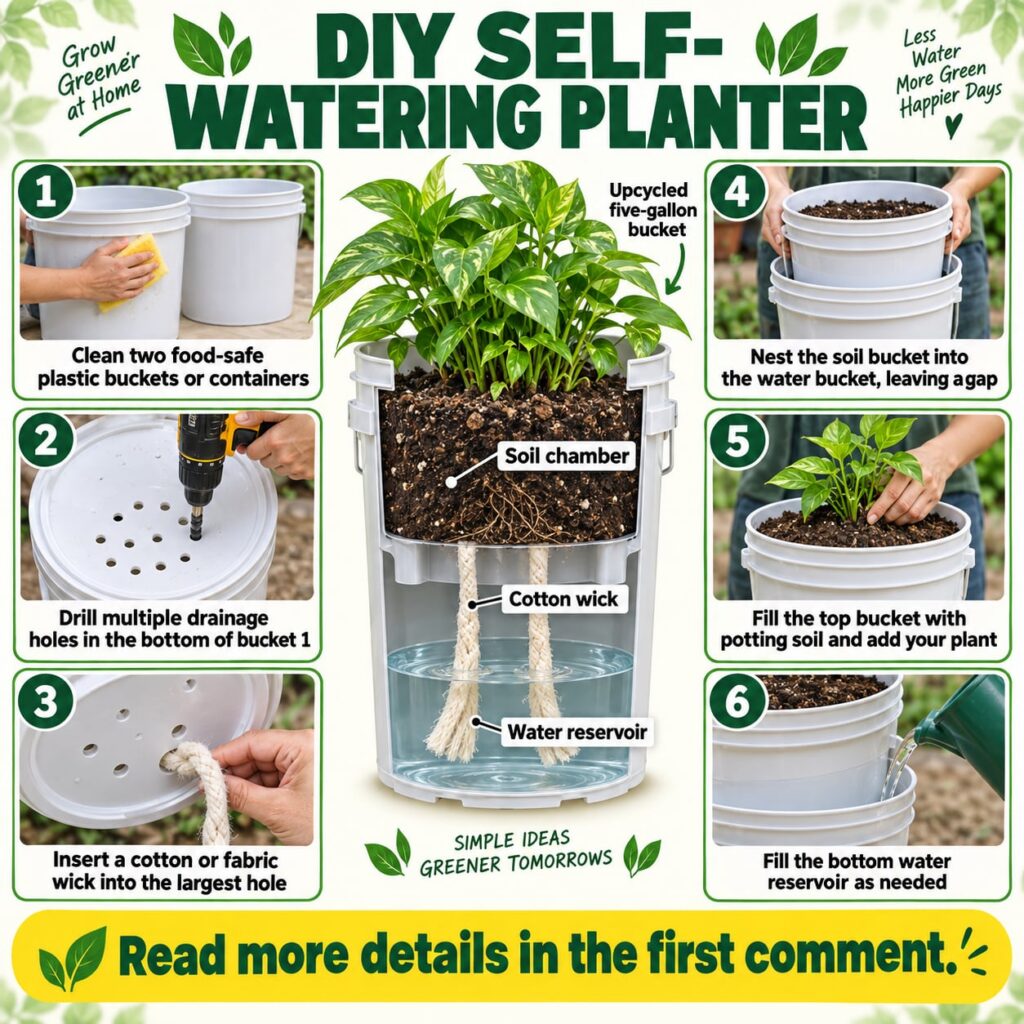
Start by thoroughly cleaning both buckets. One bucket will act as the water reservoir, and the other (or the top part of it) will hold the soil and plant. Ensure they are free from any residue.
Step 2: Create the Soil Chamber
Take one bucket. This will be your ‘soil chamber’ or inner bucket. Drill several drainage holes (about 6-8) in the bottom of this bucket. These holes will allow water to wick up to the soil. If using a lid, you can cut a large hole in the center of the lid to act as a support for the inner bucket, or simply rest the inner bucket directly inside the reservoir bucket.
Step 3: Add the Wicking System
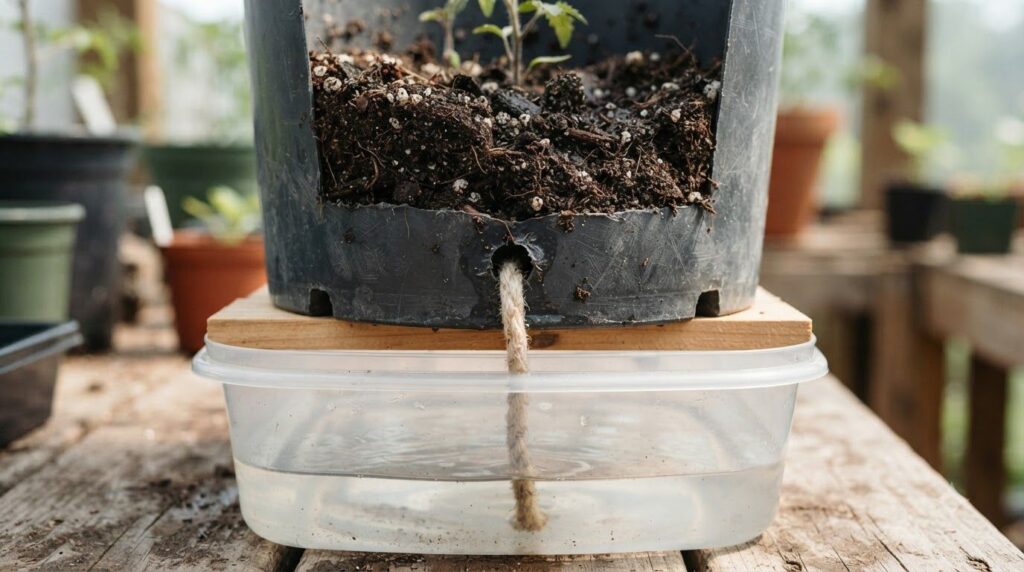
Cut 2-3 lengths of your chosen wicking material (cotton rope, fabric strips) about 18-24 inches long. Thread one end of each wick through different drainage holes in the bottom of your soil chamber bucket. The wicks should hang down into what will be the water reservoir below and extend up into the soil chamber.
Step 4: Create the Water Reservoir
Take your second bucket. This will be the ‘water reservoir’ or outer bucket. If you’re using a lid, place it on this bucket, ensuring the cut-out hole is aligned if you’re using it for support. The soil chamber bucket will nest inside this reservoir bucket, with the wicks extending into the water at the bottom.
Step 5: Nest and Plant
Carefully lower the soil chamber bucket (with wicks threaded) into the water reservoir bucket. The wicks should extend into the bottom of the reservoir. Fill the soil chamber bucket with your high-quality potting mix. Then, plant your chosen plant into the soil, following its specific planting instructions.
Step 6: Fill the Water Reservoir
Add water to the reservoir. You can do this by carefully pouring water down the side of the inner bucket or, ideally, by drilling a small ½-inch hole in the side of the outer reservoir bucket, just below the rim of the inner bucket. This allows for easy refilling without disturbing the plant. Fill until the water reaches just below the bottom of the inner bucket.
Best Plants for Self-Watering Planters
Many plants thrive in self-watering systems, especially those that prefer consistent moisture. Great choices include:
- Vegetables: Tomatoes, peppers, lettuce, spinach, kale, cucumbers, beans, strawberries.
- Herbs: Basil, mint, cilantro, parsley.
- Flowers: Petunias, impatiens, fuchsias, coleus.
- Indoor Plants: Many tropical houseplants also benefit from this consistent moisture.
Avoid plants that prefer very dry conditions, like cacti or succulents, as they might be prone to root rot in a consistently moist environment.
Tips for Success
- Monitor Water Levels: Especially in the beginning, check the reservoir regularly until you get a feel for how quickly your plant uses water.
- Fertilize Thoughtfully: Nutrients can leach out of the soil faster with constant moisture. Use a slow-release fertilizer or liquid fertilizer diluted in the reservoir.
- Clean Annually: At the end of the growing season, clean your buckets to prevent algae buildup and ensure optimal performance for the next season.
Building your own self-watering planter is a rewarding project that promotes healthier plants and a more sustainable gardening practice. Give it a try and enjoy the ‘less water, more green, happier days’ in your garden!