Unlock Your Gardening Success: 6 Seed Tests
Every gardener dreams of a bountiful harvest and thriving plants. But sometimes, despite all your efforts, seeds just don’t sprout. The secret to a successful garden often begins long before the first sprout emerges: with viable seeds! Knowing whether your seeds are still good can save you time, effort, and disappointment. Instead of blindly planting and hoping for the best, why not test your seeds first?
Today, we’re diving into six simple yet effective seed viability tests you can easily do at home. These tests will help you determine which seeds are ready to burst with life and which might be best for the compost pile. Let’s get started on ensuring your gardening success!
Why Test Your Seeds?
Seeds are living things, and like all living things, they have a shelf life. Factors like age, storage conditions, and environmental stresses can impact their ability to germinate. Testing your seeds helps you:
- Save Time and Resources: Avoid planting dead seeds that will never sprout, freeing up valuable garden space and your precious time.
- Increase Success Rate: Plant only the seeds most likely to germinate, leading to fuller beds and healthier plants.
- Optimize Planting Density: Adjust how many seeds you plant based on their viability rate, ensuring you don’t over or under-plant.
The 6 Essential Seed Viability Tests
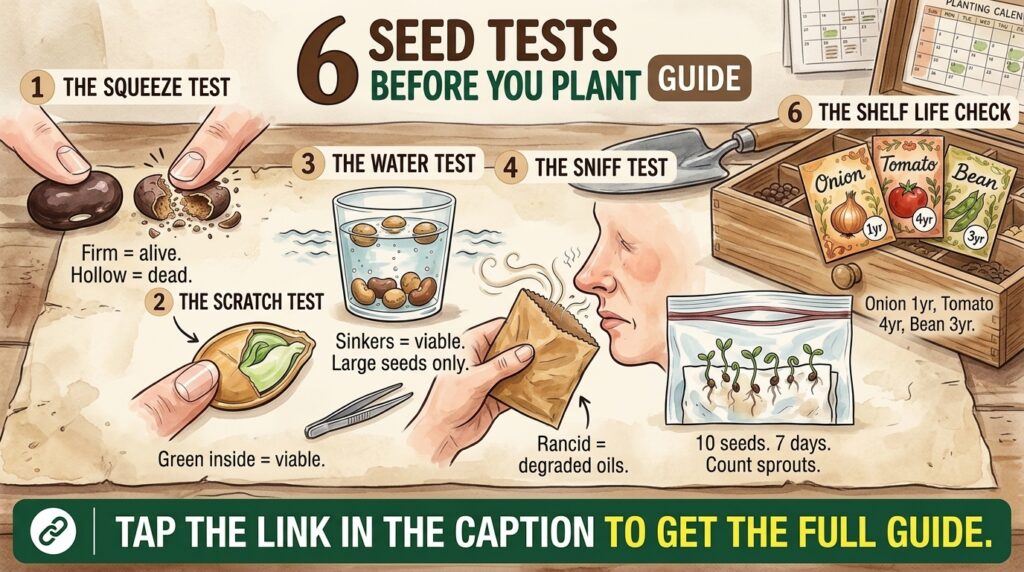
1. The Water Test (Float Test)
This is one of the simplest and quickest tests, especially for larger seeds. Fill a glass or bowl with water and drop your seeds in. Let them sit for 15-30 minutes (some recommend up to an hour or longer for very dry seeds).
- Viable Seeds: Generally, good, healthy seeds will absorb water and sink to the bottom.
- Non-Viable Seeds: Seeds that float are often hollow or otherwise compromised and are unlikely to germinate.
Note: This test isn’t foolproof for all seeds, as some viable seeds might naturally float due to their structure, and some unviable ones might sink if waterlogged. Use it as a quick first indicator.
2. The Paper Towel Test (Germination Test)
This method gives you a clear germination rate and works well for most medium to small seeds.
- Moisten a paper towel (it should be damp, not dripping wet).
- Spread 10-20 seeds evenly on one half of the paper towel.
- Fold the other half over the seeds, or roll the paper towel up loosely.
- Place the folded/rolled paper towel into a plastic bag or covered container to retain moisture.
- Keep it in a warm spot (like the top of a refrigerator) and check daily, misting to keep it moist.
After a few days to a couple of weeks (depending on the seed type), you’ll see sprouts. Count how many seeds germinated to get your viability percentage. For example, if 8 out of 10 seeds sprout, you have an 80% germination rate.
3. The Squeeze Test / Visual Inspection
Sometimes, all it takes is a good look and a gentle touch. This is particularly useful for larger seeds like beans, peas, or corn.
- Visual Check: Look for any signs of mold, discoloration, insect damage, or shriveling. Healthy seeds typically have a uniform color and plump appearance.
- Squeeze Test: Gently squeeze the seed between your fingers. A healthy, viable seed will feel firm and solid. If it crumbles, feels hollow, or squishes easily, it’s likely not viable.
4. The Soil Germination Test
This is arguably the most accurate test because it mimics actual planting conditions. It’s especially good if you have a small amount of space or want to be absolutely sure.
- Plant 5-10 seeds in a small pot or tray filled with seed-starting mix, following the recommended planting depth and spacing for that particular seed type.
- Water thoroughly and keep the soil consistently moist.
- Place the pot in a warm location, ideally with some indirect light.
Monitor for germination. This test takes longer than the paper towel method but provides the most realistic insight into how your seeds will perform in the garden.
5. The Cut Test (for Larger Seeds)
For larger seeds, you can cut them open to inspect their internal structure. This requires sacrificing a few seeds, but it can quickly tell you if the embryo is healthy.
- Carefully cut a seed in half with a sharp knife or razor blade.
- Examine the cross-section. You should see a plump, firm embryo inside, often white or pale yellow.
If the inside is shriveled, discolored, or completely hollow, the seed is likely not viable.
6. The Warm Water Soak Test
Some seeds, especially those with hard outer shells, benefit from a warm water soak to kickstart germination by softening their coats. This isn’t strictly a viability test but can help you prepare stubborn seeds.
- Place seeds in a bowl of warm (not hot!) water for 12-24 hours.
- Change the water after 12 hours if soaking longer.
Seeds that swell slightly indicate they are absorbing water and are likely viable. Plant these softened seeds immediately. This method can also be combined with the float test – those that eventually sink after soaking are usually good candidates for planting.
What to Do After Testing
Once you’ve tested your seeds, you’ll have a much better idea of what to expect:
- High Viability (70%+): You can plant these confidently.
- Medium Viability (40-69%): Plant these more densely than usual to compensate for the lower germination rate.
- Low Viability (Below 40%): It’s probably best to acquire fresh seeds.
Proper storage is key to maintaining seed viability. Keep seeds in a cool, dark, and dry place in airtight containers to prolong their life. Label them clearly with the type of seed and the date collected or purchased.
Incorporating these simple seed tests into your gardening routine will undoubtedly boost your confidence and your success rate. Happy planting, and may your garden flourish!