Have you ever dreamed of harvesting your own fresh, delicious mushrooms right from your home? It’s easier than you think, and oyster mushrooms are a fantastic place to start for any aspiring home gardener! Not only are they incredibly tasty and versatile in the kitchen, but growing them yourself is a rewarding DIY project that connects you with nature.
At Garden – L. Quyên, we believe gardening should be accessible and fun for everyone. That’s why we’ve put together this simple, friendly guide to help you cultivate your own bounty of oyster mushrooms. Let’s dig in!
Why Grow Oyster Mushrooms?
- Delicious & Nutritious: Oyster mushrooms have a delicate flavor and a tender texture, perfect for stir-fries, soups, or even as a meat substitute. They’re also packed with vitamins and minerals!
- Easy to Grow: Compared to other mushroom varieties, oyster mushrooms are quite forgiving and grow relatively quickly, making them ideal for beginners.
- Sustainable & Fun: Reusing materials like coffee grounds, straw, or sawdust as a substrate makes this an eco-friendly hobby. Plus, watching them grow is simply magical!
- Freshness Guaranteed: Imagine picking fresh mushrooms moments before cooking – the flavor and texture are incomparable to store-bought varieties.
What You’ll Need
Before you begin, gather your supplies. Most items can be found around your home or at a local garden supply store:
- Oyster Mushroom Spawn: This is the ‘seed’ of your mushrooms. You can purchase it online.
- Substrate: The material your mushrooms will grow on. Popular choices include:
- Straw (chopped)
- Sawdust or wood pellets (hardwood is best)
- Spent coffee grounds (freshly collected)
- Cardboard (shredded)
- Containers: Food-grade buckets (with drilled holes), sturdy grow bags, or even plastic containers with lids.
- Spray Bottle: For misting and maintaining humidity.
- Large Pot or Pressure Cooker: For pasteurizing your substrate.
- Gloves & Disinfectant: To maintain a sterile environment and prevent contamination.
Step-by-Step Guide to Growing Oyster Mushrooms
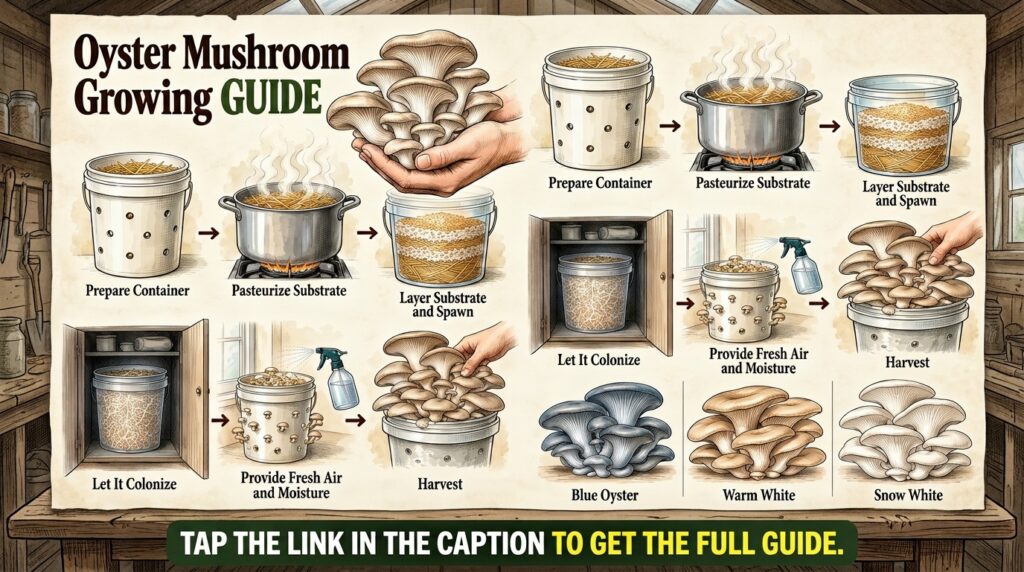
Step 1: Prepare Your Substrate
The substrate needs to be cleaned and partially sterilized (pasteurized) to kill off competing molds and bacteria, giving your mushroom spawn the best chance to thrive.
- Choose your substrate: Straw is a common and effective choice. Chop it into 1-2 inch pieces to increase surface area.
- Pasteurize: Immerse your chosen substrate in hot water (around 160-180°F or 71-82°C) for 1-2 hours. You can do this in a large pot on the stove, ensuring it doesn’t boil. Alternatively, for smaller batches, you can use a microwave or oven. The goal is to reduce competitor organisms, not completely sterilize.
- Cool & Drain: After pasteurization, let the substrate cool down to room temperature (below 75°F or 24°C) and drain any excess water. It should be moist but not dripping wet – like a wrung-out sponge.
Step 2: Inoculation (Mixing Spawn)
This is where you introduce the mushroom spawn to the prepared substrate.
- Clean your workspace: Sanitize your hands, gloves, and all tools with rubbing alcohol or a bleach solution.
- Mix: Break up your mushroom spawn into small pieces. In a clean bucket or bag, layer the cooled substrate with the spawn. A general ratio is about 5-10% spawn by weight of your wet substrate. Mix thoroughly to ensure the spawn is evenly distributed throughout the substrate.
- Pack your container: Tightly pack the inoculated substrate into your chosen grow bags or containers. If using a bucket, make sure it has small holes drilled around the sides (about 1/4 inch diameter, spaced every 4-6 inches) to allow for air exchange and mushroom growth.
Step 3: Incubation (Colonization)
During this phase, the mushroom mycelium (the root structure of the fungus) will grow and colonize the substrate.
- Place in a dark, warm spot: Find a clean, dark place with a consistent temperature between 65-75°F (18-24°C). A closet, pantry, or unused cabinet works well.
- Be patient: Over the next 2-4 weeks, you’ll see white, fuzzy growth spreading throughout your substrate. This is the mycelium. It should completely colonize the substrate before moving to the next stage. Avoid opening the container too much to prevent contamination.
Step 4: Fruiting Conditions
Once the substrate is fully colonized, it’s time to encourage your mushrooms to ‘fruit’ or produce actual mushrooms!
- Introduce light: Move your container to a spot with indirect light, like a bright room but not direct sunlight.
- Increase humidity: This is crucial. Mist the surface of your substrate and the holes in your container several times a day with your spray bottle to keep the air moist. Aim for 85-95% humidity. You can also create a humidity tent by loosely placing a clear plastic bag over your container, ensuring there’s still some airflow.
- Provide fresh air: Oyster mushrooms need fresh air to grow properly. If using a humidity tent, make sure to air it out a few times a day. If using a bucket with holes, simply misting will provide enough air exchange.
- Lower temperature (optional): Some growers slightly lower the temperature to around 60-70°F (15-21°C) during this phase to encourage fruiting, but it’s not strictly necessary if your incubation temperature was in the optimal range.
Step 5: Harvesting Your Delicious Oyster Mushrooms
Once you see small ‘pins’ (tiny mushroom buds) forming, they will grow rapidly!
- Watch for maturity: Oyster mushrooms are ready to harvest when their caps begin to flatten out and their edges start to curl slightly upwards. Don’t wait too long, as they can become tough and release spores.
- Harvest: Gently twist the entire cluster of mushrooms off the substrate at its base. Avoid pulling individual mushrooms, as this can damage the mycelium and reduce future yields.
- Second Flush: After your first harvest, you can often get a second (or even third) flush of mushrooms! Continue to mist and maintain humidity. Sometimes, soaking the block in cold water for a few hours can rehydrate the mycelium and stimulate another flush.
Tips for Success
- Sterility is Key: Always work in a clean environment to prevent contamination from other fungi or bacteria.
- Moisture Control: Too dry, and your mushrooms won’t grow. Too wet, and you risk mold. The substrate should feel consistently moist, like a damp sponge.
- Patience: Gardening, especially with fungi, takes time. Don’t get discouraged if your first attempt isn’t perfect!
- Experiment: Try different substrates or container types to see what works best for you.
Growing oyster mushrooms at home is a wonderfully rewarding experience that adds fresh, organic produce to your kitchen. It’s a fantastic way to engage with the natural world and enjoy the fruits (or fungi!) of your labor. Happy growing, fellow gardeners!