Tired of cabinets overflowing with different cleaning products, each promising a miracle but delivering harsh chemicals and lingering odors? We totally get it. Maintaining a clean and inviting home shouldn’t mean sacrificing your health or your budget. Many conventional cleaners contain ingredients that can irritate skin, lungs, and even contribute to indoor air pollution. Plus, the sheer number of specialized cleaners can make cleaning feel like an overwhelming chore.
Imagine simplifying your cleaning routine with one powerful, natural solution that you can whip up right in your kitchen. That’s exactly what we’re diving into today! This guide is for anyone who dreams of a sparkling clean home without the harshness of store-bought alternatives. Whether you’re a seasoned DIY enthusiast or just beginning your journey into natural home care, you’ll find this recipe straightforward and incredibly effective.
In this article, you’ll discover how to create a versatile, gentle multi-purpose cream cleaner that tackles grime, grease, and dirt on a variety of surfaces. We’ll walk you through each step, from gathering your simple ingredients to expert tips for maximizing its cleaning power. Get ready to transform your cleaning habits and enjoy a fresher, healthier home environment, one gentle swirl at a time!
Why You’ll Love This Guide
- Easy to Prepare: You can mix up a batch in just minutes with minimal effort.
- Uses Common Ingredients: All components are likely already in your pantry or easily found at any grocery store.
- Budget-Friendly: Significantly cheaper than buying multiple specialized cleaning products.
- Beginner-Friendly: No complicated techniques or specialized knowledge required.
- Eco-Friendly: Reduces plastic waste and the introduction of harsh chemicals into your home and the environment.
- Gentle on Surfaces: Effectively cleans without scratching or damaging delicate finishes.
- Customizable: Easily adapt the scent with your favorite essential oils.
- Effective: Tackles tough grime and leaves surfaces sparkling clean.
Ingredients for Your Gentle Multi-Purpose Cream Cleaner
Our goal is to create a cleaner that’s effective, safe, and uses ingredients you can trust. Here’s what you’ll need:
- 1 cup Baking Soda (Sodium Bicarbonate): This is our gentle abrasive and odor absorber, perfect for scrubbing without scratching.
- 1/4 cup Liquid Dish Soap: Choose a mild, preferably eco-friendly, dish soap. It acts as a powerful degreaser and helps lift dirt.
- 1/4 cup Warm Water: Used to create the perfect creamy consistency.
- 10-15 drops Essential Oils (Optional): For a natural scent boost and added cleaning benefits. Popular choices include lemon, tea tree, lavender, or peppermint.
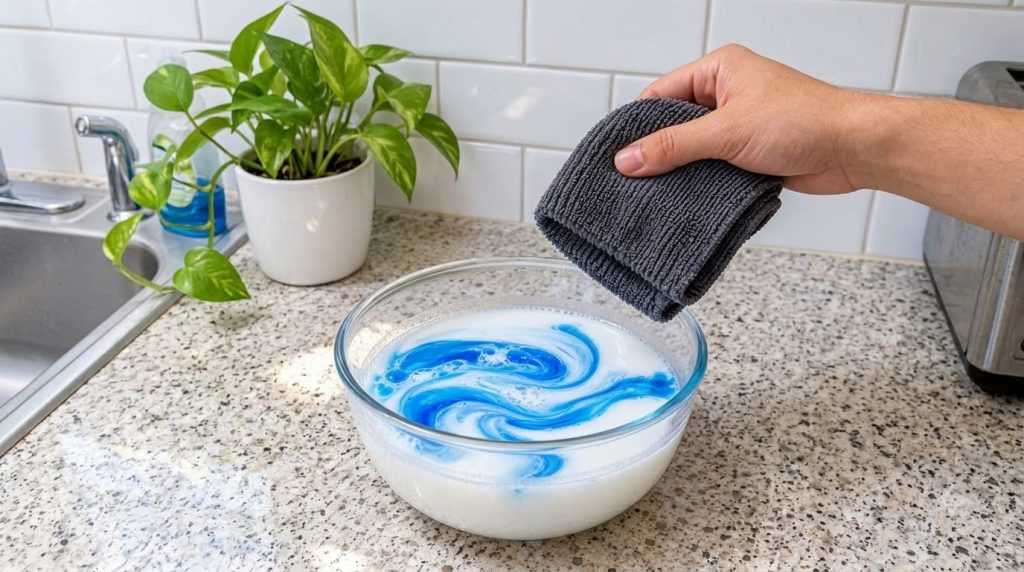
- 1-2 drops Blue Food Coloring (Optional): To mimic the visual inspiration and add a fun pop of color, making your cleaner visually appealing.
Equipment Needed
Gathering your tools beforehand makes the process smooth and quick:
- Mixing Bowl: A medium-sized bowl for combining your ingredients.
- Measuring Cups and Spoons: For accurate quantities.
- Spatula or Spoon: For thoroughly mixing the ingredients.
- Airtight Container: A glass jar, a wide-mouthed plastic tub, or an old (clean) cream cleaner container for storing your homemade solution.
- Microfiber Cloths: Essential for applying and wiping down surfaces for a streak-free shine.
Step-by-Step Instructions: Crafting Your Cream Cleaner
Ready to make your cleaning magic happen? Follow these simple steps:
-
Gather Your Supplies (Estimated Time: 1 minute)
Lay out all your ingredients and equipment on a clean countertop. Having everything within reach will make the process much smoother. Ensure your mixing bowl is clean and dry.
-
Combine Baking Soda (Estimated Time: 30 seconds)
Pour the full cup of baking soda into your mixing bowl. This is the foundation of your gentle abrasive cleaner.
-
Add Liquid Dish Soap (Estimated Time: 30 seconds)
Next, add 1/4 cup of liquid dish soap directly onto the baking soda. The soap will immediately begin to interact with the powder, forming a slightly clumpy mixture.
-
Introduce Warm Water Gradually (Estimated Time: 2-3 minutes)
Slowly begin adding the 1/4 cup of warm water, a little at a time, while continuously stirring with your spatula or spoon. The mixture will start to fizz slightly as the baking soda reacts with the water. Keep stirring until you achieve a smooth, creamy paste consistency, similar to a soft scrub or a thick lotion. If you’re adding blue food coloring, now is the time to swirl in 1-2 drops for that lovely visual effect, mixing until the color is evenly distributed.
-
Mix in Essential Oils (Optional) (Estimated Time: 1 minute)
If you’ve chosen to add essential oils, drip 10-15 drops into your cream cleaner. Stir well to ensure the oils are thoroughly incorporated, infusing your cleaner with a delightful, natural fragrance and potentially boosting its cleaning power.
-
Transfer to Storage (Estimated Time: 1 minute)
Carefully spoon your freshly made multi-purpose cream cleaner into your chosen airtight container. Seal it tightly to maintain freshness and prevent it from drying out.
-
How to Use Your Cleaner (Estimated Time: Varies per task)
To use, simply scoop a small amount onto a damp microfiber cloth or sponge. Gently rub the cleaner onto the surface you wish to clean, working in small sections. For tougher spots, allow it to sit for a minute or two. Then, wipe away with a clean, damp cloth and buff dry with another clean, dry microfiber cloth for a sparkling finish. This cleaner is excellent for sinks, countertops (test first!), stovetops, bathtubs, and tiles.
Expert Tips for Best Results
- Adjust Consistency: If your cleaner is too thick, add a tiny bit more water. If it’s too runny, incorporate a little more baking soda until you reach your desired creamy texture.
- Always Test First: Before applying to a large area, especially on delicate or new surfaces, always test the cleaner on an inconspicuous spot to ensure compatibility and prevent any discoloration or damage.
- Scent Customization: Experiment with different essential oil blends! Lemon and peppermint offer an invigorating clean, while lavender provides a calming aroma. Tea tree oil adds an extra antimicrobial boost.
- For Tougher Grime: For stubborn stains or built-up grease, apply a slightly thicker layer of the cleaner and let it sit for 5-10 minutes before scrubbing gently and wiping clean.
- Use Quality Microfiber: Good quality microfiber cloths are crucial for achieving streak-free results and maximizing the cleaner’s effectiveness without scratching.
- Not for All Surfaces: While gentle, avoid using baking soda-based cleaners on very delicate surfaces like unsealed granite, marble, or unvarnished wood, as it can potentially etch or dull the finish over time.
- Keep it Fresh: For optimal performance, try to use your batch within a few weeks, as homemade cleaners don’t contain commercial preservatives.
Variations
One of the beauties of DIY cleaning solutions is the ability to customize them to your specific needs and preferences:
- Fragrance-Free Version: Simply omit the essential oils if you prefer a cleaner with no added scent, or if you have sensitivities to fragrances.
- Heavy-Duty Scrub: For areas requiring a more abrasive scrub (like stubborn baked-on grime in ovens or severely stained grout), reduce the amount of water slightly to create a thicker, stiffer paste. Apply, let sit, then scrub with a brush.
- Liquid Spray Cleaner: While this recipe is for a cream, you can adapt it. For a sprayable cleaner, use only 1-2 tablespoons of baking soda, 1/4 cup dish soap, and 1-2 cups of warm water. Shake well before each use as the ingredients will separate. Note: this will not have the same scrubbing power as the cream.
- Citrus Boost: While baking soda reacts with vinegar, you can add a tablespoon of fresh lemon juice for extra degreasing power. Use immediately after adding, as the reaction will cause fizzing, and store any leftovers without the lemon juice.
Storage Instructions
Proper storage ensures your homemade cleaner remains effective and safe to use:
- Best Containers: Store your multi-purpose cream cleaner in an airtight container, such as a glass jar with a lid, a reusable plastic tub, or even an old (thoroughly cleaned and disinfected) cream cleaner container. This prevents it from drying out and maintains its consistency.
- Shelf Life: Since this cleaner contains water and no preservatives, it’s best to use it within 2-3 weeks. Over time, its effectiveness might diminish, and there’s a slight chance of bacterial growth if not stored properly.
- Refrigeration: Refrigeration is not necessary, but storing it in a cool, dry place away from direct sunlight will help prolong its freshness.
- Signs of Spoilage: If you notice any unusual odor, mold growth, or significant changes in consistency, it’s best to discard the batch and make a fresh one.
Safety Notes
While this cleaner uses natural ingredients, it’s essential to practice safe handling, especially when cleaning around your home:
- Not for Consumption: This cleaner is for external use only. Keep it out of reach of children and pets. Label your container clearly as a cleaning product.
- Eye Contact: Avoid direct contact with eyes. If contact occurs, flush thoroughly with water. If irritation persists, seek medical attention.
- Surface Compatibility: Always perform a patch test on an inconspicuous area of any new surface before widespread application. As mentioned, avoid unsealed natural stone (like marble or granite) and unvarnished wood.
- Ventilation: While natural, it’s always good practice to clean in a well-ventilated area.
- Do Not Mix with Other Chemicals: Never mix this homemade cleaner with commercial cleaning products, especially those containing bleach. Mixing bleach with dish soap can create toxic fumes. Stick to using your DIY cleaner on its own.
- Wear Gloves (Optional): If you have sensitive skin, consider wearing gloves to protect your hands, especially during extended cleaning sessions.
Frequently Asked Questions
How long does this multi-purpose cream cleaner last?
Due to its natural ingredients and lack of preservatives, it’s best to use this cleaner within 2-3 weeks for optimal freshness and effectiveness.
Can I prepare it in advance?
Yes, you can prepare a batch in advance and store it in an airtight container. Just be mindful of the recommended shelf life.
Can I swap an ingredient, like using a different type of soap?
You can experiment with different mild liquid dish soaps. However, avoid harsh soaps or those with strong chemicals, as they might not be as gentle or effective in this specific formulation.
Does it work on all surfaces?
It works wonderfully on most non-porous surfaces like stainless steel, ceramic, porcelain, laminate, and sealed countertops. Always perform a patch test on an inconspicuous area, especially on delicate or unfamiliar surfaces like unsealed natural stone or unvarnished wood.
Is it safe for pets and children?
While made with natural ingredients, it is a cleaning product and should be kept out of reach of children and pets. It is not intended for consumption.
What if my cleaner separates or dries out in the container?
If it separates, simply give it a good stir. If it dries out, you can try adding a tiny bit of warm water and stirring vigorously to revive it, though it might not return to its original consistency.
Can I use this cleaner on floors?
For spot cleaning tough stains on floors, yes. For general floor cleaning, a more diluted, liquid solution is typically better. You might consider a separate DIY floor cleaner recipe.
Does this cleaner disinfect surfaces?
While baking soda and soap are excellent at cleaning and removing germs, this recipe is primarily a cleaner, not a disinfectant. For true disinfection, you might need a separate solution like diluted hydrogen peroxide after cleaning.
Why did my cleaner fizz when I added water?
The fizzing is a normal reaction between the baking soda (a base) and water, which contains some acidity. It’s part of the process of creating the creamy texture.
Conclusion
There you have it – a simple, effective, and incredibly satisfying way to achieve a sparkling clean home with your very own gentle multi-purpose cream cleaner! By harnessing the power of common household ingredients, you’ve not only created a cleaner that’s kind to your surfaces but also to your wallet and the environment. No more harsh chemical fumes or endless bottles under the sink!
Embracing DIY cleaning solutions like this empowers you to take control of what goes into your home and onto your surfaces. It’s a small change that yields big results, bringing a sense of accomplishment and a breath of fresh air to your cleaning routine. So, go ahead, give this recipe a try, and experience the gentle swirl of clean for yourself. Your home (and your nose!) will thank you for it!