Sparkle and Shine: Your DIY Tile and Grout Cleaning Solution
Are your tile floors looking dull and the grout lines a dingy mess, making your entire room feel less fresh? You’re not alone! Over time, dirt, grime, and everyday spills can take their toll, leaving your beautiful tiles looking lackluster. But before you reach for harsh chemicals, consider this simple and effective DIY cleaning solution designed to bring back the sparkle to your tiled surfaces.
This homemade cleaner uses common household ingredients to tackle stubborn dirt and leave your floors looking significantly cleaner without excessive scrubbing. It’s an affordable and practical way to revitalize your tiles and make your home feel brighter.
What You’ll Need
Ingredients:
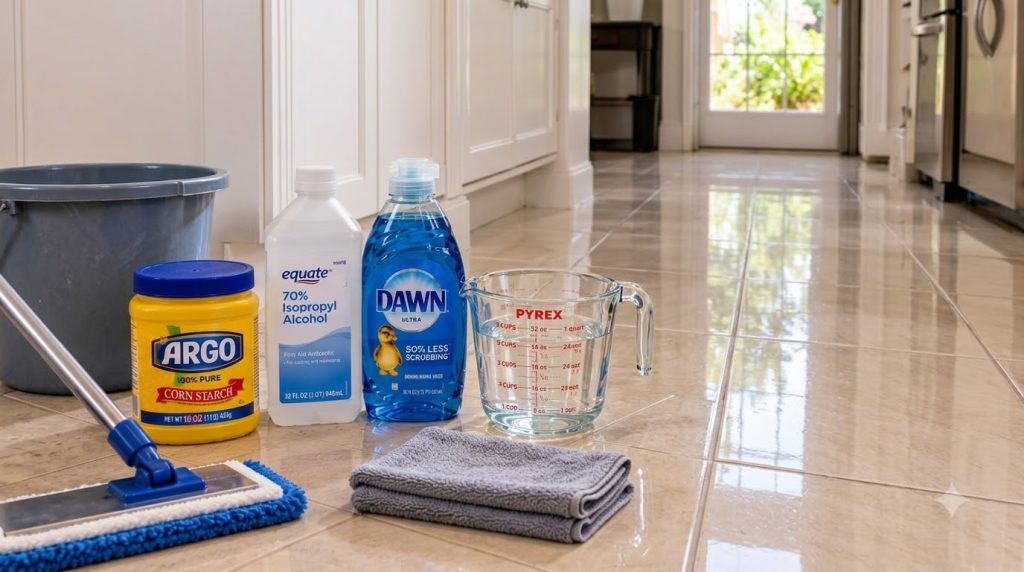
- 2 gallons warm water
- 1/2 cup corn starch
- 1 cup isopropyl alcohol
- 2 tablespoons liquid dish soap
Tools:
- Large cleaning bucket
- Measuring cups and spoons
- Mop (preferably one with a good scrubbing surface or a microfiber head)
- Microfiber cloths or old towels for wiping/drying
Why This DIY Can Be Useful
Each ingredient in this DIY cleaner plays a specific role in tackling floor grime:
- Corn Starch: Often used as a thickening agent, corn starch in cleaning solutions can act as a mild abrasive and help absorb grease and dirt, contributing to a streak-free shine on many surfaces.
- Isopropyl Alcohol: This ingredient is excellent for breaking down grease and oil, and it evaporates quickly, which helps prevent streaks and water spots. It also has some disinfectant properties.
- Liquid Dish Soap: A powerful degreaser, dish soap cuts through tough dirt and grime, helping to lift it from your tile and grout surfaces.
How to Make It
This solution is incredibly easy to mix together:
- Pour 2 gallons of warm water into your large cleaning bucket.
- Add 1/2 cup of corn starch to the water. Stir well until the corn starch is mostly dissolved and no clumps remain.
- Pour in 1 cup of isopropyl alcohol.
- Add 2 tablespoons of liquid dish soap.
- Stir all the ingredients thoroughly until they are well combined. Your cleaning solution is now ready to use!
How to Use It
Follow these steps for sparkling clean tile floors and brighter grout:
- Prepare Your Floors: Before applying the solution, thoroughly sweep or vacuum your entire tiled area to remove any loose dirt, dust, and debris. This prevents you from just pushing dirt around.
- Apply the Solution: Dip your mop into the cleaning solution, wringing out any excess so the mop is damp, not dripping wet. Mop a small section of your tiled floor, focusing on one area at a time.
- Let it Work: Allow the solution to sit on the tiles for about 5-10 minutes. This gives the ingredients time to penetrate and break down the grime, especially in the grout lines. For heavily soiled areas, you might use a soft-bristled brush to gently scrub the grout during this time.
- Mop Again: After the waiting time, mop the section again, using clean, firm strokes to lift the loosened dirt.
- Rinse (Optional but Recommended): For best results and to prevent any residue, follow up by mopping with clean, warm water. Change your rinse water frequently to ensure you’re picking up dirt, not spreading it.
- Dry: For an extra streak-free finish, especially on shiny tiles, wipe the floor dry with a clean, dry microfiber cloth or allow it to air dry completely.
What to Expect
After using this DIY cleaner, you can expect visibly cleaner tiles and noticeably brighter grout lines. While it may not reverse years of neglect instantly, regular use can maintain the cleanliness and shine of your floors. The solution is designed to tackle everyday grime, reduce streaks, and leave a refreshed appearance without the use of harsh chemicals.
Helpful Tips
- Test First: Always test the solution in an inconspicuous area of your floor before cleaning the entire surface, especially if you have sensitive or specialty tiles.
- Warm Water Works Best: Using warm water helps the ingredients mix better and can aid in breaking down grime more effectively.
- Change Mop Water: If you’re cleaning a large area, change your dirty cleaning solution and rinse water regularly to avoid spreading dirt.
- Ventilation: Ensure good ventilation in the area you are cleaning, especially when using isopropyl alcohol.
Important Notes / Safety
- Slippery Surfaces: Floors will be slippery when wet with the cleaning solution. Exercise caution to prevent falls.
- Surface Compatibility: While generally safe for most sealed ceramic and porcelain tiles, avoid using this solution on unsealed natural stone tiles (like marble, granite, or slate) or hardwood floors, as the ingredients may cause damage.
- Storage: Prepare only as much solution as you plan to use. Do not store leftover solution for extended periods, as its effectiveness may diminish, and the corn starch can settle or clump.