Tired of scrubbing endlessly with commercial cleaners that don’t quite deliver? What if we told you that many of your toughest cleaning challenges could be conquered with simple combinations of common household ingredients? It’s time to unlock the power of smart cleaning, transforming your routine from a chore into a satisfying triumph.
This comprehensive guide is for anyone looking to make cleaning easier, more affordable, and effective using everyday items you likely already have. Whether you’re a seasoned DIY enthusiast or just starting your journey to a sparkling home, these hacks are designed to be straightforward and deliver noticeable results.
We’ll dive into specific, clever combinations that tackle everything from stubborn water stains on stainless steel to discolored grout and smelly plastic containers. Get ready to discover ingenious solutions that will leave your home looking and feeling fresh without resorting to harsh chemicals.
Quick Summary
- Preparation Time: 5-10 minutes (per solution)
- Application Time: 5-30 minutes (depending on task)
- Difficulty Level: Easy
- Best Uses: Stainless steel polishing, odor removal from plastics, grout whitening, dust removal from high surfaces.
- Suitable Surfaces: Stainless steel, various plastics, ceramic tile grout, painted or plastic fan blades. (Always test first!)
- Storage Time: Varies; solutions are best used fresh.
Why You’ll Love These DIY Solutions
- Easy to Make: Simple recipes using readily available items.
- Budget-Friendly: Save money on specialized cleaning products.
- Uses Common Household Ingredients: No need for exotic purchases.
- Beginner-Friendly: Clear, step-by-step instructions.
- Multipurpose: Many ingredients have multiple uses around the home.
- Effective: Proven to tackle specific cleaning challenges.
- Reduces Chemical Exposure: Rely on natural or milder alternatives.
- Quick to Prepare: Solutions come together in minutes.
Ingredients / Materials
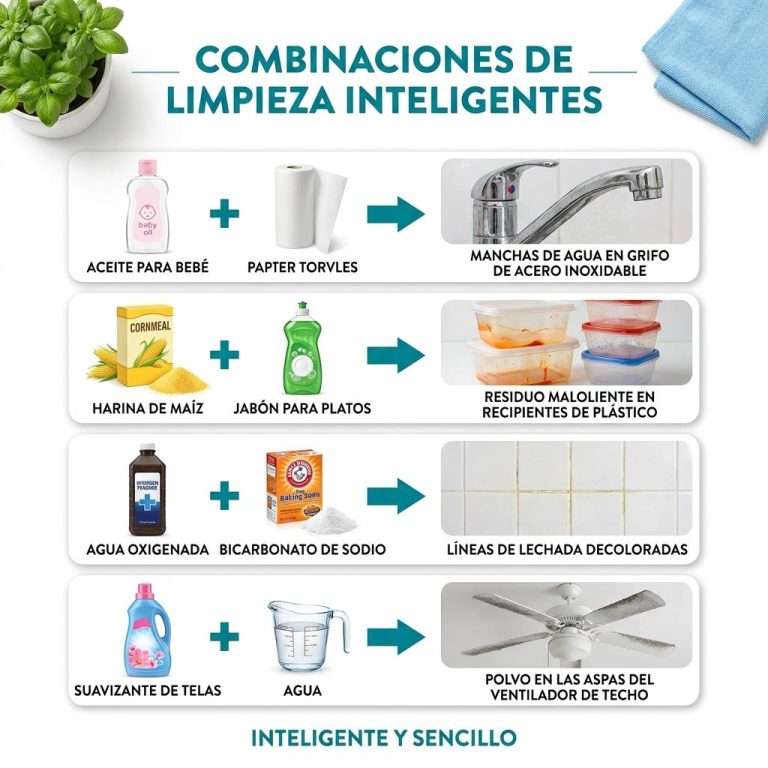
For Stainless Steel Water Stain Removal & Polish
- 1-2 tablespoons baby oil
- 2-3 sheets of paper towels or a microfiber cloth
For Smelly Plastic Containers
- 1/4 cup cornmeal
- 1 teaspoon dish soap
- 1/2 cup warm water
For Discolored Grout Lines
- 1/2 cup baking soda
- 1/4 cup hydrogen peroxide (3%)
For Dusty Ceiling Fan Blades
- 1/4 cup fabric softener
- 1 cup warm water
Equipment Needed
- Small mixing bowl
- Spoon or whisk
- Spray bottle (for fan cleaner)
- Microfiber cloths (multiple)
- Paper towels
- Old toothbrush or grout brush
- Gloves (optional, but recommended for grout cleaning)
- Step stool or ladder (for ceiling fan cleaning)
Step-by-Step Instructions
1. Stainless Steel Water Stain Removal & Polish
What to do: This hack works wonders on refrigerators, dishwashers, and sinks.
- Apply a small amount: Dab a few drops of baby oil onto a clean paper towel or microfiber cloth. You only need a thin film.
- Wipe with the grain: Gently wipe the stainless steel surface, moving in the direction of the grain. This helps to avoid streaks and ensures an even polish. Focus on areas with water stains or smudges.
- Buff to a shine: Using a clean, dry part of the cloth or a fresh paper towel, buff the surface until it shines and any excess oil is removed.
Helpful tips: A little goes a long way. Too much oil can leave a greasy residue. Works best on dry surfaces.
Expected result: Water stains disappear, and the stainless steel has a streak-free, gleaming finish.
Approximate time: 5 minutes per appliance.
2. Smelly Plastic Containers
What to do: Say goodbye to lingering food odors like garlic or tomato sauce in your plastic food storage.
- Combine ingredients: In a small bowl, mix 1/4 cup cornmeal, 1 teaspoon dish soap, and 1/2 cup warm water to form a thick paste.
- Apply to container: Scoop the paste into the smelly plastic container.
- Scrub gently: Use a sponge or brush to scrub the inside of the container with the cornmeal mixture. The cornmeal acts as a gentle abrasive, while the soap lifts odors.
- Let it sit (optional): For stubborn odors, let the paste sit in the container for 15-30 minutes.
- Rinse thoroughly: Wash the container with warm, soapy water and rinse completely.
Helpful tips: Ensure all corners and crevices are scrubbed. The cornmeal helps absorb and lift odors.
Expected result: Plastic containers will be free of food odors.
Approximate time: 10-20 minutes, including soak time.
3. Discolored Grout Lines
What to do: Bring your tile grout back to life in bathrooms and kitchens.
- Create the paste: In a small, non-metal bowl, combine 1/2 cup baking soda and 1/4 cup hydrogen peroxide. Mix until a thick, spreadable paste forms.
- Apply to grout: Using an old toothbrush or a grout brush, apply the paste directly onto the discolored grout lines.
- Let it work: Allow the paste to sit on the grout for 10-15 minutes. You might see a gentle bubbling action, which indicates it’s working.
- Scrub: Vigorously scrub the grout lines with the brush.
- Rinse: Wipe away the paste with a damp cloth or rinse the area thoroughly with water.
Helpful tips: Ensure good ventilation when working with hydrogen peroxide. Wear gloves to protect your hands.
Expected result: Grout lines will appear noticeably brighter and cleaner.
Approximate time: 15-30 minutes, depending on the area.
4. Dusty Ceiling Fan Blades
What to do: Clean dusty fan blades without dust falling everywhere.
- Prepare the solution: In a spray bottle, combine 1/4 cup fabric softener with 1 cup warm water. Shake gently to mix.
- Spray a cloth: Lightly spray a clean microfiber cloth with the fabric softener solution. Do not spray directly onto the fan.
- Wipe the blades: Carefully climb a sturdy step stool or ladder. Starting with one blade, wipe both the top and bottom surfaces with the damp cloth. The fabric softener helps to pick up dust and leaves a static-free finish that repels future dust.
- Repeat for all blades: Continue wiping each blade until all are clean.
Helpful tips: Always ensure the fan is turned off and completely still before cleaning. Place an old sheet or newspaper on the floor below to catch any rogue dust.
Expected result: Dust-free fan blades, with a residue that helps repel dust for longer.
Approximate time: 10-15 minutes.
Best Uses
- Stainless Steel Water Stain Remover: Ideal for refrigerators, ovens, dishwashers, and stainless steel sinks. Not recommended for brushed stainless steel if you prefer a less shiny finish.
- Smelly Plastic Container Refresher: Perfect for lunchboxes, food storage containers, and plastic cutting boards that retain odors.
- Grout Brightener: Excellent for ceramic tile grout in bathrooms, kitchens, and entryways. Avoid using on unsealed natural stone tiles or colored grout without testing first, as it could affect color or finish.
- Dusty Ceiling Fan Cleaner: Safely cleans most ceiling fan blades made of metal, plastic, or wood. Not for use on delicate fabric shades.
Safety Notes
- Always test any new cleaning solution on a small, inconspicuous area first to ensure it doesn’t damage the surface.
- Wear gloves, especially when working with hydrogen peroxide or if you have sensitive skin.
- Ensure good ventilation when using any cleaning agents, even natural ones.
- Keep all cleaning solutions and ingredients out of reach of children and pets.
- Never mix hydrogen peroxide with bleach, as this can create dangerous gases.
- When cleaning high surfaces like ceiling fans, always use a stable ladder or step stool and ensure the fan is powered off and stationary.
Expert Tips
- Consistency is Key: For best results, incorporate these hacks into your regular cleaning routine.
- For Tough Grout Stains: After applying the baking soda and hydrogen peroxide paste, you can let it sit for up to 30 minutes before scrubbing for extra power.
- Baby Oil Alternatives: Mineral oil or even olive oil (use sparingly to avoid rancidity) can be used as alternatives for stainless steel polishing, though baby oil is often preferred for its light scent and consistency.
- Maximize Odor Absorption: For very stubborn smells in plastic, after cleaning with cornmeal, you can place a crumpled piece of newspaper or a sprinkle of baking soda inside the dry container and seal it overnight.
- Preventing Dust Build-up: The fabric softener solution not only cleans but also leaves a static-reducing film. Reapply this solution every few months to keep fan blades dust-free longer.
- Use Dedicated Cloths: Keep separate microfiber cloths for different tasks (e.g., one for stainless steel, one for fans) to prevent cross-contamination or residue transfer.
- Warm Water Boosts Effectiveness: For many DIY solutions, using warm water helps ingredients dissolve better and can improve cleaning power.
Storage Instructions
Most of these DIY cleaning solutions are best made fresh right before use for maximum effectiveness. If you have any leftover solution:
- Stainless Steel Polish (Baby Oil): No need to store a mixed solution. Simply keep your baby oil bottle in a cool, dry place.
- Smelly Plastic Container Paste: This paste should be discarded after use. The cornmeal can spoil if stored.
- Grout Cleaning Paste: Similarly, this paste is most effective when freshly made. Hydrogen peroxide loses its potency when exposed to light, so any leftover paste should be discarded.
- Ceiling Fan Cleaner (Fabric Softener Solution): This solution can be stored in a labeled spray bottle for up to one week in a cool, dark place. Discard if it becomes cloudy or develops an odor. Always shake well before each use.
Frequently Asked Questions
Can I store these DIY solutions long-term?
Most of these specific solutions are best used fresh for optimal effectiveness. Hydrogen peroxide-based mixtures and cornmeal pastes are not designed for long-term storage.
How often should I use these cleaning hacks?
It depends on the area and usage. Stainless steel can be polished weekly, plastic containers as needed, grout every few months, and ceiling fans quarterly or bi-annually.
Are these solutions safe for all surfaces?
No, always test in an inconspicuous area first. Specifically, avoid hydrogen peroxide on unsealed natural stone and use baby oil sparingly on brushed stainless steel.
Can I substitute ingredients if I don’t have them?
Substitutions should be made with caution. For instance, white vinegar might clean grout, but the baking soda/peroxide combination offers a specific whitening action. Stick to the recommended ingredients for best results.
Are these solutions safe around pets and children?
While they use common household items, always keep cleaning solutions and ingredients out of reach of children and pets. Ensure areas are rinsed thoroughly after cleaning.
Will these solutions damage my hands?
While generally mild, some ingredients like hydrogen peroxide can be drying or irritating to sensitive skin. Wearing gloves is always a good precaution.
Can I use rubbing alcohol instead of baby oil on stainless steel?
Rubbing alcohol can clean stainless steel, but baby oil is used here specifically to polish and leave a streak-free, protective shine. They serve different purposes.
Conclusion
Transforming your home cleaning routine doesn’t require an arsenal of expensive, harsh chemicals. With these smart cleaning combinations, you have the power to tackle common household grime and dirt using simple, effective ingredients already found in your pantry or medicine cabinet. From restoring the gleam to your stainless steel to banishing odors from plastic and brightening up dull grout, these DIY hacks offer practical solutions for a cleaner, fresher home.
So go ahead, pick a problem area, gather your ingredients, and give these methods a try. You’ll be amazed at the results and enjoy the satisfaction of a sparkling home, cleaned the smart and simple way. Happy cleaning!