Are you tired of scrubbing your toilet bowl endlessly, only to see those stubborn brown, yellow, or reddish-orange stains persist? You’re not alone! Hard water, mineral deposits, and rust can leave behind unsightly marks that conventional cleaners often struggle to remove. These stains aren’t just an aesthetic problem; they can also be a breeding ground for bacteria, making your bathroom feel less than pristine.
But what if we told you there’s a simple, natural, and highly effective solution hiding in your pantry? White vinegar, a common household staple, is a cleaning powerhouse, especially when it comes to breaking down tough mineral deposits without harsh chemicals. It’s an eco-friendly alternative that’s safer for your home, your family, and the environment.
This guide is for anyone looking to ditch strong chemical cleaners and embrace a more natural approach to a sparkling clean toilet. Whether you’re dealing with years of built-up grime or just persistent hard water rings, vinegar can come to the rescue. Get ready to transform your toilet bowl from grimy to gleaming with just a few easy steps and some good old-fashioned vinegar power!
In this comprehensive guide, you’ll learn the exact method to use vinegar to tackle even the toughest toilet stains. We’ll cover everything from the basic ingredients and equipment you’ll need to step-by-step instructions, safety tips, and expert advice to ensure your toilet stays sparkling clean. Let’s get started and discover the magic of vinegar!
Quick Summary
- Preparation Time: 2 minutes
- Application Time: 5-10 minutes (active scrubbing)
- Difficulty Level: Easy
- Best Uses: Removing hard water stains, mineral deposits, rust rings, and general grime in toilet bowls.
- Suitable Surfaces: Ceramic toilet bowls and porcelain.
- Storage Time: Not applicable (vinegar is used directly, not pre-mixed into a storable solution).
Why You’ll Love This DIY Solution
- Budget-Friendly: White vinegar is inexpensive and readily available.
- Easy to Make: No complicated mixing or special techniques required.
- Uses Common Household Ingredients: You likely already have everything you need.
- Beginner-Friendly: Simple instructions that anyone can follow.
- Eco-Friendly: A natural alternative to harsh chemical cleaners, reducing your exposure to toxins.
- Effective on Tough Stains: Acids in vinegar break down mineral deposits and limescale.
- Odor Neutralizer: Helps eliminate unpleasant bathroom odors.
- Versatile: While focused on toilets, vinegar is a general-purpose cleaning hero.
Ingredients / Materials
- 1 gallon (approx. 3.8 liters) white distilled vinegar (5% acidity)
- 1/2 cup baking soda (optional, for extra scrubbing power)
- 10-15 drops lemon or tea tree essential oil (optional, for scent and antimicrobial boost)
Equipment Needed
- Toilet brush (a sturdy one with stiff bristles is best)
- Rubber gloves
- Measuring cup (if using baking soda or essential oil)
- Spray bottle (optional, for pre-treatment of rim stains)
- Microfiber cloth or sponge (for wiping the exterior)
Step-by-Step Instructions
- Prepare the Bowl (Optional, for tougher stains): If you have very stubborn stains, you can temporarily drain the water from the toilet bowl for a more concentrated vinegar application. To do this, simply turn off the water supply valve behind the toilet and flush. Then, use your toilet brush to push any remaining water down the drain. This step takes about 1-2 minutes.
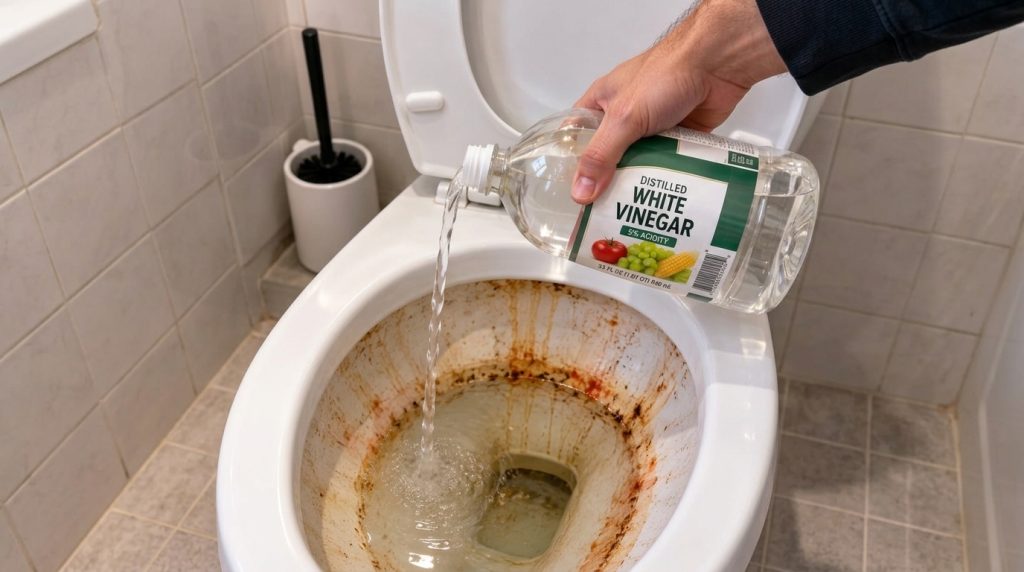
- Pour in the Vinegar: Generously pour at least 2-3 cups of white vinegar directly into the toilet bowl, making sure to coat the sides where stains are present. For the best coverage, especially around the rim, you can pour slowly or even use a spray bottle to target specific areas. If you drained the bowl, pour enough to cover all stained areas. This step takes about 1 minute.
- Let it Soak: Allow the vinegar to sit and work its magic for at least 30 minutes to an hour. For extremely tough stains, let it sit overnight. The longer it soaks, the better it can break down those mineral deposits. During this time, the acidic properties of the vinegar will begin to dissolve the grime.
- Add Baking Soda (Optional): If you’re using baking soda for extra power, sprinkle about 1/2 cup into the bowl after the vinegar has soaked for some time. The baking soda will react with the vinegar, creating a fizzing action that helps lift stains and provides a gentle abrasive for scrubbing. This takes about 30 seconds.
- Scrub Thoroughly: Put on your rubber gloves. Using your toilet brush, vigorously scrub all stained areas. Pay extra attention to the waterline and under the rim. The combination of vinegar’s acidity and the mechanical action of the brush will lift away the dissolved grime. This step takes about 3-5 minutes.
- Flush and Rinse: Once you’re satisfied with your scrubbing, turn the water supply back on (if you turned it off), and flush the toilet several times to rinse away the loosened stains and vinegar. Admire your sparkling clean bowl!
- Repeat if Necessary: For very old or deep-seated stains, you may need to repeat the process. Don’t be discouraged; consistency is key to tackling the toughest grime.
Best Uses
- Hard Water Stains: Excellent for dissolving white, chalky mineral deposits left by hard water.
- Rust Rings: Effectively breaks down reddish-brown rust stains caused by iron in water.
- Limescale Buildup: Tackles tough limescale that can accumulate in and around the bowl.
- General Grime and Odors: Great for a deep clean and natural deodorizing of the toilet bowl.
Surface Limitations: This method is safe for standard ceramic and porcelain toilet bowls. Avoid using vinegar on natural stone (like marble or granite) surfaces in your bathroom, as its acidity can etch and damage them. Always test a small, inconspicuous area first if you are unsure about your toilet bowl’s material or finish, though it is generally safe for typical toilets.
Safety Notes
- Wear Gloves: Always wear rubber gloves to protect your hands from prolonged contact with cleaning solutions and toilet grime.
- Ensure Good Ventilation: While vinegar isn’t as harsh as some chemical cleaners, ensure the bathroom is well-ventilated by opening a window or turning on the exhaust fan.
- Never Mix with Bleach: This is crucial. Never, under any circumstances, mix vinegar with bleach. Combining them creates toxic chlorine gas, which can be extremely dangerous and even fatal.
- Keep Away from Children and Pets: Store vinegar and all cleaning supplies out of reach of children and pets.
- Avoid Contact with Eyes: In case of accidental contact, flush eyes thoroughly with water for several minutes.
Expert Tips
- Heat it Up: For extremely stubborn stains, gently heat the vinegar before pouring it into the bowl. Warm vinegar can be even more effective at breaking down tough mineral deposits.
- Consistency is Key: Don’t expect miracles instantly for years of buildup. Regular use of vinegar can prevent new stains from forming and gradually diminish old ones.
- Pre-Treat Rim Stains: For stains under the rim, soak paper towels or toilet paper in vinegar and tuck them under the rim, allowing them to cling to the stains and soak. Leave overnight for best results.
- Use a Pumice Stone for the Toughest Spots: If vinegar and scrubbing aren’t quite enough, a pumice stone designed for toilets can safely buff away very tough rings without scratching porcelain, but use it gently and only after the vinegar has softened the stains.
- Maintain Regularly: A quick vinegar spray and scrub once a week can prevent severe stains from developing, making deep cleaning much easier.
- Essential Oil Boost: Add 10-15 drops of lemon, tea tree, or peppermint essential oil to your vinegar for a fresh scent and added antimicrobial properties.
Storage Instructions
Since white distilled vinegar is used directly from its original container, there’s no need to store a pre-mixed solution for this particular toilet cleaning method. Vinegar itself has an indefinite shelf life when stored properly.
- Best Storage Container: Keep white vinegar in its original sealed bottle.
- Storage Location: Store in a cool, dark place away from direct sunlight and heat. A pantry or under the sink is ideal.
- Signs the Solution Should Be Discarded: As pure vinegar doesn’t go bad, there are no signs to discard it. If you happen to mix a batch of vinegar with other ingredients for general cleaning, store it in a labeled spray bottle and use it within a few weeks to ensure maximum effectiveness, especially if essential oils are added.
Frequently Asked Questions
Q: How often should I clean my toilet with vinegar?
A: For general maintenance and to prevent new stains, once a week is ideal. For existing tough stains, you might need to apply it daily for a few days or leave it to soak overnight multiple times.
Q: Can I use apple cider vinegar instead of white vinegar?
A: While apple cider vinegar has acidic properties, white distilled vinegar is preferred for cleaning due to its higher acidity (typically 5%) and lack of color, which could potentially stain. It’s also much more cost-effective.
Q: Is vinegar safe for septic systems?
A: Yes, vinegar is generally safe for septic systems. Unlike harsh chemical cleaners, it breaks down naturally and won’t harm the beneficial bacteria in your septic tank.
Q: Will vinegar damage my toilet’s porcelain finish?
A: No, vinegar is safe for porcelain and ceramic toilet bowls. Its acidity is strong enough to dissolve mineral deposits but not strong enough to etch or damage these durable surfaces, as long as it’s not left for extremely extended periods on very old or compromised finishes.
Q: What if the stains don’t come off completely?
A: For very old or severe stains, you may need to repeat the process several times. Consider using warm vinegar or soaking overnight. For truly intractable stains, a toilet-specific pumice stone can be used carefully after the vinegar has softened the grime.
Q: Can I add dish soap to the vinegar?
A: Yes, adding a few drops of dish soap can help the vinegar cling to vertical surfaces and provide a bit more cleaning power, especially against greasy residue. However, avoid adding too much, as excessive suds can be hard to rinse.
Q: Does vinegar kill germs in the toilet?
A: Vinegar has antimicrobial properties due to its acetic acid content. While it’s not a registered disinfectant like bleach, it can kill many common bacteria and viruses found in a toilet bowl, contributing to a more hygienic environment.
Conclusion
Tackling tough toilet stains doesn’t have to be a battle with harsh chemicals or endless scrubbing. With the natural power of white vinegar, you have an effective, eco-friendly, and budget-conscious solution right at your fingertips. By following these easy steps, you can restore your toilet bowl to its sparkling best, making your bathroom feel fresh and clean once more.
Remember to prioritize safety by never mixing vinegar with bleach and ensuring good ventilation. Embrace this simple DIY hack, and you’ll not only achieve a cleaner toilet but also contribute to a healthier home environment. Give it a try, and prepare to be amazed by the vinegar power!