Are your favorite silver pieces looking dull and tarnished? It’s a common problem, but before you give up on those beautiful rings, necklaces, or even your cutlery, consider a surprisingly simple and effective DIY method right from your kitchen. This ingenious hack uses common household items to gently lift away tarnish, bringing back that brilliant shine without harsh chemicals or strenuous scrubbing.
This method is not only easy but also a great way to revitalize silver items that have lost their sparkle, making them look new again. You might already have everything you need on hand, making it a cost-effective and convenient solution for your tarnished treasures.
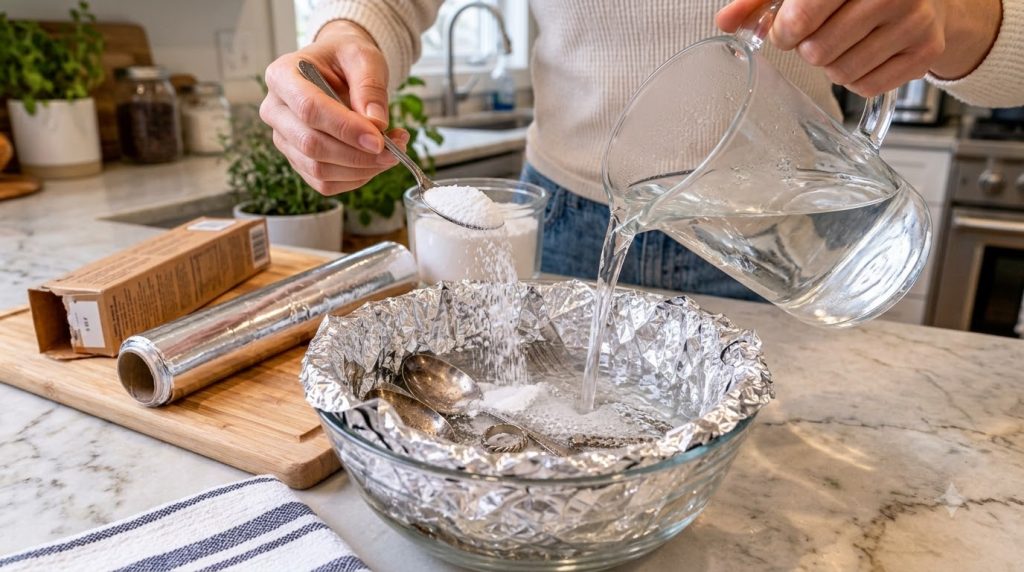
What You’ll Need
Materials:
- Aluminum foil (enough to line your bowl)
- 1 tablespoon baking soda (or table salt as an alternative)
- Hot water (enough to submerge your silver items)
- Tarnished silver items (jewelry, cutlery, etc.)
Tools:
- Glass bowl or a non-reactive dish (ceramic or plastic also works)
- Measuring spoon
- Tongs (optional, for handling hot items)
- Soft cloth for drying and buffing
Why This DIY Can Be Useful
This method works through an electrochemical reaction, often called the “ionic bath” method. When aluminum foil, baking soda, and hot water come together, they create a small electrical current. The baking soda acts as an electrolyte, allowing electrons to flow. The aluminum sacrifices itself, reacting with the sulfur compounds (which cause tarnish) on your silver, effectively transferring the tarnish from the silver to the aluminum foil. This means you’re not scrubbing away at your precious silver; the tarnish is gently lifted off, preserving the metal.
How to Make It
Prepping your silver cleaning bath is quick and straightforward:
- Line the Bowl: Take a piece of aluminum foil and line the bottom and sides of your glass or non-reactive bowl. Make sure the shiny side of the foil is facing up.
- Add Baking Soda: Sprinkle 1 tablespoon of baking soda evenly over the aluminum foil in the bowl.
- Arrange Silver: Place your tarnished silver items directly on the aluminum foil, ensuring each piece is touching the foil as much as possible. It’s crucial for the silver to be in contact with the foil for the reaction to occur.
- Pour Hot Water: Carefully pour enough hot (but not boiling) water into the bowl to completely submerge all the silver items. You should see a reaction almost immediately, often indicated by small bubbles or a slight odor.
How to Use It
Once your cleaning bath is set up, the process is mostly hands-off:
- Let it Soak: Allow your silver items to soak in the hot water solution. For light tarnish, 5-10 minutes might be sufficient. For heavier tarnish, you might need to leave them for 30 minutes to an hour, or even longer for very stubborn cases. You may even notice the tarnish appearing on the aluminum foil as the silver brightens.
- Check Progress: Periodically check your silver. You can use tongs to carefully lift a piece and observe if the tarnish has diminished.
- Remove and Rinse: Once the desired shine is achieved, carefully remove the silver items from the bowl using tongs or by draining the water. Rinse each piece thoroughly under cool running water to remove any baking soda residue.
- Dry and Buff: Immediately dry your silver completely with a soft, clean cloth. For an extra sparkle, gently buff the dry silver to enhance its shine.
What to Expect
You can expect a significant reduction in tarnish and a noticeable return of your silver’s original luster. For items with light to moderate tarnish, the results can be quite dramatic, revealing a beautiful, bright finish. Very heavily tarnished items might require a longer soaking time or a repeat of the process. This method works best for surface tarnish and will not remove deep scratches or pitting. The goal is a clean, radiant shine, not a ‘new from the factory’ look.
Helpful Tips
- Ensure Contact: Make sure all silver items are making direct contact with the aluminum foil. If you have many pieces, you might need to layer them or do them in batches.
- Hot Water is Key: Using hot water speeds up the chemical reaction. The hotter the water (without boiling), the faster the tarnish will lift.
- Salt as an Alternative: If you don’t have baking soda, table salt can be used in the same quantity. Baking soda is generally preferred for its slightly stronger reaction, but salt will also work.
- Repeat if Necessary: For stubborn tarnish, don’t hesitate to repeat the process. Sometimes a second soak can do wonders.
- Thorough Drying: Always dry your silver immediately and completely after rinsing to prevent water spots and slow down future tarnishing.
Important Notes / Safety
- Not for All Silver: This method is generally safe for sterling silver and fine silver. However, avoid using it on silver-plated items, as it can potentially damage the plating.
- Avoid Certain Finishes: Do NOT use this method on antique silver that has an intentional oxidized (darkened) finish, as it will remove the patina. It’s also not suitable for silver pieces with porous gemstones (like pearls, opals, or turquoise) or glued components, as the hot water and chemicals can damage them.
- Ventilation: While the chemicals used are common household items, it’s always good practice to ensure good ventilation when performing any DIY cleaning task.
- Patch Test: If you are unsure about a specific silver item, consider testing a small, inconspicuous area first.