Imagine stepping into your backyard and harvesting fresh, organic gourmet mushrooms, rich in flavor and packed with nutrients. Sounds like a dream, right? Well, it’s more achievable than you might think! Growing edible mushrooms on logs is a rewarding, sustainable, and surprisingly straightforward process that connects you directly with nature’s bounty.
Here at Garden – L. Quyên, we love sharing gardening tips that empower you to create a greener, more self-sufficient lifestyle. Today, we’re diving into the wonderful world of log inoculation – a method that allows you to cultivate delicious mushrooms like Shiitake, Oyster, and Lion’s Mane right in your own garden.
Why Grow Mushrooms on Logs?
Log cultivation mimics the natural growing environment for many beloved mushroom varieties, leading to robust yields and a sustainable harvest for years. Unlike growing in sterile substrates indoors, logs offer a long-term solution, often producing mushrooms for several seasons once successfully inoculated.
- Sustainable & Eco-Friendly: Utilizes fallen branches or sustainably harvested wood.
- Long-Lasting: A single log can produce mushrooms for 3-7 years, depending on the wood type and mushroom species.
- Natural Habitat: Mushrooms grown on logs often develop superior flavor and texture compared to those grown on artificial substrates.
- Low Maintenance: Once inoculated and established, logs require relatively little active care.
Choosing Your Mushrooms & Logs
The first step to a successful mushroom harvest is selecting the right combination of mushroom species and log type. Certain mushrooms thrive on specific hardwoods.
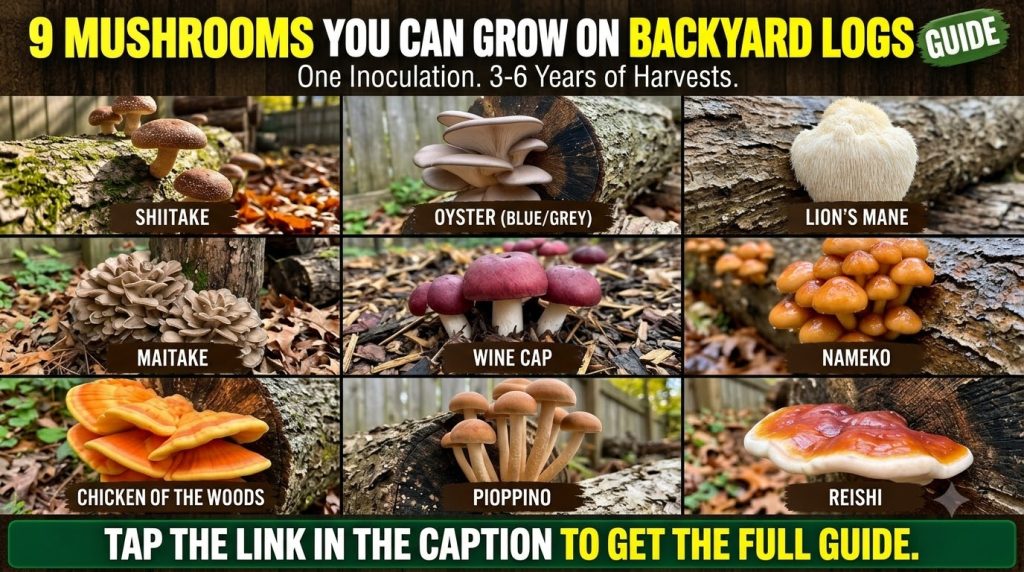 Discover popular edible mushroom varieties that thrive on hardwood logs for home cultivation.
Popular Mushroom Varieties for Log Cultivation:
- Shiitake (Lentinula edodes): A culinary favorite, best on oak, sweetgum, maple, or birch.
- Oyster Mushrooms (Pleurotus ostreatus): Fast-growing and versatile, good on almost any hardwood, including poplar, oak, or alder.
- Lion’s Mane (Hericium erinaceus): Unique seafood-like flavor, thrives on oak, maple, or beech.
- Reishi (Ganoderma lucidum): Known for medicinal properties, prefers oak, maple, or elm.
Choosing Your Logs:
- Hardwood is Key: Oak, maple, sweetgum, poplar, birch, and beech are excellent choices. Avoid conifers (pine, fir) as they contain resins that inhibit mushroom growth.
- Freshly Cut: Logs should be cut within 2-4 weeks of inoculation. This ensures the wood’s natural defenses are low but still has plenty of moisture and nutrients.
- Size Matters: Logs should be 4-8 inches in diameter and 3-4 feet long for manageability and optimal colonization.
Gathering Your Supplies
Before you begin, make sure you have everything you need:
- Mushroom Spawn: Typically hardwood dowel plugs or sawdust spawn. Choose a reputable supplier.
- Fresh Hardwood Logs: As described above.
- Drill: With a 5/16-inch (8mm) drill bit for dowel spawn or 7/16-inch (12mm) for sawdust spawn.
- Inoculation Tool (optional but recommended for sawdust spawn): A specialized tool to insert sawdust spawn.
- Hammer or Mallet: For tapping in dowel spawn.
- Cheese Wax or Food-Grade Wax: For sealing the inoculation sites.
- Small Brush or Wax Dauber: For applying wax.
- Permanent Marker & Tags: To label your logs with the mushroom type and inoculation date.
- Gloves: To maintain cleanliness.
Step-by-Step Log Inoculation Process
Step 1: Prepare Your Logs
If your logs aren’t freshly cut, soak them in water for 24 hours to rehydrate them. This ensures sufficient moisture for the mycelium to establish.
Step 2: Drill Holes
Using your drill, create holes about 1-1.5 inches deep, spaced roughly 4-6 inches apart along the log. Stagger the holes in a diamond pattern around the log’s circumference. For a 3-foot log, you’ll typically need 30-50 holes.
Step 3: Insert Spawn
- Dowel Spawn: Gently tap the dowel plugs into the drilled holes with a hammer until they are flush with the bark.
- Sawdust Spawn: Use your inoculation tool to pack the sawdust spawn firmly into each hole.
Step 4: Seal the Holes
Melt your cheese wax or food-grade wax. Using a brush or dauber, apply a generous coat of melted wax over each inoculated hole. This protects the spawn from contamination, pests, and drying out, trapping moisture inside the log.
Step 5: Label Your Logs
Use your permanent marker and tags to clearly label each log with the mushroom species and the date of inoculation. This is crucial for tracking progress and planning future harvests, especially if you’re experimenting with multiple types.
Caring for Your Mushroom Logs
Incubation (Spawn Run)
This is the waiting game! Place your inoculated logs in a shady, moist area of your garden. A wooded area, under dense shrubs, or even stacked in a cool, humid shed works well. Ensure they are off the ground to prevent contact with soil pests. Maintain consistent moisture – mist them regularly during dry spells or if your climate is arid. The incubation period can range from 6 months to 2 years, depending on the mushroom species and environmental conditions.

