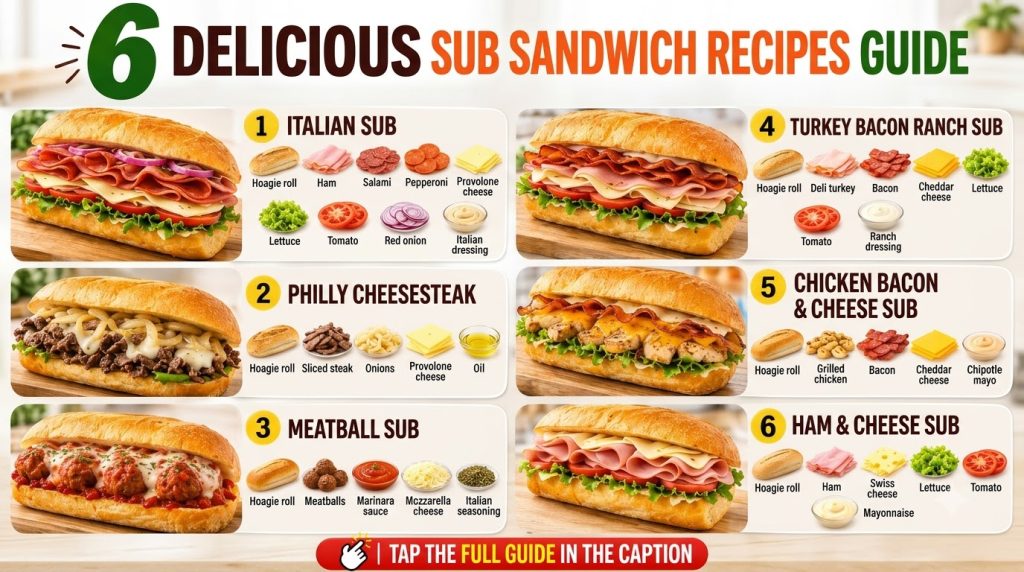
Why Homemade Subs Are Worth Making
A good sub sandwich is one of the easiest meals to build at home. You get a crusty roll, layers of fresh vegetables, savory proteins, and a sauce or spread that ties everything together. Once you know the basic formula, you can create a new combination whenever you want.
This guide covers the core ideas behind six popular sub styles. Use it to choose your first sandwich, shop for ingredients, and understand how each component works.
Why You Will Love Making Subs at Home
- Simple ingredients: Most subs rely on pantry staples, deli meats, cheese, and fresh produce.
- Easy to customize: Swap proteins, cheeses, and vegetables to match your taste.
- Great for lunch or dinner: Subs travel well and can be packed for work or school.
- Budget friendly: Buying a whole loaf of bread and fresh toppings often costs less than takeout.
The Building Blocks of a Great Sub
Every sandwich in this guide follows the same basic structure. Understanding these parts makes it easier to build your own version.
- The roll: Choose a sturdy hoagie or sub roll with a crisp crust and soft interior. A fresh roll makes the biggest difference.
- The protein: Options include sliced deli meats, roasted chicken, meatballs, or tuna salad. Plan roughly 3 to 4 ounces per sub for a hearty portion.
- The cheese: Provolone, American, and mozzarella are common choices because they melt well and add creaminess.
- The vegetables: Crisp lettuce, tomato, red onion, bell pepper, and pickles add crunch and freshness.
- The sauce: Mayonnaise, mustard, vinaigrette, or a simple oil and vinegar blend adds moisture and flavor.
Equipment You Will Need
- A sharp serrated knife for slicing rolls and produce
- A cutting board
- A baking sheet, if you want to warm or toast the rolls
- Aluminum foil or parchment paper for wrapping
How to Build a Sub Sandwich Step by Step
- Prepare the roll. Slice the roll lengthwise, leaving a hinge on one side. If the bread is very soft, warm it in a 350°F (175°C) oven for about 3 to 5 minutes until it feels crisp on the outside.
- Spread the sauce. Apply a thin layer of mayonnaise, mustard, or dressing to both cut sides so every bite has flavor.
- Layer the protein. Fold or stack the meat evenly. Folded slices look fuller and bite more smoothly.
- Add the cheese. Place the cheese directly on top of the meat so it stays in contact with the warm components if you are heating the sandwich.
- Melt if desired. Bake the assembled sub at 350°F (175°C) for about 5 to 8 minutes, or until the cheese softens and the bread is warm. Watch closely, since oven times vary.
- Add the vegetables. Layer lettuce, tomato, onion, and pickles on top after heating so they stay crisp.
- Season and close. Add a pinch of salt, pepper, oregano, or vinegar to the vegetables, then close the sandwich and press gently.
- Slice and serve. Cut the sub in half on a diagonal for a neat presentation and easier eating.
Pro Tips for Better Subs
- Toast the roll lightly before assembling so the bread holds up to moist fillings.
- Keep wet ingredients like tomato and pickles away from the bread by placing them between layers of cheese or meat.
- Season tomatoes and onions with a little salt and vinegar to bring out their flavor.
- Pat wet vegetables dry before adding them to avoid soggy bread.
- Shred lettuce finely or use whole leaves so it stays crisp and does not tear the roll.
Common Mistakes to Avoid
Soggy bread: Too much dressing or fresh tomato can soak the roll quickly. Use sauce sparingly and layer wet ingredients in the middle.
Overstuffed sandwiches: Too many fillings make the sub hard to bite and can cause the contents to slide out. Aim for a balanced amount of protein, cheese, and vegetables.
Dry or stale rolls: Bread that has been sitting out too long becomes tough. Buy rolls the same day if possible, or warm them briefly before serving.
Variations to Try
- Italian cold cut sub: Layer salami, ham, and provolone with oregano and red wine vinegar.
- Turkey and cheddar sub: Pair sliced turkey with sharp cheddar, lettuce, and a honey mustard spread.
- Chicken cutlet sub: Use breaded and pan-fried chicken with mozzarella and marinara.
- Veggie sub: Replace meat with roasted peppers, cucumbers, avocado, and hummus.
- Tuna sub: Mix canned tuna with mayonnaise, celery, and lemon juice.
Serving Suggestions
Serve subs with kettle chips, a simple green salad, or pickles on the side. For a lighter meal, add sliced fruit or a cup of vegetable soup. Cold lemonade, iced tea, or sparkling water pairs well with most styles.
Storage and Reheating
Subs are best eaten fresh. If you need to prepare them ahead, store the sauce, cheese, and vegetables in separate containers and assemble just before eating. Assembled subs can be wrapped tightly and refrigerated for a short time, but the bread will soften. Wrap leftover sandwiches in foil and warm them in the oven rather than the microwave to help the roll stay firmer. Subs do not freeze well because the vegetables and bread lose texture.
Frequently Asked Questions
Can I make subs ahead of time?
You can prep components like shredded lettuce, sliced onions, and sauces ahead. Assemble the sub shortly before serving for the best texture.
What is the best bread for a sub?
Look for a sturdy hoagie or sub roll with a crisp crust and soft center. It should hold fillings without falling apart.
How do I keep my sub from getting soggy?
Use a light hand with sauce, place wet vegetables in the middle, and keep dressings separate if you are packing lunch.
Can I make a sub without meat?
Yes. Roasted vegetables, hummus, avocado, and cheese make satisfying vegetarian subs.
Are subs a good option for meal prep?
Subs work well when you prep the fillings in advance and assemble on the day you eat. This keeps the bread fresh and the vegetables crisp.
Which Sub Are You Making First?
Pick the style that matches the ingredients already in your kitchen, then build from there. Let us know in the comments which sub you plan to try first.