Picture walking outside in January, past a snowy yard, and stepping into a green space where spinach, lettuce, and fresh herbs are still growing. That is the promise of a walipini greenhouse, also called a pit greenhouse. Instead of building a tall glass box above ground, you partly sink the growing space into the earth, so the soil itself helps hold warmth through the cold months. For home gardeners and small growers who want fresh produce beyond the usual season, it is one of the most practical structures you can build. In this guide, you will learn how a walipini works, how to set one up step by step, what to grow inside it, and where its limits are, so you can decide whether it fits your yard and your climate.
What Is a Walipini Greenhouse?
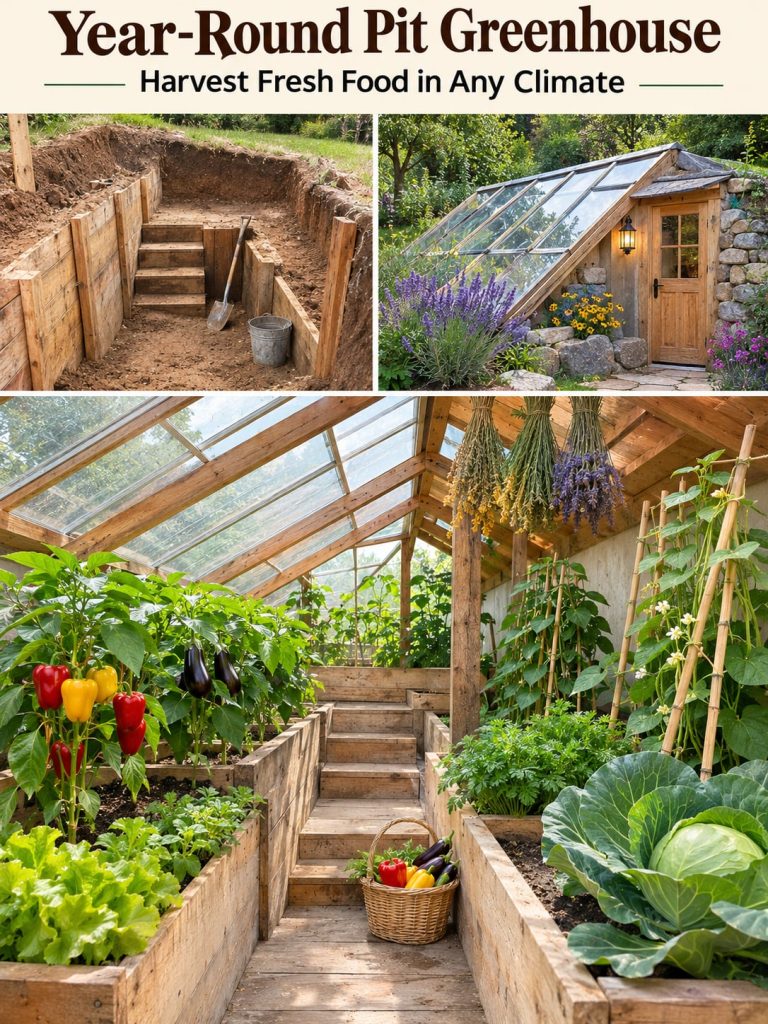
The word walipini comes from the Aymara language of the Andes, where farmers have used sunken growing spaces for generations to protect crops from frost and harsh winds at high elevations. A walipini is essentially a shallow pit, usually dug about 4 to 6 feet deep, with a sloped, transparent roof on the sun-facing side. The back and sides are earth, which means the structure is insulated by the ground around it.
It is important to understand that a walipini does not create heat out of nothing. Sunlight enters through the glazing, warms the air and soil, and the surrounding earth releases that stored warmth slowly overnight. This thermal mass keeps temperatures steadier than a standard above-ground hoop house, which is why many gardeners can grow cool-season crops through winters that would otherwise stop their gardens completely.
Why the Earth Does Much of the Work
Soil changes temperature slowly. During a sunny winter day, the soil absorbs heat, and at night it gives some of that heat back. A walipini keeps the growing area out of the worst wind and deepest cold, so the air around your plants stays more stable. In many climates, the soil in a walipini stays well above the air temperature outside on cold nights.
Light is still the main limit in winter. Short days and low winter sun angles mean plants grow more slowly, even when the temperature is comfortable. Expect slower growth from December through February, and plan your harvests with that in mind. Keeping glazing clean is one of the simplest ways to get more light, since dust and algae can block a surprising amount of sunlight.
How to Build a Walipini Step by Step
1. Choose the right site
Look for a spot that gets full sun for most of the day, ideally with the long side running east to west and the glazed roof facing south in the Northern Hemisphere. The site should have good drainage. Avoid low spots where water collects after rain or snowmelt. Before digging, call your local utility locator service to check for buried lines.
2. Dig the pit
Excavate the pit to a depth of about 4 to 6 feet, creating a sloped floor or stepped layout so the roof can meet the ground at the right angle. Many builders use a ramp or stairs on the north side for entry. Stack the removed soil carefully, because you will reuse it to build the north wall and berm.
3. Build the walls and roof frame
Use treated lumber, concrete block, or stone for the north wall and any retaining walls. Build a sturdy frame for the glazed roof, sloped toward the sun. The angle of the glazing is typically set near your latitude, so you get strong winter light. Glazing options include polycarbonate panels, which resist breakage and insulate better than single glass, and glass or double-wall plastic if you prefer them.
4. Plan ventilation
Ventilation is essential. Install operable vents near the top of the glazing, and consider a second low vent to draw in cooler air. On a sunny winter afternoon, the interior can overheat quickly, even when outdoor temperatures are freezing. Check the greenhouse on bright days and open vents when the thermometer climbs above roughly 75 to 80 degrees Fahrenheit.
5. Prepare the soil and beds
Fill raised beds with a loose, well-draining mix of garden soil, compost, and aged manure or leaf mold. Aim for beds about 3 to 4 feet wide so you can reach the center without stepping on the soil. Test the soil before planting if you can, and add amendments based on the results from your local extension service.
What to Grow in a Walipini
Cool-season crops perform best because they tolerate low light and cool air. Good choices include spinach, kale, Swiss chard, lettuce, arugula, and mustard greens. Sow these in succession every two to three weeks so you have a steady supply rather than one big harvest. Radishes and baby carrots also do well, especially in the shorter days of late autumn and early winter.
Herbs such as parsley, cilantro, chives, and thyme can add flavor through the cold months. Cilantro tends to bolt in warm conditions, so keep it cooler and harvest the outer leaves regularly. Warm-season crops like tomatoes, peppers, and cucumbers can be grown in a walipini during the warmer months, but they need strong ventilation and careful watering to avoid heat stress and disease.
Water, Humidity, and Temperature Management
Check soil moisture by pushing a finger about 2 inches into the bed. If the soil feels dry at that depth, water the root zone at the base of the plants in the morning so leaves can dry before evening. Cold, wet conditions encourage fungal diseases, so avoid overhead watering in winter.
Watch your plants for clues. Pale, stretched growth with long spaces between leaves often means too little light. Yellowing lower leaves in wet soil can point to overwatering. Crisp, scorched leaf edges on a sunny day usually mean the greenhouse is overheating and needs more ventilation.
Common Mistakes to Avoid
The most common mistake is underestimating heat buildup. A walipini that stays cold on a cloudy day can become too hot on a sunny afternoon, so vents should be managed actively. Another frequent error is poor drainage. If water pools on the floor, the soil stays cold and roots can rot, so install a gravel layer or grade the floor toward a drain point.
Many new builders also expect winter production to match summer output. Plan for smaller harvests and slower growth, and use the time for soil building, seed starting, and planning your spring garden.
Regional Considerations and USDA Zones
USDA hardiness zones describe average winter cold, not summer heat, rainfall, humidity, or the microclimate of your yard. Walipini greenhouses offer the greatest winter benefit in colder regions, roughly USDA zones 3 through 7, where ground frost and cold air limit outdoor gardening for months. In these areas, a walipini can extend the season significantly and may allow leafy greens to grow through much of winter with careful management.
In warmer zones, roughly 8 through 11, the pit can be more useful for summer shade and heat management, and winter growing may be easier outdoors. The design still works, but you will focus more on ventilation and cooling. Local conditions matter more than zone alone, so contact your state university extension office for advice on frost dates, sunlight, snowfall, and soil conditions.
Is a Walipini Worth the Effort?
A walipini is often described as budget-friendly, and it can be, but the real cost depends on excavation, materials, and labor. If you have access to equipment or a helper, your costs can stay modest. If you hire out the digging and glazing, the price will rise. Compare the cost against the value of fresh greens, herbs, and seedlings you can grow when stores are expensive or limited.
Start Small and Build Your Winter Garden
You do not need a large structure to begin learning how a walipini works. Start by observing the sun in your yard during winter, marking shadows, and noting where snow melts first. Then plan a site, test your soil, and make a simple layout. Once you see how the earth holds warmth and how your plants respond, you will have a practical, year-round growing system that rewards patience and careful observation. Choose one bed, sow your first crop of spinach or lettuce, and watch what the winter sun can do.