Every autumn, the same question comes up in gardens across the country: what do I do with all these leaves? Bagging them and sending them to the curb wastes a valuable resource. Your leaves can become a crumbly, earthy soil conditioner that improves your beds for free, and the process is simpler than most people expect.
In this guide, you will learn how to shred leaves with a lawn mower, store them in a barrel, and turn them into leaf mold that helps your soil hold moisture and nutrients. We will also cover what to avoid, how long the process takes in different climates, and how to use the finished material so it actually helps your plants.
Why Shredded Leaves Make Such a Useful Soil Conditioner
Fallen leaves are mostly carbon-rich plant material. When they break down, they form a material gardeners often call leaf mold. Leaf mold does not work like a fertilizer that feeds plants quickly. Instead, it improves soil structure. It helps sandy soil hold water and gives heavy clay soil more air pockets, which allows roots to breathe.
Whole leaves take a long time to decompose because their waxy surfaces and tough structure resist moisture and microbes. Shredding them increases the surface area, so fungi and bacteria can get to work much faster. That is why the mower step matters. A few passes over a pile of dry leaves can turn them into a fluffy material that breaks down in months instead of years.
What You Need to Get Started
You do not need special equipment. A standard rotary lawn mower, a leaf bag attachment or a tarp, and a few sturdy containers are enough for most home gardens. Good options include:
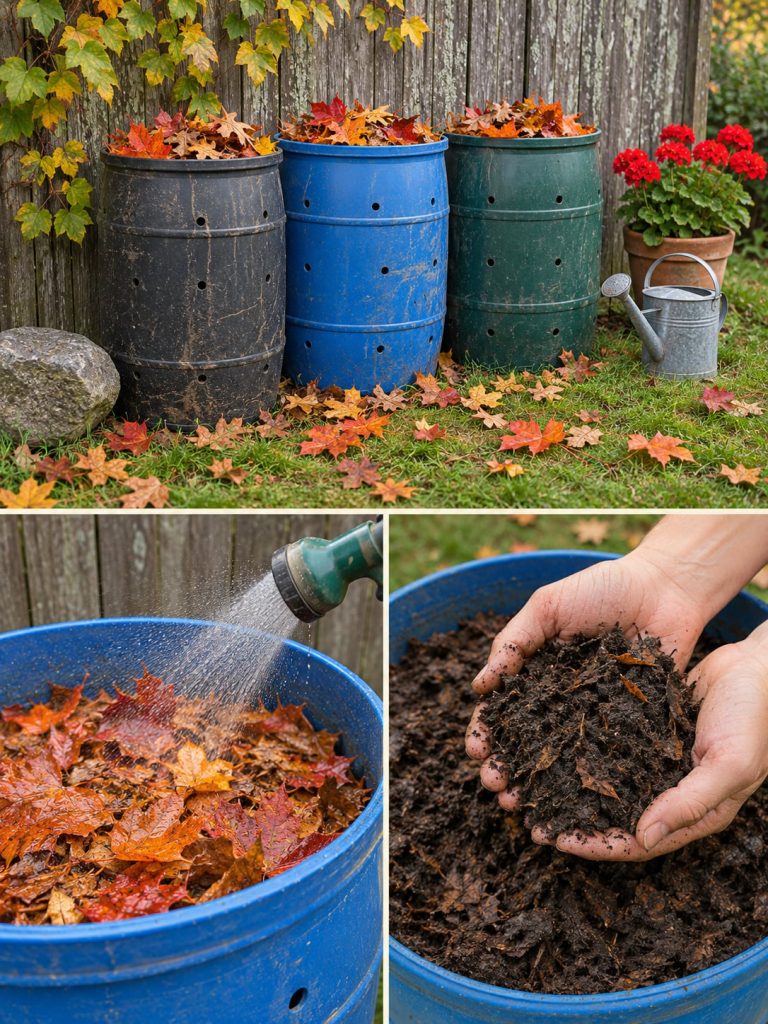
- A large plastic or wooden barrel with drainage holes drilled near the bottom
- A wire mesh or hardware cloth enclosure if you have a larger yard
- A garden fork for turning the pile
- A hose or watering can for keeping the material damp
Choose a shady spot near a water source, but not directly under a tree that will keep dropping debris into the barrel. Place the barrel on bare soil or gravel so excess water can drain and earthworms can move in from below.
Step-by-Step: Shredding and Storing Leaves
Step 1: Gather Dry Leaves
Rake or blow leaves from your lawn, beds, and driveway. Dry leaves shred more easily than soggy ones. If the leaves are wet, spread them on a tarp for a day or two before mowing.
Step 2: Mow Over the Leaves
Place the leaves on the lawn or on a tarp and run your mower over them several times. Aim for pieces roughly the size of a fingernail or smaller. Use a bag attachment or a tarp to catch the shredded material. Many gardeners find that mowing with the bag attached helps collect the pieces without scattering them.
Step 3: Fill the Barrel and Moisten the Material
Fill the barrel loosely with shredded leaves. Add water as you go until the material feels like a wrung-out sponge. If you squeeze a handful and only a few drops come out, it is damp enough. Dry leaves will sit in the barrel without breaking down, so do not skip this step.
Step 4: Add Nitrogen When You Can
Leaves are high in carbon and low in nitrogen. Adding a small amount of nitrogen-rich material, such as grass clippings, coffee grounds, or fresh kitchen vegetable scraps, speeds decomposition and helps heat build up inside the pile. A few shovelfuls of fresh grass clippings mixed into each layer of leaves works well. Avoid adding meat, dairy, oils, or pet waste to a leaf barrel.
Step 5: Turn and Check the Pile
Every few weeks, lift the material with a garden fork or turn it over in the barrel. Check the moisture level each time. You want the pile to stay evenly damp, not soggy. If it smells sour or rotten, it is probably too wet and needs more air. Add dry leaves and turn it again.
How Long Does It Take?
Decomposition time depends on your climate, the type of leaves, how finely they were shredded, and how often you turn the pile. Shredded leaves in a warm, moist environment may become usable in about six to twelve months. Oak and beech leaves are slower because they are tougher and contain more waxy material. In colder regions, the pile may slow down through winter and need another season to finish.
The finished material should be dark brown, crumbly, and earthy-smelling. You should not be able to recognize individual leaves. If you can still see whole leaf shapes, give the pile more time.
Using Your Leaf Soil Conditioner
Spread a layer of finished leaf mold about one to two inches thick over garden beds and mix the top few inches into the soil with a fork or hand tools. In vegetable beds, work it in before planting. Around established trees and shrubs, spread a thinner layer on the soil surface and keep it a few inches away from the trunk. Shredded but not fully decomposed leaves can also be used as a mulch in perennial beds, but keep them loose so air and water can reach the soil below.
Potting mixes can include leaf mold as well. Mix it with compost, peat-free potting media, or coir at a moderate ratio. For container plants, avoid using pure leaf mold because it can compact and hold too much water.
Common Mistakes to Avoid
- Leaving the pile dry. Dry leaves stay dormant. Keep the material consistently damp.
- Letting it turn into a soggy mass. Excess water causes odors and slows decomposition. Add dry leaves and turn the pile.
- Using leaves from diseased plants. Leaves with signs of blight, leaf spot, or fungal infection can carry problems back into your garden if the pile does not heat up enough to kill pathogens. Compost those leaves separately or send them to a municipal yard waste program that handles diseased material.
- Including black walnut leaves. Black walnut leaves and nuts release juglone, a compound that can inhibit the growth of many garden plants, including tomatoes. Keep them out of your conditioner.
- Using leaves from lawns treated with persistent herbicides. Some herbicide residues can remain active in organic material. If you are unsure, skip those leaves or check the product label.
- Expecting it to replace fertilizer. Leaf mold improves soil structure and moisture retention, but it does not supply large amounts of nutrients. Pair it with compost or a balanced organic fertilizer for heavy feeders.
How Your Region Changes the Process
USDA hardiness zones measure winter cold, not the rate of decomposition, but they still help you plan. In zones 3 to 5, fall leaves often arrive with cold weather, so the barrel may slow down through winter. Build the pile in fall, keep it covered to shed excess snow, and expect it to finish the following season. In zones 6 to 8, decomposition continues through much of the winter, and many gardeners have usable material by the next spring or fall. In zones 9 to 11, leaves may break down quickly, but the material can dry out rapidly during hot summers, so check moisture more often.
Rainfall, humidity, and the number of hot days also matter. In dry regions, you may need to water the barrel more often. In very wet climates, cover the barrel loosely to prevent it from becoming waterlogged. Your local cooperative extension office can advise you on leaf disposal rules, local yard waste programs, and soil recommendations for your area.
Bringing It All Together
Shredded leaves are one of the most practical ways to build healthier soil without spending money. Mow the leaves, keep the barrel damp, add a little nitrogen, turn the pile now and then, and give it time. The result is a dark, crumbly material that helps your garden hold water, supports soil life, and improves the foundation for next season’s vegetables and flowers.
Start with one barrel this fall and see how the process works in your yard. Once you have your first batch of leaf mold, you will likely look at autumn leaves in a whole new way. Your garden is ready for next season, and the leaves you already have are the place to start.