There’s something truly magical about watching a tiny seed transform into a vibrant plant. It’s the beginning of life in your garden, a promise of fresh harvests and beautiful blooms. But sometimes, it feels like those little seeds take forever to sprout, or worse, they don’t sprout at all! Understanding seed germination times and how to encourage your seeds can make all the difference between a frustrating start and a flourishing garden.
At Garden – L. Quyên, we’re all about making gardening easy, inspiring, and successful for everyone. Let’s dive into the fascinating world of seed germination and uncover the secrets to getting your garden off to the best possible start!
Why Understanding Germination Time is Crucial
Knowing how long your seeds typically take to germinate isn’t just interesting trivia; it’s a vital part of successful garden planning. It helps you:
- Plan Your Planting Schedule: Avoid planting seeds too early or too late for your region’s climate.
- Monitor Progress Effectively: Know when to expect sprouts so you’re not constantly digging around or giving up too soon.
- Identify Potential Problems: If seeds aren’t germinating within their expected window, you can investigate issues like poor seed quality, incorrect planting depth, or environmental factors.
- Maximize Garden Space: Efficiently stagger plantings to ensure continuous harvests.
The Marvelous Process of Seed Germination
Before we discuss speeding things up, let’s briefly understand what happens during germination. It’s a precise biological process:
- Imbibition: The dry seed absorbs water from its surroundings, causing it to swell. This activates enzymes within the seed.
- Activation: The activated enzymes begin to break down stored food reserves (starches, fats, proteins) to provide energy for growth.
- Radicle Emergence: The first sign of life! The primary root (radicle) pushes out of the seed coat, anchoring the seedling and beginning to absorb water and nutrients.
- Shoot Development: Following the radicle, the embryonic shoot (plumule) emerges, growing upwards towards light, eventually developing into stems and leaves.
Essential Tips for Faster Germination of Your Garden Seeds
While every seed has its own biological clock, you can create optimal conditions to encourage faster and more successful germination. Here are our top tips:
1. Start with Quality Seeds
Not all seeds are created equal. Opt for fresh seeds from reputable suppliers. Older seeds often have lower viability and slower germination rates. Check the ‘packed for’ date on your seed packets.
2. Provide the Right Temperature
Temperature is perhaps the most critical factor. Most seeds have an ideal temperature range for germination. Too cold, and they’ll be sluggish or won’t sprout; too hot, and they might ‘cook’ or go dormant. Many common vegetables prefer soil temperatures between 65-75°F (18-24°C). Consider using a seed-starting heat mat, especially for warmth-loving plants or if your indoor environment is cool.
3. Maintain Consistent Moisture
Seeds need consistent moisture to trigger imbibition and growth, but not too much. Overwatering can lead to damping-off disease or suffocate the embryo. Keep the soil consistently damp like a wrung-out sponge. Using a spray bottle for initial watering or covering seed trays with a clear dome helps retain humidity.
4. Use Well-Draining Seed Starting Mix
Don’t just use garden soil! A good seed-starting mix is light, sterile, and drains well while retaining moisture. This provides the ideal environment for delicate young roots and prevents soil-borne diseases.
5. Plant at the Correct Depth
A common mistake is planting seeds too deep or too shallow. A general rule of thumb is to plant seeds at a depth two to three times their diameter. Very tiny seeds often just need to be pressed onto the soil surface or lightly covered with a thin layer of vermiculite.
6. Consider Scarification or Stratification (for tough seeds)
- Scarification: For seeds with hard coats (e.g., morning glories, beans), gently scratching the seed coat with sandpaper or nicking it with a knife can help water penetrate faster.
- Stratification: Some seeds (often perennials or wildflowers) require a period of cold to break dormancy, mimicking winter conditions. This can be done by refrigerating them in moist sand or paper towels for a few weeks.
7. Adequate Light (After Germination)
While most seeds don’t need light to germinate (some even prefer darkness), once they sprout, light becomes crucial. Provide strong, direct light to prevent leggy, weak seedlings. South-facing windows or grow lights are excellent options.
Knowing Your Seeds: A Quick Guide to Germination Times
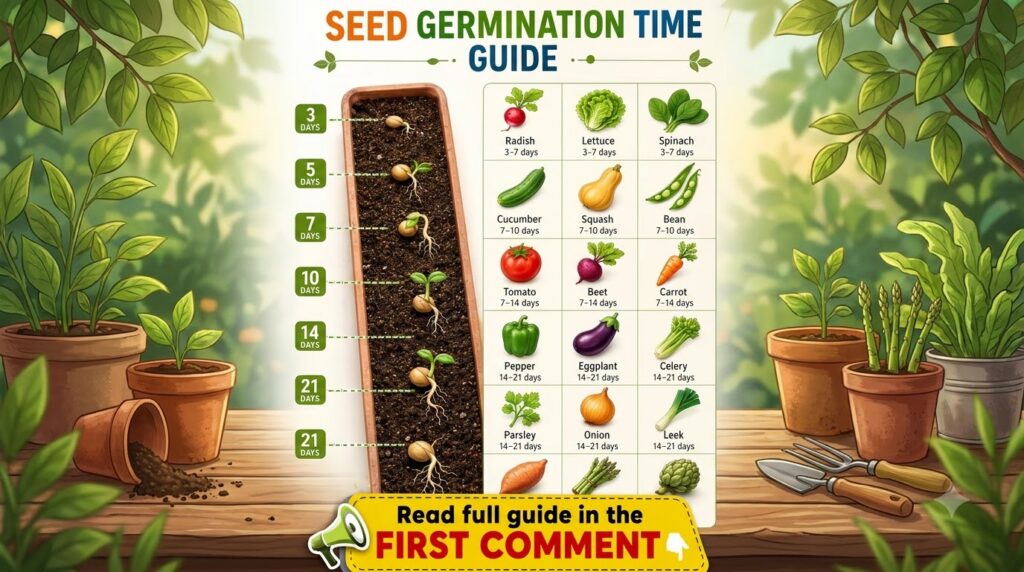
As our infographic shows, germination times vary widely! Here are a few examples to give you an idea:
- Fast Sprouters (3-7 days): Radishes, lettuce, spinach, beans, peas, corn.
- Medium Sprouters (7-14 days): Carrots, broccoli, cabbage, cucumbers, pumpkins, peppers, tomatoes, most herbs.
- Slow Sprouters (14-21+ days): Parsley, celery, rosemary, some flower seeds.
Always refer to the specific seed packet for the most accurate germination time and ideal conditions for your chosen variety.
Ready to Grow?
With these tips, you’re well on your way to a more successful seed-starting journey. Remember, gardening is a continuous learning process, and every seed successfully germinated is a small victory! Share your germination successes with us, or ask any questions you have. Happy planting, fellow garden enthusiasts!