Harnessing the power of nature for your garden is one of the most rewarding aspects of gardening. Rainwater, often called ‘liquid gold’ by seasoned gardeners, is naturally soft, free of chlorine and other chemicals found in tap water, and packed with beneficial micronutrients. It’s truly ideal for helping your plants thrive! But what if your harvested rainwater isn’t as clean as you’d like it to be? Debris from your roof, dust, and other contaminants can find their way into your rain barrel. That’s where a ‘Smart Rain Barrel Filter’ comes into play, turning good water into truly great water for your thriving garden plants!
Why Filter Your Rainwater?
While rainwater is inherently beneficial, the journey from sky to soil can introduce unwanted elements. Leaves, twigs, bird droppings, dust, and even roofing particles can wash into your collection system. Using unfiltered water on delicate plants or in sensitive irrigation systems can lead to:
- Clogged watering cans or drip lines.
- Introduction of pathogens or unwanted organic matter to your garden beds.
- Reduced aesthetic appeal of your stored water.
A smart filtration system ensures that the water reaching your plants is as pure and beneficial as possible, maximizing the natural advantages of rainwater harvesting.
Understanding the Smart Rain Barrel Filter System
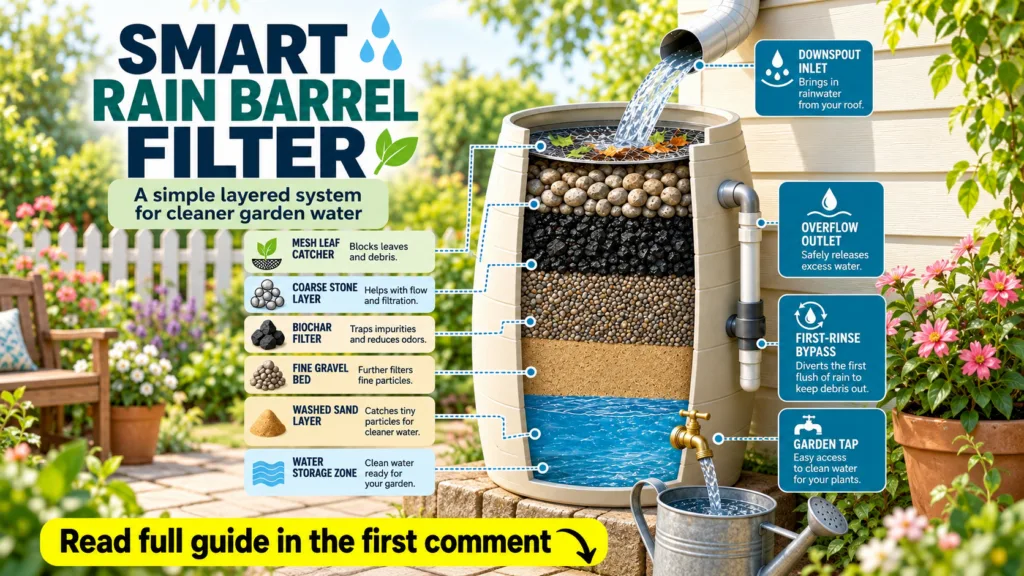
The beauty of a ‘Smart Rain Barrel Filter’ lies in its layered approach to purification. Each layer plays a crucial role in removing different types of contaminants, leaving you with wonderfully clean water. Let’s break down the components:
1. Mesh Leaf Catcher
This is your first line of defense. Positioned at the very top, where water enters the barrel, the mesh leaf catcher intercepts larger debris like leaves, twigs, and even larger insects. It prevents your internal filter layers from clogging prematurely and keeps the water flow consistent.
2. Coarse Stone Layer
Below the leaf catcher, a layer of coarse stones (like river rocks or pea gravel) acts as a pre-filter. These stones help to settle out heavier sediments and provide a sturdy base for the subsequent filtration media. They also promote even water distribution across the finer layers.
3. Biochar Layer
Biochar is a gardener’s secret weapon! This highly porous charcoal material is excellent at adsorbing impurities, odors, and even some dissolved contaminants from the water. It acts like a sponge, trapping microscopic particles and improving the overall quality and clarity of the water. It’s a fantastic natural filter that also has long-term benefits if it eventually makes its way into your garden soil.
4. Fine Gravel Layer
Following the biochar, a layer of fine gravel provides another physical filtration stage. It catches smaller suspended particles that might have passed through the coarse stone and biochar, preparing the water for the final, most refined filtration.
5. Washed Sand Layer
The washed sand layer is the heart of fine filtration. The tiny, angular grains of sand effectively trap even the smallest suspended solids, making the water sparkling clean. It’s essential to use ‘washed’ sand to avoid introducing new impurities into your system.
6. Water Storage Zone
Finally, beneath all these layers, you have your clean water storage zone. This is where the purified rainwater collects, ready for you to use in your garden whenever your plants are thirsty. A tap or spigot at the bottom allows for easy access.
Building Your Own Homemade Rainwater Filter
Creating your own smart rainwater filter is a rewarding DIY project that enhances your sustainable gardening efforts. Here’s a general guide to get you started:
- Choose Your Barrel: Select a food-grade plastic barrel or a sturdy, opaque container that will not leach chemicals. Ensure it has a lid for safety and to keep pests out.
- Prepare for Inflow: Create an opening near the top of the barrel for your downspout connection. Install your mesh leaf catcher here.
- Install the Layers: Starting from the bottom of the filtration section (above the clean water storage), add your layers in reverse order of how water will flow through them.
- First, add a support layer or permeable barrier (like landscape fabric) to prevent the sand from falling into the storage zone.
- Add the washed sand layer.
- Follow with the fine gravel layer.
- Add the biochar layer.
- Top with the coarse stone layer.
- Create the Clean Water Tap: Install a spigot or garden tap at the very bottom of the barrel, in the designated clean water storage zone, for easy access to your filtered water.
- Test and Maintain: Once assembled, allow some rainwater to pass through. You might need to flush the system a few times to clear any initial dust from the filter media. Periodically check and clean your mesh leaf catcher and replace or clean your filter media as needed, usually every 6-12 months depending on debris accumulation.
Enjoy a Greener, Healthier Garden!
Implementing a smart rainwater filter system is a fantastic step towards a more sustainable and vibrant garden. You’ll not only conserve water and reduce your utility bills but also provide your beloved plants with the cleanest, most natural hydration possible. Watch your garden flourish with this simple, yet powerful, eco-friendly solution!