There’s a special kind of magic in gardening, isn’t there? From nurturing tiny seedlings to harvesting a bountiful crop, every step is a reward. But what if that magic could extend beyond a single season? What if you could preserve the essence of your favorite, most delicious tomatoes, ensuring a legacy of flavor and abundance for years to come? That’s where the wonderful art of saving tomato seeds comes in!
Saving seeds from your best-performing plants is not only incredibly satisfying but also a fantastic way to cultivate varieties perfectly suited to your garden’s unique conditions. It’s a step towards sustainable gardening, reducing waste, and creating a continuous cycle of growth. If you’ve ever wanted to keep growing that perfect heirloom tomato, this guide is for you.
Why Save Your Own Tomato Seeds?
Beyond the joy of self-sufficiency, there are many practical reasons to save tomato seeds:
- Cost Savings: Why buy new seeds every year when you can grow them for free?
- Preserve Favorite Varieties: If you find a tomato variety that thrives in your garden and tastes amazing, saving its seeds ensures you can grow it again and again. This is especially important for open-pollinated and heirloom varieties.
- Adaptation to Your Climate: Over time, seeds saved from plants that perform well in your specific microclimate can lead to stronger, more resilient plants better adapted to your garden.
- Sustainability: It’s a key practice in sustainable gardening, reducing your reliance on commercial seed suppliers and promoting biodiversity.
- Connect with Nature: It deepens your connection to the gardening cycle, from seed to fruit and back to seed.
Choosing the Right Tomatoes for Seed Saving
Not all tomatoes are created equal when it comes to seed saving. Here’s what to look for:
- Open-Pollinated or Heirloom Varieties: These are crucial! Seeds from open-pollinated (OP) or heirloom tomatoes will produce plants true to the parent plant.
- Avoid Hybrids (F1): Seeds from hybrid (F1) tomatoes often won’t grow true to the parent plant; you might get unexpected results or sterile plants. Always check the seed packet if you’re unsure.
- Healthy, Ripe Fruit: Select fully ripe, healthy tomatoes that are free from disease and pests. These are the strongest plants and will produce the most viable seeds.
- Best Flavor and Performance: Choose tomatoes from plants that produced the best-tasting fruit and showed excellent vigor, yield, and disease resistance.
Simple Method for Saving Tomato Seeds: Fermentation
The fermentation method is widely considered the best way to save tomato seeds because it mimics nature’s process. It helps separate viable seeds from the pulp and protects them from seed-borne diseases.
What You’ll Need:
- Ripe tomatoes (from open-pollinated or heirloom varieties)
- A small jar or container with a lid
- Water
- A sieve or fine mesh strainer
- Paper towels or a non-stick surface (like a ceramic plate or glass)
Step-by-Step Guide:
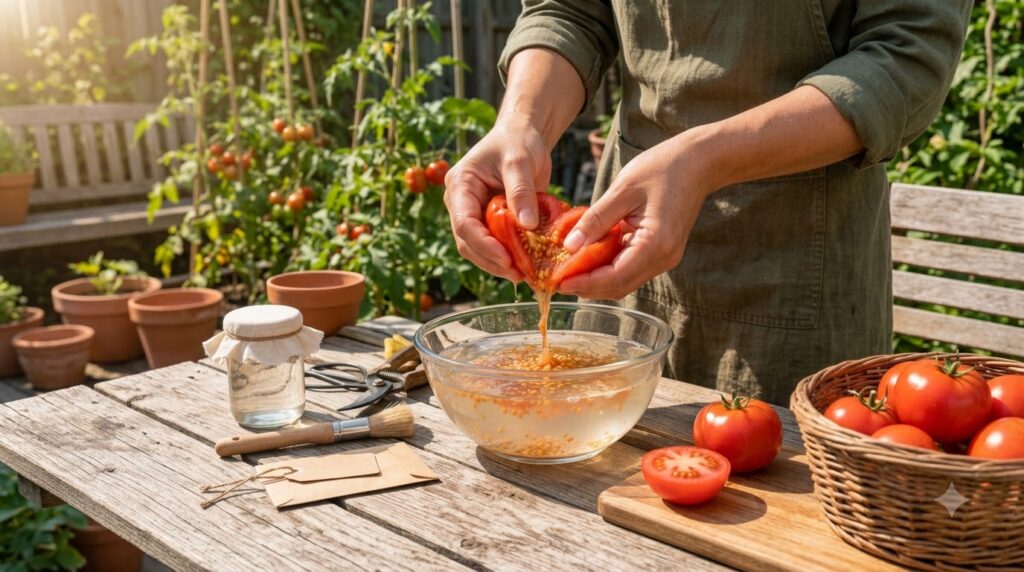
1. Extract the Seeds and Pulp
Cut your selected ripe tomatoes in half. Using a spoon, carefully scoop out the seeds and the surrounding gel-like pulp into a small jar. Don’t worry if some flesh comes along; it’s all part of the process.
2. Add Water and Ferment
Add a small amount of water to the jar, just enough to cover the seeds and pulp. Stir gently. Loosely cover the jar (don’t seal it tightly, as gases will be produced) and place it in a warm spot out of direct sunlight. A kitchen counter is usually fine.
3. Monitor the Fermentation
Over the next 2-5 days, a layer of mold may form on top, and the mixture will start to bubble. This is normal! The fermentation process breaks down the jelly-like coating around the seeds, which inhibits germination, and kills off many seed-borne diseases. Stir the mixture once or twice a day.
You’ll notice that the viable seeds will sink to the bottom, while the pulp, bad seeds, and mold will float to the top.
4. Rinse the Seeds
Once the seeds have sunk and the fermentation process is complete (usually when a good layer of mold has formed and bubbling has subsided), it’s time to rinse. Pour the contents of the jar into a fine-mesh sieve or strainer. Rinse the seeds thoroughly under running water, gently rubbing them against the mesh to remove any remaining pulp or mold.
5. Dry the Seeds
Spread the clean seeds in a single layer on a paper towel, a ceramic plate, or a piece of glass. Avoid using paper plates, as the seeds might stick. Place them in a dry, well-ventilated area away from direct sunlight. It’s crucial for the seeds to dry completely to prevent mold and ensure viability.
This can take anywhere from a few days to a week. Stir or gently separate them periodically to ensure even drying. The seeds should feel completely dry and separate easily when done.
6. Store Your Seeds
Once completely dry, store your tomato seeds in an airtight container or a paper envelope. Label clearly with the tomato variety and the date you saved them. Store in a cool, dark, and dry place. A refrigerator or freezer can extend their viability for several years.
Tips for Success
- Practice Makes Perfect: Don’t be discouraged if your first batch isn’t perfect. Seed saving is a skill that improves with practice.
- Isolate Varieties (Optional): If you’re growing multiple open-pollinated varieties and want to ensure pure genetics, consider isolating them to prevent cross-pollination. However, for most home gardeners, this isn’t strictly necessary for good results.
- Test Germination: Before planting your entire saved batch, you can do a germination test to see how viable your seeds are. Place 10 seeds on a damp paper towel, roll it up, and keep it warm. Check after a week or two to see how many sprout.
Saving tomato seeds is a deeply rewarding aspect of gardening that closes the loop on your harvest and ensures future abundance. Give it a try this season, and enjoy the satisfaction of growing your favorite tomatoes from your very own saved seeds!