There’s a special kind of magic that happens when you watch a tiny seed transform into a vibrant, healthy plant. Starting seeds indoors not only saves money but also gives you more control over the varieties you grow and the satisfaction of nurturing life from its very beginning. However, getting those seedlings strong and ready for the garden requires a bit of know-how. Fear not, fellow gardeners! We’re here to guide you through the essential steps to cultivate robust, resilient seedlings that will thrive in your outdoor spaces.
The Foundation: Essential Steps for Strong Seedlings
1. Choose the Right Containers
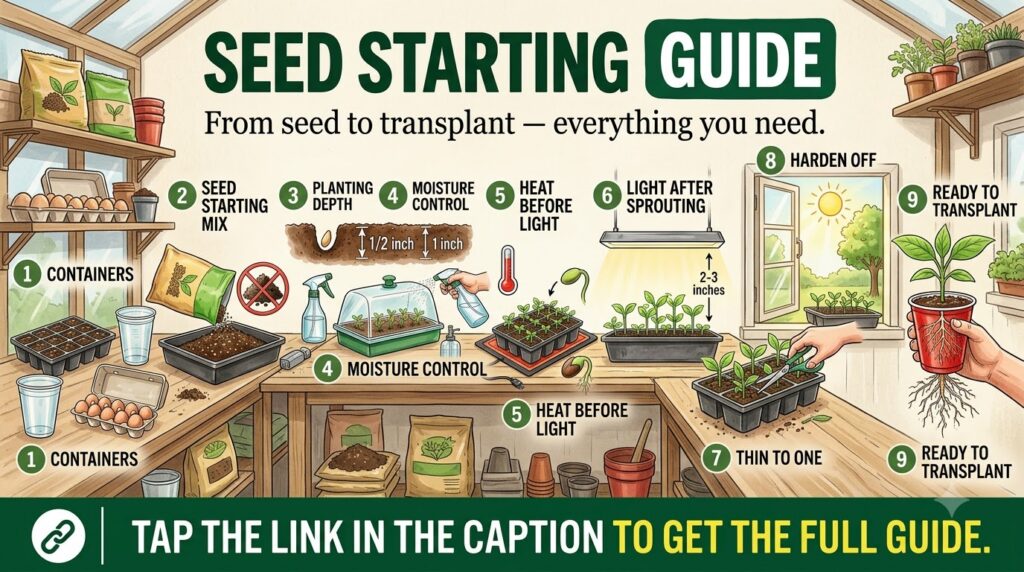
The journey begins with the right home for your tiny seeds. Opt for containers with good drainage holes to prevent waterlogging, which can lead to damping-off disease. You can use anything from specialized seed-starting trays and peat pots to recycled yogurt cups or milk cartons (just be sure to poke holes in the bottom!). Always sterilize used containers by washing them with a dilute bleach solution to eliminate any lurking pathogens.
2. Select Quality Seed Starting Mix
Garden soil is too heavy and can contain weed seeds and disease pathogens. A specialized seed-starting mix is light, sterile, and designed to retain moisture while providing excellent aeration. It gives delicate new roots the perfect environment to grow without compaction or disease worries.
3. Plant Seeds at the Correct Depth
Reading your seed packets is crucial here! Most seeds should be planted at a depth roughly two to three times their diameter. Very tiny seeds often just need to be pressed onto the surface of the soil, as they require light to germinate. Too deep, and they might not have enough energy to push through; too shallow, and they might dry out.
4. Maintain Consistent Moisture
Seeds need consistent moisture to germinate and grow. Keep the seed-starting mix moist but never soggy. Use a gentle misting bottle or bottom-water by placing your seed trays in a shallow pan of water until the surface of the soil appears moist. A humidity dome can help maintain consistent moisture levels until germination.
5. Provide Adequate Warmth
Many seeds require warmth to germinate successfully. While specific temperature requirements vary by plant type, most common vegetables and flowers prefer soil temperatures between 65-75°F (18-24°C). A heat mat placed under your seed trays can significantly speed up germination and improve success rates, especially for heat-loving plants.
6. Ensure Plenty of Light
Once your seeds sprout, light becomes paramount. Insufficient light is the most common reason for leggy, weak seedlings. A sunny windowsill often isn’t enough. Invest in grow lights and keep them just a few inches above the tops of your seedlings, adjusting as they grow. Aim for 12-16 hours of light per day.
7. Thin Seedlings for Stronger Growth
It can feel counterintuitive, but thinning is vital. When multiple seedlings sprout close together, they compete for light, water, and nutrients. Once seedlings have their first set of true leaves, snip off the weaker ones at the soil line, leaving the strongest seedling to grow. This gives your remaining plants the space and resources they need to become robust.
8. Harden Off Your Seedlings
Before transplanting outdoors, seedlings need a period of acclimatization called ‘hardening off.’ This process gradually exposes them to outdoor conditions like wind, direct sun, and cooler temperatures. Start by placing them outdoors in a sheltered spot for a few hours each day, slowly increasing their exposure over 7-14 days. This prevents transplant shock.
9. Transplant with Care
Once hardened off and all danger of frost has passed, your seedlings are ready for their permanent home. Dig a hole slightly larger than the seedling’s root ball, gently remove the seedling from its container (avoid pulling by the stem!), place it in the hole, and backfill with soil. Water thoroughly after transplanting to help settle the soil and reduce stress.
Growing strong and healthy seedlings is a rewarding process that lays the foundation for a bountiful garden. By following these essential steps, you’ll be well on your way to enjoying a garden full of thriving plants that you nurtured from tiny seeds. Happy gardening!