Dreaming of a bountiful herb garden but limited by space? You’re not alone! Many gardeners face the challenge of cultivating fresh herbs without a sprawling backyard. The good news is, you can create a thriving, vertical herb garden using a common and affordable material: cinder blocks. This ingenious DIY project allows you to grow a dozen or more of your favorite culinary herbs in a footprint of less than 5 square feet, transforming even the smallest patios or balconies into productive green spaces.
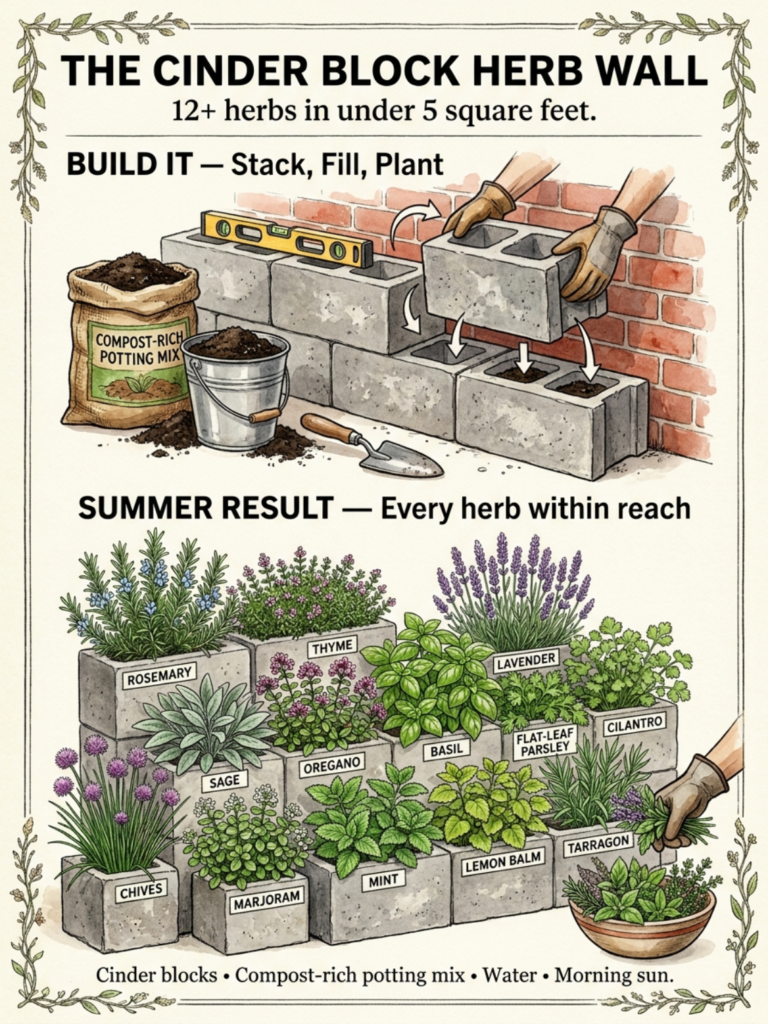 Visualize your very own compact and productive cinder block herb wall.
Why a Cinder Block Herb Wall?
Before we dive into the ‘how-to,’ let’s consider the compelling benefits of this gardening solution:
- Maximizes Small Spaces: This design is perfect for balconies, small patios, or even against a garage wall. It utilizes vertical space efficiently.
- Affordable & Accessible: Cinder blocks are inexpensive and readily available at most hardware or home improvement stores.
- Easy to Build: No complex tools or advanced construction skills are required. It’s a project almost anyone can tackle in an afternoon.
- Excellent Drainage: The open nature of cinder blocks, when properly stacked, provides good drainage, crucial for healthy herb growth.
- Organized & Accessible: Each block cavity can house a different herb, making it easy to identify, care for, and harvest your plants.
- Aesthetic Appeal: With lush green (and sometimes flowering) herbs spilling from the blocks, it creates a unique and attractive garden feature.
Gather Your Materials
Before you begin, make sure you have everything you need. The beauty of this project is its simplicity:
- Cinder Blocks: The exact number will depend on how tall and wide you want your wall to be. For a modest 3-tier wall, you’ll need around 6-9 blocks.
- Compost-Rich Potting Mix: High-quality soil is essential for healthy herbs. Look for a mix that drains well but retains moisture.
- Herbs: Your chosen plants (seedlings or small established plants work best).
- Water: For hydrating the soil and your newly planted herbs.
- Gardening Gloves: To protect your hands.
- Small Trowel or Shovel: For scooping soil.
- Spirit Level (Optional but Recommended): To ensure your structure is stable and level.
Step-by-Step: Building Your Herb Wall
Follow these simple steps to construct your space-saving herb haven:
1. Choose Your Location
Herbs generally love sunshine! Select a spot that receives at least 6 hours of direct sunlight, ideally morning sun which is less intense than afternoon sun. Ensure the ground is relatively level and sturdy enough to support the weight of the blocks and soil.
2. Lay the Foundation
Place your first layer of cinder blocks directly on the ground. Position them so the open cavities face upwards. For a stable structure, ensure these blocks are level. A spirit level will be very helpful here.
3. Stack the Second Layer
Place the next layer of cinder blocks on top of the first. For stability, stagger the blocks like bricks in a wall. This means each block on the second layer should bridge the gap between two blocks on the layer below it, with its cavities positioned over the solid sections of the lower blocks.
4. Add More Layers (Optional)
Continue stacking layers until you reach your desired height. Remember to always stagger the blocks for maximum stability. Most herb walls are 2-3 layers tall to allow easy access to all plants.
5. Fill with Potting Mix
Once your structure is complete, it’s time to fill the cavities. Pour your compost-rich potting mix into each open cavity of the cinder blocks, leaving about an inch or two from the top to allow for watering.
Planting Your Herbs
Now for the fun part – bringing your herb wall to life!
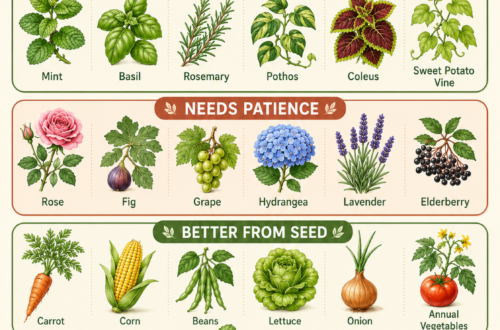
- Choose Your Herbs: Consider what you use most in your cooking. Popular choices that thrive in this setup include Rosemary, Thyme, Lavender, Sage, Oregano, Basil, Flat-Leaf Parsley, Cilantro, Chives, Marjoram, Mint, Lemon Balm, and Tarragon. Remember that some herbs, like mint, can be invasive, so keeping them contained in their own block cavity is ideal.
- Plant Carefully: Gently remove your herb seedlings from their nursery pots. Loosen any root-bound roots. Dig a small hole in the potting mix in each cinder block cavity and carefully place the herb, ensuring its root ball is covered.
- Water Thoroughly: After planting, water your herbs generously. This helps settle the soil around the roots and provides immediate hydration.
Care and Maintenance for a Thriving Herb Wall
To keep your cinder block herb wall flourishing throughout the season, follow these simple care tips:
- Watering: Cinder blocks can dry out faster than traditional garden beds, especially in warm weather. Check the soil moisture daily and water when the top inch of soil feels dry.
- Sunlight: Ensure your wall continues to receive adequate sunlight. If needed, you might be able to gently rotate smaller walls to optimize sun exposure.
- Feeding: Herbs are not heavy feeders, but a light application of a balanced liquid organic fertilizer every 4-6 weeks during the growing season can boost their health.
- Harvesting: Regular harvesting encourages more growth! Snip leaves as needed, making sure not to remove more than one-third of the plant at a time.
- Pest & Disease Control: Keep an eye out for any signs of pests or diseases. Address them promptly with organic solutions if possible.
Enjoy Your Fresh Herbs!
With minimal effort, you’ll soon be enjoying a continuous supply of fresh, aromatic herbs right outside your door. The cinder block herb wall is not just a practical gardening solution; it’s a testament to how creative thinking can solve common gardening challenges and bring the joy of homegrown produce to any space. Happy gardening!