Imagine your garden filled with vibrant, fragrant roses, not just from purchased plants, but from the very bushes you cherish. Propagating roses from cuttings is a deeply rewarding skill that allows you to multiply your favorite varieties, share them with friends, or simply expand your own rose collection without breaking the bank. It connects you more intimately with the life cycle of your plants, turning a single beautiful stem into a thriving new bush. While it might seem a bit daunting at first, with a clear, step-by-step approach and a little patience, anyone can master the art of rose propagation.
This guide will walk you through the essential process of taking rose cuttings, encouraging them to root, and nurturing them into robust young plants. We’ll cover everything from selecting the right cutting material to the final transplant, ensuring you have all the practical insights to succeed. Get ready to transform your garden with an abundance of your favorite roses, grown by your own hands!
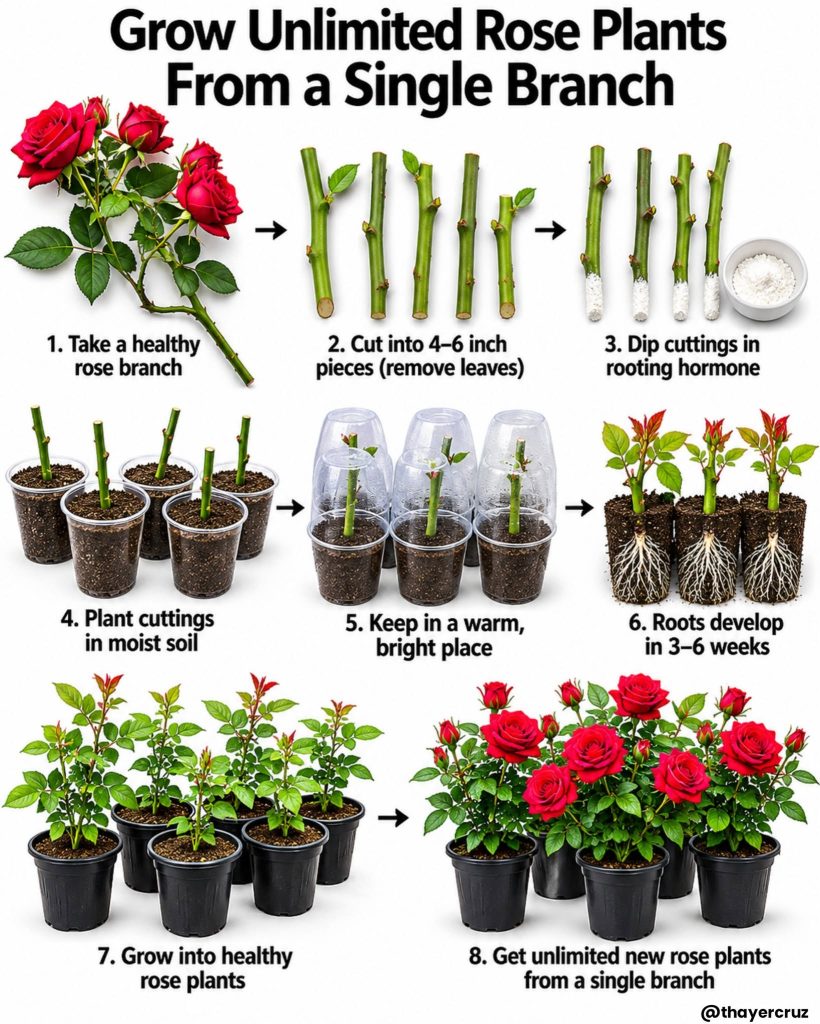 Propagate your favorite roses easily with these proven steps.
The Magic of Rose Cuttings: A Simple Principle
At its heart, propagating roses from cuttings relies on a plant’s incredible ability to regenerate. When you take a healthy section of a rose stem and provide it with the right conditions—warmth, moisture, and protection—it will produce new roots, effectively growing into a clone of the parent plant. This method is preferred for many rose varieties because it ensures the new plant retains all the desirable characteristics of the original, from flower color to growth habit.
The best time to take rose cuttings generally depends on the type of rose and your climate. For most gardeners, spring through early summer (when the wood is ‘softwood’ or ‘semi-hardwood’) offers the highest success rates, as these stems are actively growing but not too woody. In warmer climates (USDA Zones 8-11), you might find success into late summer or early fall. Always aim for a time when the parent plant is healthy and not under stress from extreme heat or drought.
Gather Your Tools and Materials
Before you begin, gather everything you’ll need. Having your supplies ready ensures a smooth process and minimizes stress on your cuttings:
- Sharp, sterile pruners or a sharp knife
- A healthy rose bush (your desired variety)
- Rooting hormone (powder or gel)
- Small pots or a propagation tray with drainage holes
- Sterile, well-draining potting mix (a blend of peat moss and perlite or coarse sand works well)
- Clear plastic cups or plastic bags (to create humidity domes)
- Watering can or spray bottle
- A pencil or dibber for making holes
Your Step-by-Step Guide to Rose Propagation
Step 1: Select and Prepare Your Cuttings
Choose healthy stems from the current season’s growth that have recently flowered or are just about to. Look for stems that are about the thickness of a pencil, firm but still slightly flexible (this is often referred to as semi-hardwood). Avoid stems with new, soft growth or very old, woody growth.
Using your sharp, sterile pruners, take a cutting that is 4 to 8 inches long. Make the cut just below a leaf node (the point where a leaf or branch emerges from the stem). This area contains cells that are active in root development. Remove all leaves from the lower two-thirds of the cutting. If the remaining leaves at the top are very large, you can cut them in half horizontally to reduce moisture loss, leaving just one or two sets of leaves.
Step 2: Apply Rooting Hormone
Rooting hormone significantly increases your chances of success by stimulating root development. Dip the bottom inch of your prepared cutting into water, then into the rooting hormone powder or gel, ensuring the cut end is thoroughly coated. Tap off any excess hormone.
Step 3: Plant Your Cuttings
Fill your pots or propagation tray with the sterile, well-draining potting mix. Use a pencil or dibber to create a hole about 2-3 inches deep in the center of the potting mix. Carefully insert the hormone-dipped end of your cutting into the hole, ensuring the rooting hormone remains intact. Gently firm the soil around the base of the cutting to ensure good contact. You can plant multiple cuttings in one larger container, spaced a few inches apart, or one per small pot.
Step 4: Create a Miniature Greenhouse
Roses need high humidity to root successfully. Water your potted cuttings thoroughly until water drains from the bottom. Then, cover each pot with a clear plastic cup, inverted like a dome, or place the entire tray inside a large clear plastic bag. This creates a humid microclimate. Ensure the plastic doesn’t touch the leaves of the cutting. If using plastic cups, you might need to poke a few small holes for minimal air exchange, but primarily, the goal is to retain moisture.
Step 5: Provide the Right Environment
Place your covered cuttings in a location that receives bright, indirect light. A north-facing window, a bright porch, or under grow lights are ideal. Avoid direct, intense sunlight, as this can overheat the plastic domes and scorch your delicate cuttings. Maintain consistent moisture in the soil, checking every few days. The plastic cover helps reduce the need for frequent watering, but the soil should never be allowed to dry out completely.
Step 6: Monitor for Root Development
Patience is key! While some online sources might suggest roots form in a couple of weeks, rose cuttings typically take 3 to 8 weeks to develop a substantial root system. You may see new leaf growth appearing, but this isn’t always an indicator of roots. To check for roots, very gently tug on a cutting. If it offers resistance, it has likely rooted. You might also carefully remove a cutting from its pot to visually inspect for white roots.
Step 7: Harden Off and Transplant
Once your cuttings have developed a good root system, they need to gradually acclimate to lower humidity and outdoor conditions. This process is called hardening off. Over a week or two, gradually increase their exposure to the open air by removing the plastic covers for a few hours each day, progressively lengthening the time until they can stay uncovered completely. This prepares them for transplanting.
When the plants are strong and established in their small pots, with healthy new growth and a robust root ball, they are ready for their next home. This might be a larger container or directly into the garden, depending on the season and your climate.
Step 8: Plant in the Garden
If you’re planting directly into the garden, choose a site with at least 6 hours of direct sunlight per day and well-draining soil. Dig a hole twice as wide as the root ball and just as deep. Carefully remove the rose plant from its pot and place it in the hole, ensuring the top of the root ball is level with the surrounding soil. Backfill with enriched garden soil, gently firming it around the roots. Water thoroughly after planting.
For gardeners in colder climates (USDA Zones 3-7), consider planting your rooted cuttings in larger pots for their first winter, bringing them indoors or protecting them in a sheltered area until spring. This gives them an extra season to establish before facing harsh winter conditions.
Common Mistakes to Avoid
- Overwatering: Soggy soil leads to rot. Keep soil consistently moist but never waterlogged.
- Insufficient Humidity: Without a humidity dome, cuttings will dry out and fail to root.
- Too Much Direct Sun: Young cuttings are sensitive and will scorch in intense direct sunlight.
- Impatience: Rooting takes time. Don’t disturb cuttings too frequently.
- Unhealthy Parent Plant: Cuttings from stressed or diseased plants are less likely to root.
- Not Hardening Off: Moving a humidity-protected plant directly outdoors can shock and kill it.
Embrace the Rewarding Journey of Rose Propagation
Successfully propagating roses is one of the most satisfying achievements for a gardener. Each new plant is a testament to your care and a continuous source of beauty in your landscape. By following these practical steps, understanding the needs of your cuttings, and practicing a little patience, you’ll soon be enjoying an endless supply of your favorite roses, enriching your garden and sharing the joy with others. Happy growing!