Imagine turning a single snip from your favorite plant into a whole new thriving specimen, all without a speck of soil! Water propagation is a truly magical and incredibly simple way to multiply your beloved houseplants and garden favorites. It’s a fantastic DIY gardening technique that saves money, allows you to share plants with friends, and gives you an endless supply of greenery.
Whether you’re a seasoned gardener or just starting your green journey, rooting plants in water is a rewarding experience that offers a front-row seat to nature’s incredible resilience. You get to watch tiny roots emerge and grow, connecting you more deeply with the life cycle of your plants. Let’s dive into this easy method and transform your home into a lush, vibrant oasis!
Why Choose Water Propagation?
Water propagation isn’t just easy; it offers several compelling benefits:
- Visibility: You can literally watch the roots grow! This makes it easier to know when your plant is ready for soil and adds to the enjoyment of the process.
- Cleanliness: No messy soil involved, making it perfect for indoor spaces and small areas.
- Cost-Effective: Turn one plant into many without buying new plants or expensive propagating supplies.
- High Success Rate: Many plants root exceptionally well in water, often with fewer issues than direct soil propagation for beginners.
- Aesthetic Appeal: A collection of plant cuttings in beautiful glass jars can be a stunning decorative element in any room.
What Plants Can You Root in Water?
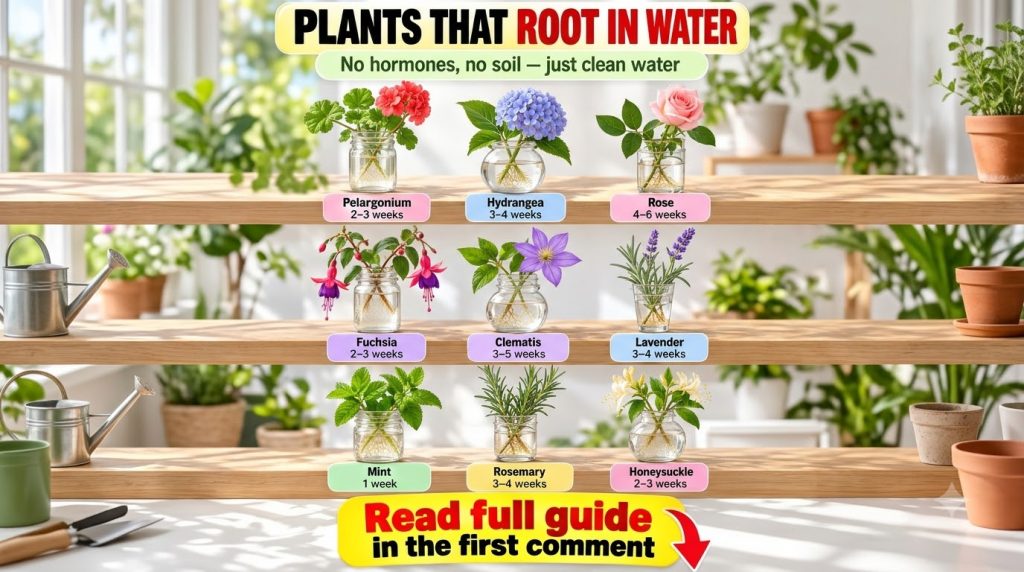
Many popular plants readily root in water. Here are some of our favorites, including some you might recognize from the image above:
- Houseplants: Pothos, Philodendron, Monstera, Spider Plants, Tradescantia (Wandering Jew), African Violets, Begonias, Impatiens.
- Herbs: Mint, Rosemary, Basil, Sage, Thyme, Oregano.
- Flowering Plants: Geranium (Pelargonium), Hydrangea, Rose, Fuchsia, Lavender, Honeysuckle, Clematis, Coleus.
Experimentation is key! If you have a plant you love, give water propagation a try.
Your Step-by-Step Guide to Water Propagation
Ready to start your water propagation journey? Follow these simple steps:
1. Choosing and Preparing Your Cutting
- Select a Healthy Stem: Look for a vigorous, non-flowering stem from the parent plant. Avoid any stems that look stressed, diseased, or are flowering.
- Make a Clean Cut: Using sharp, clean scissors or pruning shears, cut a section about 4-6 inches long. Make the cut just below a ‘node’ – this is where a leaf or branch grows out of the main stem, and it’s where new roots are most likely to form.
- Remove Lower Leaves: Gently strip off any leaves that would be submerged in water. Leaves left in water will rot, contaminating the water and potentially harming your cutting.
2. Setting Up Your Propagation Station
- Choose a Container: Almost any clear glass jar, bottle, or vase will work. Clear containers allow you to monitor root growth and water clarity easily.
- Fill with Water: Use room-temperature tap water, ideally left out for a few hours to allow chlorine to dissipate. Filtered water is also a good option.
- Place Your Cutting: Carefully place your prepared cutting into the water, ensuring that at least one node is submerged.
3. Water Care and Maintenance
- Location: Place your propagation station in a spot with bright, indirect light. Avoid direct, harsh sunlight, which can scorch the leaves and promote algae growth.
- Change Water Regularly: Change the water every 3-5 days, or whenever it looks cloudy. This replenishes oxygen and prevents bacterial growth.
- Be Patient: Rooting times vary greatly depending on the plant species and environmental conditions. Some plants might show roots in a week or two, while others can take several weeks or even months.
4. When to Pot Up Your Rooted Cuttings
Once your cutting has developed a good network of roots – usually an inch or two long and branching – it’s ready for soil. This typically happens when the roots are substantial enough to support the plant in a new environment.
- Prepare the Pot: Use a small pot with drainage holes and fill it with a well-draining potting mix suitable for your plant type.
- Plant Gently: Create a small hole in the soil, carefully place the rooted cutting into it, and gently backfill with soil, making sure not to damage the delicate roots.
- Water Thoroughly: Water your newly potted plant immediately to help settle the soil around the roots.
- Acclimation: Keep the newly potted plant in a slightly shadier, more humid spot for the first week or two to help it adjust to its new environment.
Tips for Success
- Use Clean Tools: Always start with clean tools to prevent the spread of diseases.
- Humidity Helps: Some plants benefit from higher humidity during propagation. You can create a mini-greenhouse effect by placing a plastic bag loosely over the cutting and jar.
- Avoid Overcrowding: Don’t cram too many cuttings into one jar, as this can hinder air circulation and promote rot.
Troubleshooting Common Issues
- Yellowing Leaves: This can be a sign of too much light, nutrient deficiency (after extended water rooting), or simply the plant adjusting.
- Stem Rot: If the stem becomes soft and mushy, it’s likely rotting. Trim off the rotted part, change the water, and try again. Ensure no leaves are submerged.
- No Roots: Some plants are just slower than others. Ensure you have a node submerged and that the conditions (light, water changes) are optimal.
Rooting plants in water is an incredibly satisfying aspect of gardening. It’s a simple act that allows you to expand your plant collection, share the joy of gardening, and connect with nature in a unique way. Give it a try, and watch the magic unfold in your own home!
What are your favorite plants to propagate in water? Share your tips and success stories in the comments below!