Have you ever admired a beautiful bloom in your garden and wished you had more of them? Or perhaps a friend shared a cutting from their stunning plant, and you’re not sure how to make it thrive? Good news, fellow garden enthusiast! Propagating flowers in water is one of the simplest and most rewarding ways to multiply your favorite plants. It’s like magic, watching tiny roots emerge, transforming a simple stem into a new, vibrant plant.
At Garden – L. Quyên, we believe gardening should be enjoyable and accessible to everyone. Water propagation is a fantastic technique for beginners and experienced gardeners alike, offering a clear view of the rooting process and a high success rate for many popular flowers. Let’s dive into how you can easily grow your garden through this fascinating method!
Why Choose Water Propagation?
Water propagation offers several advantages:
- Simplicity: It requires minimal supplies – just a healthy cutting and a container of water.
- Visibility: You can watch the roots grow, which is incredibly satisfying and helps you know exactly when your new plant is ready for soil.
- Cleanliness: No soil mess, making it ideal for indoor projects or small spaces.
- Versatility: Many popular flowers and houseplants root well in water.
What Flowers Can You Propagate in Water?
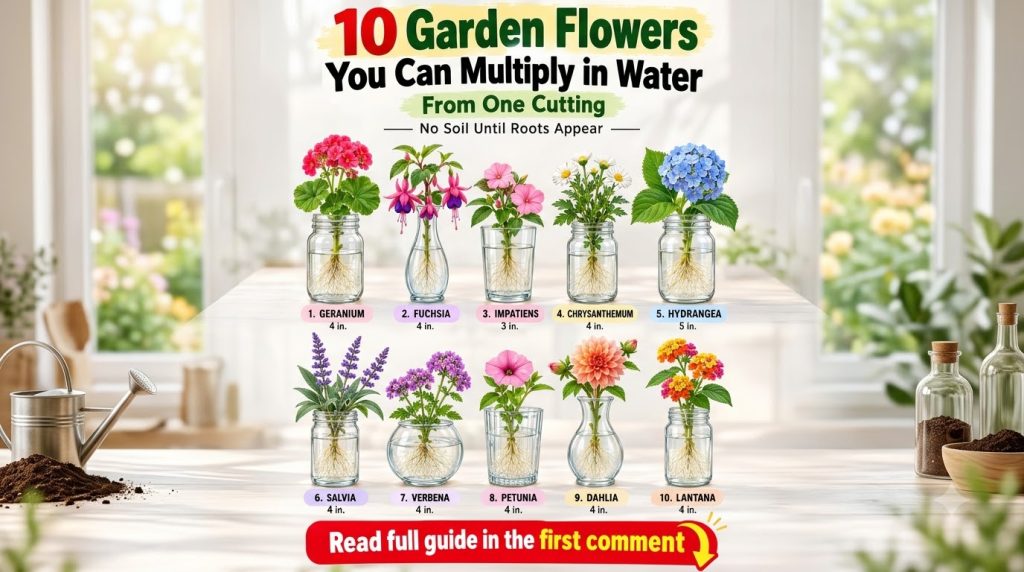
While not every plant is a good candidate, many common and beloved garden flowers readily root in water. Some excellent choices include:
- Geraniums
- Coleus
- Impatiens
- Begonias
- Hydrangeas
- Mint (while not strictly a flower, it’s a popular aromatic plant easily propagated)
- Pothos (a classic houseplant, but great for practicing)
- Rosemary (another herb that can have lovely blooms)
Experimentation is part of the fun in gardening! If you’re unsure about a specific flower, a quick online search can usually tell you if it’s a good candidate for water propagation.
Your Step-by-Step Guide to Water Propagation
Step 1: Choose and Prepare Your Cuttings
The success of your propagation starts with healthy cuttings. Look for vigorous, non-flowering stems from the parent plant. Avoid any stems that show signs of disease or pests.
- Using clean, sharp scissors or pruners, take a cutting that is typically 4-6 inches long.
- Make your cut just below a ‘node’ (the point where leaves or branches emerge from the stem). Nodes contain cells that are primed for root development.
- Remove any leaves from the bottom 2-3 inches of the stem to prevent them from rotting in the water. Leave a few healthy leaves at the top to help with photosynthesis.
Step 2: Set Up Your Water Vessel
Almost any clean container can work, but clear glass jars, bottles, or vases are ideal so you can monitor root growth.:
- Fill your chosen container with clean, room-temperature water. Tap water is usually fine, but if your tap water is heavily chlorinated, let it sit out for 24 hours to allow the chlorine to dissipate.
- Place your prepared cuttings into the water, ensuring that at least one node is submerged. Don’t overcrowd the container; give each cutting enough space.
Step 3: Location and Care
Where you place your cuttings makes a big difference:
- Light: Position your cuttings in a spot that receives bright, indirect light. Avoid direct, intense sunlight, which can scorch the delicate leaves and overheat the water.
- Water Changes: This is crucial! Change the water every 2-3 days, or whenever it starts to look cloudy. Fresh water provides oxygen and prevents the buildup of harmful bacteria.
- Patience: Root development can take anywhere from a few days to several weeks, depending on the plant type and environmental conditions. Don’t get discouraged if you don’t see roots immediately!
Step 4: When to Plant in Soil
Once your cuttings have developed a robust root system (usually 1-2 inches long), they are ready to be transitioned to soil. This transition is important because water roots are slightly different from soil roots and need to adapt.
- Prepare small pots with a well-draining potting mix.
- Gently plant your rooted cuttings, taking care not to damage the new roots.
- Water thoroughly and keep the soil consistently moist for the first few weeks as the roots adjust.
- Gradually introduce them to more light, mimicking the conditions of the parent plant.
Tips for Success with Water Propagation
- Rooting Hormone: While not strictly necessary for many plants, a tiny dab of rooting hormone on the cut end can sometimes speed up the process and increase success rates.
- Temperature: Most cuttings prefer warm temperatures (around 70-75°F or 21-24°C) for optimal root growth.
- Monitor for Rot: If you notice any stem sections turning mushy or black, remove the affected part and change the water immediately. You might need to take a fresh cutting.
- Labeling: If you’re propagating multiple types of flowers, label your containers to keep track!
Water propagation is a wonderfully rewarding way to expand your garden, share plants with friends, and simply enjoy the miracle of new life. Give it a try, and you’ll soon have a thriving collection of your favorite blooms without spending a fortune!
Happy gardening!