Bougainvillea’s fiery bracts paint a vibrant picture in any garden, transforming mundane spaces into tropical havens. If you’ve ever admired these dazzling climbers and wished you could have more, you’re in luck! Propagating Bougainvillea is a remarkably rewarding process, far simpler than many imagine. With a few practical techniques, you can easily multiply your favorite varieties, share them with friends, or fill your landscape with their stunning color.
This guide will walk you through five effective methods, turning you into a Bougainvillea propagation pro. Get ready to expand your garden and enjoy an abundance of these gorgeous blooms!
Understanding Bougainvillea Propagation
Bougainvillea (Bougainvillea spp.) are woody, vigorous vines or shrubs known for their spectacular, papery bracts in shades of pink, purple, red, orange, white, and yellow. While often confused with flowers, these colorful structures are modified leaves that surround tiny, inconspicuous true flowers. These resilient plants thrive in warm climates and are relatively easy to propagate once you understand their needs.
Successful propagation hinges on providing the right conditions: warmth, humidity, and a well-draining medium. Whether you’re aiming for a quick root in water or a more advanced grafting project, patience and consistent care are your best tools.
Five Effective Ways to Propagate Bougainvillea
Let’s dive into the various methods you can use to create new Bougainvillea plants from your existing beauties.
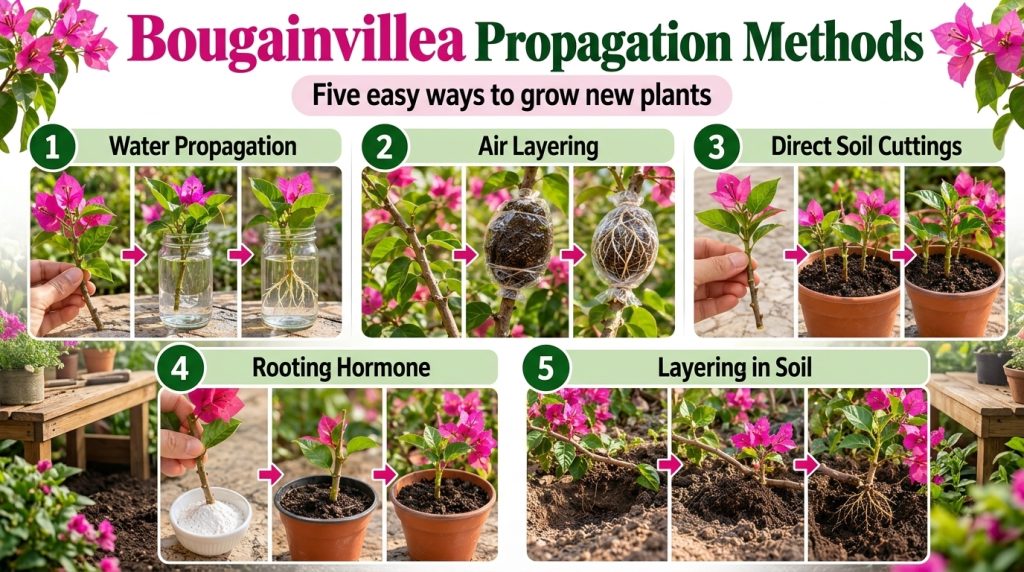
1. Water Propagation for Cuttings
Water propagation is a popular and satisfying method because you can watch the roots develop. It’s a great option for those new to propagating.
- Choosing Cuttings: Select a healthy, semi-hardwood stem (not too green and flexible, nor too old and woody) about 4-6 inches long. It should have at least 3-4 nodes. Make a clean cut just below a node.
- Preparation: Remove all leaves from the lower two-thirds of the cutting. You can dip the cut end in rooting hormone, though it’s not strictly necessary for water propagation.
- Water Setup: Place the cutting in a clear glass or jar filled with clean, lukewarm water. Ensure no leaves are submerged, as they will rot.
- Care: Place the jar in a warm spot with bright, indirect light. Change the water every few days to prevent bacterial growth.
- Transplanting: Roots typically form in 4-8 weeks. Once roots are about 1-2 inches long, gently transplant the cutting into a small pot filled with well-draining potting mix.
Practical Tip: A clear container allows you to monitor root development and know exactly when it’s time to pot them up. Too long in water can make roots fragile.
2. Soil Propagation: Direct Planting
This method often yields stronger, more robust plants as the roots adapt directly to a soil environment.
- Choosing Cuttings: Similar to water propagation, select healthy, semi-hardwood stems, 4-6 inches long, cut just below a node.
- Preparation: Remove lower leaves, leaving only 2-3 leaves at the top. Dip the cut end into a powdered or gel rooting hormone to significantly improve success rates.
- Potting Medium: Use a light, well-draining rooting mix, such as a blend of perlite and peat moss, or sand and peat. Pre-moisten the mix.
- Planting: Create a small hole in the potting mix with a pencil or stick. Insert the cutting about 2-3 inches deep, ensuring at least one node is buried. Gently firm the soil around it.
- Environment: Place the potted cutting in a warm location (ideally 70-80°F or 21-27°C) with bright, indirect light. High humidity is crucial, which you can achieve by covering the pot and cutting with a clear plastic bag or dome, ensuring some air circulation daily to prevent mold.
- Rooting Time: Roots can take anywhere from 6-12 weeks to form. You’ll know it’s rooted when you see new leaf growth or feel slight resistance when gently tugging the cutting.
Practical Tip: Maintain consistent moisture in the soil, but avoid overwatering, which can lead to rot. The plastic cover helps maintain humidity and reduces the need for frequent watering.
3. Node-Based Stem Cuttings
While often mislabeled, Bougainvillea doesn’t typically propagate from a single leaf without a node. What’s often referred to as ‘leaf-bud propagation’ actually uses a small stem section that includes a leaf, its petiole, and the crucial axillary bud located at the base of the leaf. This bud is where new growth originates.
- Selecting the Cutting: Choose a healthy, mature stem. Cut a section that includes one leaf, its petiole, and the axillary bud directly above where the leaf attaches to the stem. Ensure there’s about 1/2 inch of stem on either side of the node.
- Preparation: Dip the stem portion (including the bud) into rooting hormone.
- Planting: Plant the cutting horizontally or at a slight angle in a well-draining rooting medium, with the bud just barely covered by the soil or exposed. The leaf can remain exposed above the soil.
- Care: Provide the same warm, humid, and brightly lit conditions as for direct soil propagation.
- Growth: The new plant will sprout from the axillary bud. This method can sometimes produce a more compact plant initially.
Practical Tip: The presence of the axillary bud is non-negotiable for success with this method. Without it, a leaf will likely root but won’t be able to form a complete new plant.
4. Air Layering for Established Branches
Air layering is an excellent technique for propagating Bougainvillea, especially if you want a larger, more established plant faster or if stem cuttings have been challenging. It involves rooting a section of stem while it’s still attached to the parent plant.
- Selecting a Branch: Choose a healthy, semi-hardwood branch about 1/2 to 1 inch in diameter that is straight and strong.
- Preparation: About 6-12 inches from the tip of the branch, use a sharp, clean knife to make two parallel cuts around the circumference of the branch, about 1 inch apart. Carefully peel off the bark strip between these two cuts. Scrape away the greenish cambium layer to expose the inner white wood. This prevents the bark from re-growing.
- Rooting Hormone: Apply rooting hormone gel or powder to the exposed, scraped section of the stem.
- Rooting Medium: Moisten a handful of sphagnum moss or a well-draining potting mix. Wrap this medium around the exposed, scraped stem section, ensuring it completely covers the area.
- Wrapping: Securely wrap the moss-covered section with clear plastic film (like cling wrap), tying it tightly at both ends to seal in moisture. You can also use aluminum foil over the plastic to block light, which some growers believe encourages faster rooting.
- Rooting Time: Roots will begin to form within the moss in 6-12 weeks. You’ll see them through the clear plastic.
- Separation & Planting: Once a good network of roots has formed, cut the branch just below the rooted section. Carefully remove the plastic, and plant the new, rooted Bougainvillea in a pot with well-draining soil. Keep it well-watered and in partial shade for a few weeks to acclimate.
Practical Tip: Ensure the plastic wrap is completely sealed to maintain humidity. If it dries out, rooting will fail.
5. Grafting for Unique Varieties and Vigor
Grafting is a more advanced technique where you join two different Bougainvillea parts (the scion and the rootstock) to grow as one plant. This is particularly useful for creating multi-colored plants, growing a specific variety onto a hardier rootstock, or repairing damaged plants.
- Scion Selection: Choose a healthy, disease-free stem section (scion) of the desired Bougainvillea variety, about 4-6 inches long, with several healthy buds. The diameter should match that of your rootstock as closely as possible.
- Rootstock Selection: Use a robust, established Bougainvillea plant or a strong seedling as the rootstock. Ensure it’s healthy and actively growing.
- Joining: There are various grafting techniques (e.g., whip-and-tongue, cleft graft, bud graft). For beginners, a simple splice or whip graft is often easiest. Make matching angled cuts on both the scion and the rootstock. Carefully align the cambium layers (the green tissue just beneath the bark) of both pieces.
- Securing the Graft: Bind the joined parts tightly with grafting tape or parafilm to hold them in place and prevent moisture loss.
- Aftercare: Place the grafted plant in a protected, warm, and humid environment, out of direct sun. It can take several weeks to months for the graft to heal and new growth to emerge. Keep the rootstock trimmed of any sprouts that appear below the graft union to ensure the scion gets all the energy.
Practical Tip: Clean, sharp tools are crucial for successful grafting. Practice cuts on discarded stems to perfect your technique before working on your precious plants.
Essential Bougainvillea Care Tips
Once you’ve propagated your Bougainvillea, proper care will ensure they thrive:
- Sunlight: Bougainvillea absolutely loves sun! Provide at least 6 hours of direct sunlight per day for the best blooms.
- Soil & Drainage: They prefer slightly acidic to neutral soil (pH 5.5-6.5) that drains exceptionally well. They are intolerant of wet feet, so amend heavy clay soils with sand or perlite.
- Watering: Water deeply when the top few inches of soil are dry. Once established, Bougainvillea is quite drought-tolerant. However, consistent moisture during bloom cycles encourages more flowers. Reduce watering significantly in winter or during dormancy.
- Fertilizing: Feed during the growing season with a balanced fertilizer or one high in phosphorus to encourage blooms, but avoid over-fertilizing with nitrogen, which promotes leafy growth at the expense of flowers.
- Pruning: Prune after a flush of blooms to maintain shape, encourage bushiness, and promote new flowering growth. They can tolerate heavy pruning.
- Container Gardening: Bougainvillea thrives in containers, especially if they are slightly root-bound. This can also help control their size. Ensure pots have excellent drainage.
Regional Considerations for Bougainvillea Growers
Bougainvillea is a tropical perennial and is most reliably perennial in USDA Hardiness Zones 9-11. In these warmer regions, they can grow into large, magnificent specimens, often used as hedges, groundcovers, or magnificent climbers over pergolas and walls.
- Zones 9-11: Plant outdoors in spring after all danger of frost has passed. They will grow and bloom profusely through summer and fall, often continuing into winter in frost-free areas.
- Zones 8b: With significant winter protection (e.g., mulching, covering, planting in a very sheltered microclimate), some varieties may survive mild winters, but they can experience dieback.
- Zones 3-8a: Bougainvillea is typically grown as an annual or as a container plant that is brought indoors before the first frost. Treat them as houseplants during winter, giving them a bright, sunny window and reducing water. They often go semi-dormant indoors.
Remember that USDA zones primarily indicate winter cold tolerance. Local microclimates, summer heat, and humidity also play a significant role in how well your Bougainvillea performs.
Avoiding Common Propagation Pitfalls
- Poor Cuttings: Using too green (softwood) or too woody (hardwood) cuttings reduces success. Aim for semi-hardwood.
- Lack of Humidity: Cuttings dry out quickly. A humidity dome or plastic bag is essential for soil propagation.
- Overwatering: Leads to rot. Ensure excellent drainage and allow the top layer of soil to dry slightly between waterings.
- Insufficient Light: Cuttings need bright, indirect light to photosynthesize and develop roots, but direct, intense sun can scorch tender new growth.
- Impatience: Propagation takes time. Don’t constantly disturb cuttings to check for roots, as this can damage fragile new growth.
Cultivate Your Bougainvillea Dreams
With these five propagation methods, you’re now equipped to fill your garden and home with the breathtaking color of Bougainvillea. From simple water rooting to the more intricate art of grafting, each method offers a unique journey and a rewarding outcome. Remember, gardening is a continuous learning process, and every successful propagation builds your confidence and connection to the plant world. So grab your pruners, choose your method, and start growing more of these spectacular plants today!