Mastering Canna Lily Winter Care: Simple Steps for Stunning Spring Blooms
There’s nothing quite like the explosion of color and tropical flair that Canna Lilies (Canna spp.) bring to a summer garden. Their bold foliage and vibrant flowers, ranging from fiery reds to sunny yellows and exotic bi-colors, create a breathtaking display that truly captivates. As the chill of autumn approaches, many gardeners face a common question: how can I ensure these magnificent plants return to dazzle us again next spring? The secret lies in proper winter care, transforming what seems like a daunting task into a simple, rewarding garden ritual. Getting your cannas ready for winter now means these beauties will not only survive but will return even stronger, providing an even more spectacular show in the seasons to come. Let’s delve into the practical steps to protect your precious rhizomes and secure their vibrant future.
Why Winter Care is Essential for Canna Lilies
Canna lilies are technically tropical to subtropical perennials, hardy primarily in USDA Zones 7 through 11, though specific cultivars might vary. In these warmer zones, their rhizomes can often remain in the ground year-round with a protective layer of mulch. However, if you garden in colder regions (USDA Zones 6 and below), the soil will freeze deep enough to damage or kill the rhizomes. To enjoy these striking plants annually, gardeners in cooler climates must lift and store their canna rhizomes indoors over winter. This crucial process ensures their survival, allowing them to be replanted in spring for another season of glorious blooms. Think of it as providing a cozy, safe haven for them during their dormant period.
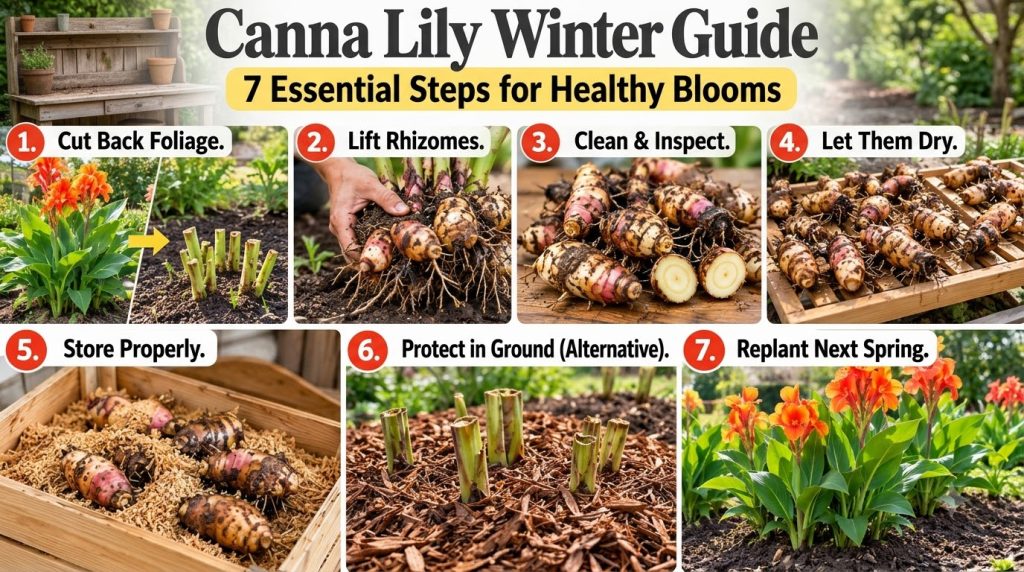
Your 7-Step Guide to Winterizing Canna Lily Rhizomes
Successfully overwintering canna lilies is a straightforward process when you follow these practical gardening tips. Each step is designed to protect the rhizomes from cold, rot, and desiccation, preparing them perfectly for their spring reawakening.
Step 1: Trim Back Foliage
Once the first light frost touches your garden, you’ll notice the canna foliage beginning to yellow or blacken. This is your cue! Before a hard freeze sets in, use clean, sharp pruning shears to cut back the stalks to about 4-6 inches above the soil line. This signals to the plant that it’s time to direct its energy back into the rhizomes, strengthening them for dormancy. Don’t worry about removing too much; the goal is to eliminate the cold-damaged top growth.
Step 2: Carefully Dig Up Rhizomes
After trimming, it’s time to unearth your hidden treasures. Using a garden fork or spade, carefully dig a wide circle around the base of each canna plant, about 6-12 inches from the stems. Gently loosen the soil and lift the entire clump of rhizomes. Be cautious not to damage the delicate rhizomes, as any nicks or cuts can invite disease during storage. The goal is to extract them intact, along with a good portion of the surrounding soil to protect them during transport.
Step 3: Clean Off Excess Soil
Once lifted, gently brush off as much loose soil as possible from the rhizome clumps. You can use your hands or a soft brush for this. Avoid washing the rhizomes with water, especially if they are going into immediate storage, as excess moisture can lead to rot. The aim is to remove the bulk of the soil while leaving a thin layer that helps protect the rhizomes’ skin, allowing them to cure slightly.
Step 4: The Crucial Drying Period
This is a vital step to prevent rot in storage. After cleaning, lay the rhizomes out in a single layer in a cool, dry, well-ventilated area, away from direct sunlight. A shed, garage, or covered porch works well. Allow them to air-dry for several days to a week. You’ll notice the skin of the rhizomes developing a slightly tougher, more leathery texture. This curing process seals any minor wounds and reduces moisture content, significantly preventing mold and rot during their winter slumber.
Step 5: Pack for Optimal Storage
Once thoroughly dry, your canna rhizomes are ready for packing. Choose a sturdy container like a cardboard box, a plastic storage bin with ventilation holes, or even an old laundry basket. Line the container with a layer of insulating material such as peat moss, sawdust, dry sand, or shredded newspaper. Place the rhizomes in the container, ensuring they don’t touch each other if possible, and then cover them with more packing material. This material provides insulation, absorbs excess moisture, and maintains a stable environment around the rhizomes.
Step 6: Choose the Right Storage Spot
The ideal storage location for canna rhizomes is a cool, dark, and moderately humid place. Temperatures between 40-50°F (4-10°C) are perfect. A basement, unheated closet, or root cellar often fits the bill. Avoid areas where temperatures fluctuate wildly or drop below freezing. Check your rhizomes periodically throughout the winter for any signs of shriveling (too dry) or softness/mold (too wet). If they look too dry, mist the packing material lightly; if too wet, improve ventilation or replace some packing material.
Step 7: Replant for a Spectacular Spring Display
As spring approaches and the danger of the last frost has passed—typically when soil temperatures consistently reach 60-65°F (15-18°C)—it’s time to bring your cannas out of dormancy. You can start them indoors in pots about 4-6 weeks before your average last frost date, or plant them directly into the garden once the soil is warm enough. Plant rhizomes horizontally, about 4-6 inches deep, with any visible ‘eyes’ or sprouts facing upwards. Space them 18-24 inches apart, depending on the mature size of your chosen variety. Provide consistent watering and plenty of sunlight, and watch as your cannas spring back to life, ready to create another vibrant garden show.
Common Mistakes to Avoid
- Digging too early or too late: Digging before the first light frost deprives the rhizomes of essential nutrients they store for winter. Waiting too long risks damage from hard freezes.
- Damaging rhizomes: Be gentle when digging and cleaning. Nicks and cuts are entry points for fungal diseases.
- Improper drying: Not drying enough leads to rot. Drying too much can lead to shriveled rhizomes that struggle to sprout. Aim for a leathery skin, not rock-hard.
- Storing in humid or freezing conditions: High humidity combined with insufficient ventilation is a recipe for mold. Freezing temperatures will kill the rhizomes outright.
- Neglecting to check during winter: A quick monthly check can save your entire crop from issues like dehydration or fungal growth.
Conclusion
Winterizing your canna lilies might seem like an extra chore, but it’s a deeply satisfying one that connects you to the natural cycles of your garden. By taking these seven smart, practical steps, you’re not just storing roots; you’re preserving the promise of future beauty and ensuring a spectacular return of those bold, tropical blooms. Imagine the joy of seeing those familiar shoots emerge in spring, knowing your thoughtful care made it possible. So, gather your tools, embrace the process, and get ready to enjoy your cannas for many seasons to come!