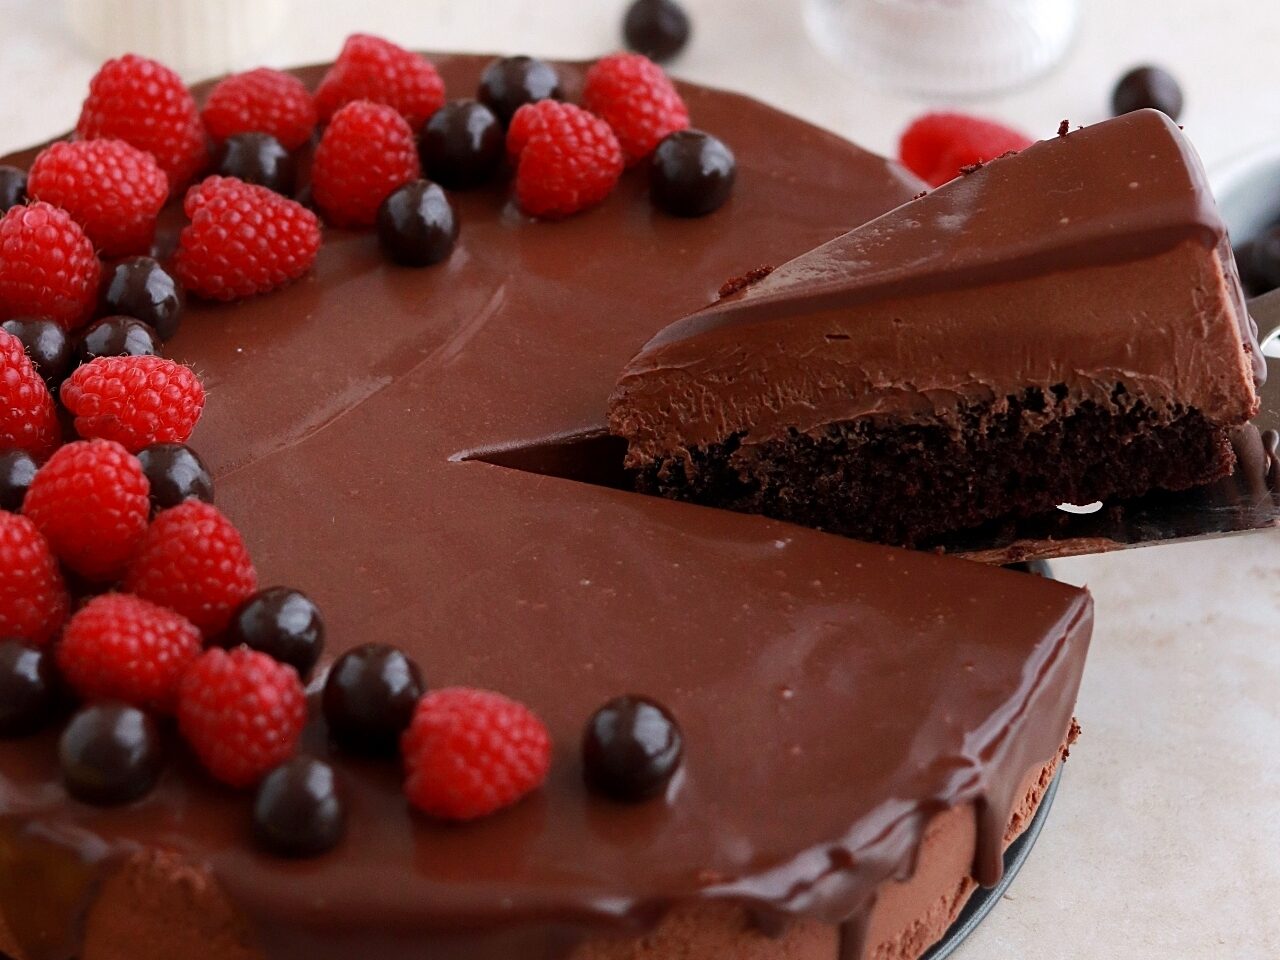
Three exquisite layers of chocolate in one beautiful and easy dessert: rich and decadent chocolate cake topped with a generous layer of velvety chocolate mousse and shiny chocolate ganache. A chocolate lover’s dream cake!
Equipment
-
9-inch springform pan
-
acetate collar
Ingredients
Chocolate Cake
- 1 Cup (133g) all purpose flour
- 3/4 Cup (150g) granulated sugar
- 1/3 Cup (30g) unsweetened natural cocoa powder
- 1 tsp baking soda
- 1/2 tsp baking powder
- 1/4 tsp salt
- 1/4 Cup (60ml) vegetable oil
- 1 large egg, room temperature
- 1 tsp pure vanilla extract
- 1/2 Cup (120ml) full-fat buttermilk*, room temperature DIY recipe in notes
- 1/2 Cup (120ml) hot coffee or hot water
Easy Chocolate Mousse
- 2 Cups (370g) semi-sweet chocolate chips
- 2 1/3 Cups (560ml) heavy whipping cream, divided
- 2 Tbsp powdered sugar
- 2 tsp pure vanilla extract
- 1 tsp instant coffee or espresso powder (optional)
Chocolate Ganache
- 1/2 Cup (93g) semi-sweet chocolate chips
- 1/2 Cup (120ml) heavy whipping cream
Garnishes (optional)
- 3 Oz fresh raspberries
- 2 Oz chocolate covered espresso beans
Instructions
1. Make the Chocolate Cake
-
Preheat the oven to 350ºF (177ºC) and prepare a 9-inch springform pan by spraying the sides with cooking spray and fitting the bottom with a parchment circle. I also like to line the outside of the pan with aluminum foil to ensure there is no leakage of cake batter, but if you’re sure your springform pan is leak-proof you can skip the aluminum foil.
-
Place all of the dry ingredients into a large bowl and whisk to combine. Add the vegetable oil, eggs, vanilla, and buttermilk and whisk until uniform. Add the hot coffee (or hot water) in a slow stream, then whisk until smooth and combined. The batter will be very thin.
-
Pour into the prepared cake pan and bake for 25-30 minutes, until a toothpick inserted comes out clean. Cool completely before moving on to making the chocolate mousse.

2. Make the Easy Chocolate Mousse
- Place the semi-sweet chocolate chips into a large glass or metal bowl and set aside.
- Place 1 Cup (240ml) of the heavy whipping cream into a small saucepan set over medium-low heat. Whisk frequently until the cream begins to simmer around the edges, then pour it over the chocolate chips and whisk until it becomes a smooth ganache. Set aside until the ganache cools to room temperature, about 25 minutes. Wait until it is room temperature to move on to the next step.
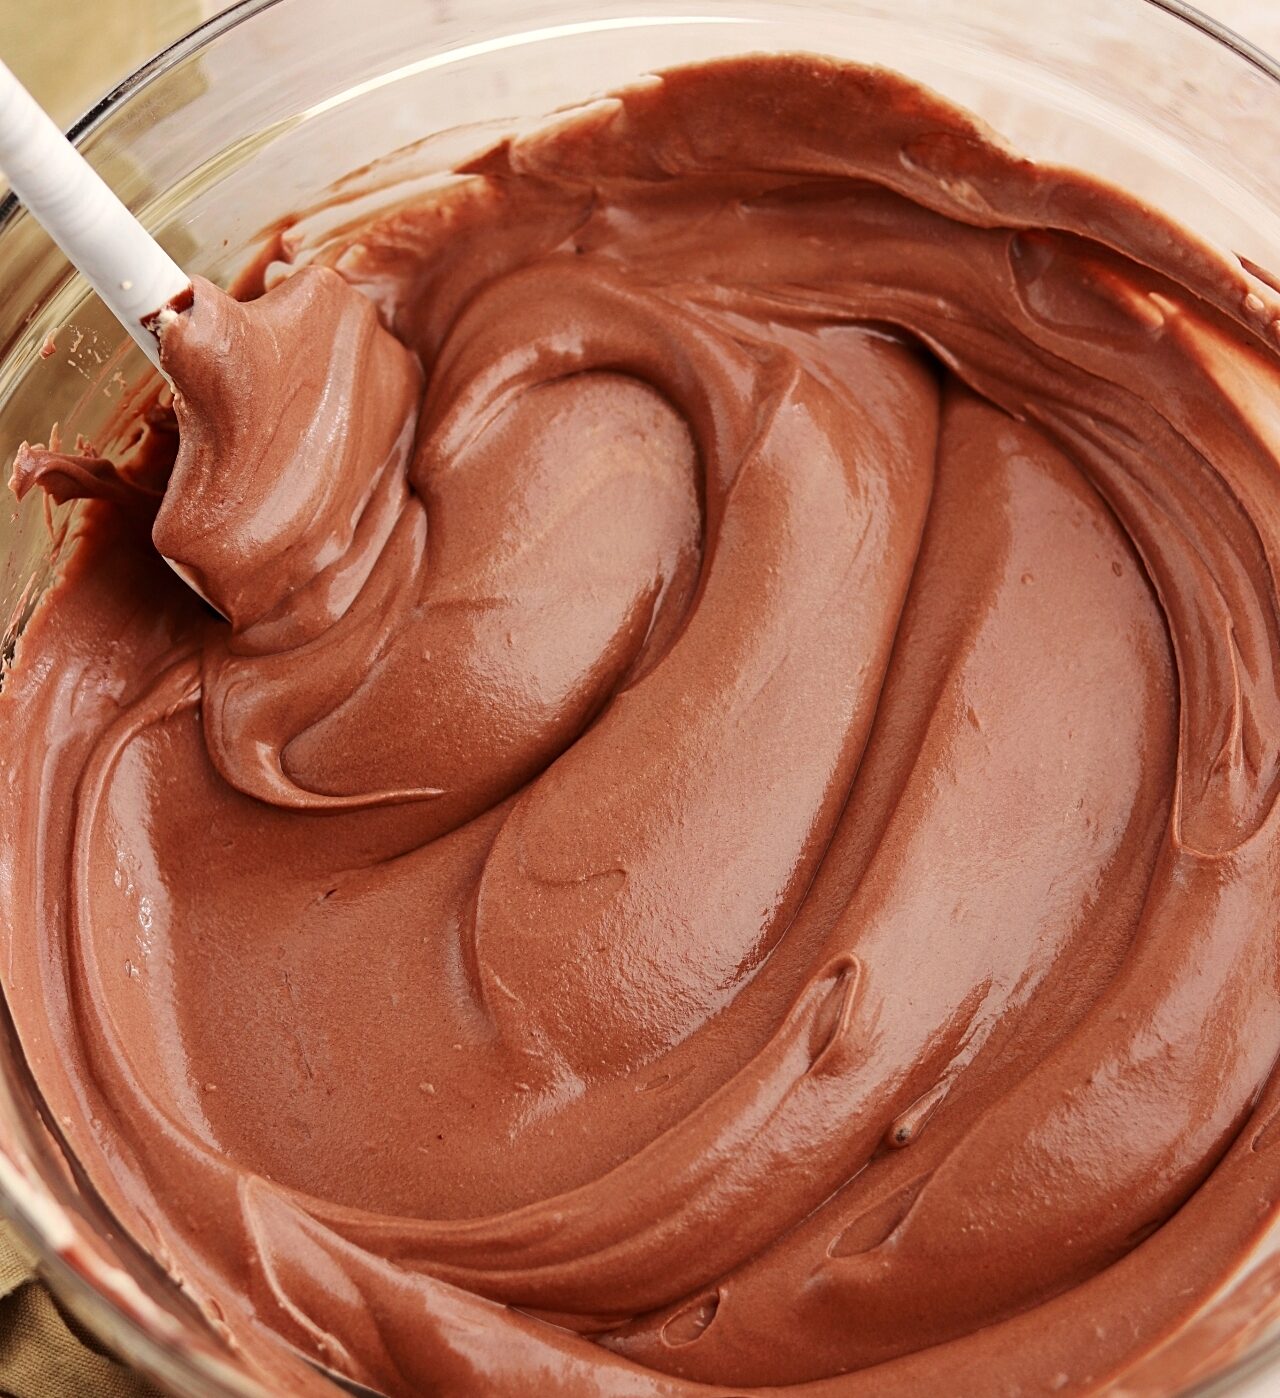
- In the bowl of your stand mixer fitted with the whisk attachment (or using a medium bowl and hand mixer), add the remaining 1 1/3 Cups (320ml) of heavy whipping cream, powdered sugar, vanilla, and instant coffee or espresso powder (if using). Mix at low speed until the ingredients are combined, then turn the mixer to high and beat until stiff peaks form, about 4 minutes.
- Add the whipped cream mixture to the cooled ganache and fold gently with a rubber spatula until there are no streaks.
3. Assemble the Chocolate Mousse Cake
-
Remove the cooled chocolate cake layer from the springform pan. Using a serrated knife or cake leveler, level the top of the cake to create an even layer. Gently peel off the parchment paper on the bottom of the cake layer, then place it back into the springform pan.
-
Wrap an acetate cake collar around the cake layer and secure it with a piece of scotch tape. This will help keep the mousse in place as it sets.
-
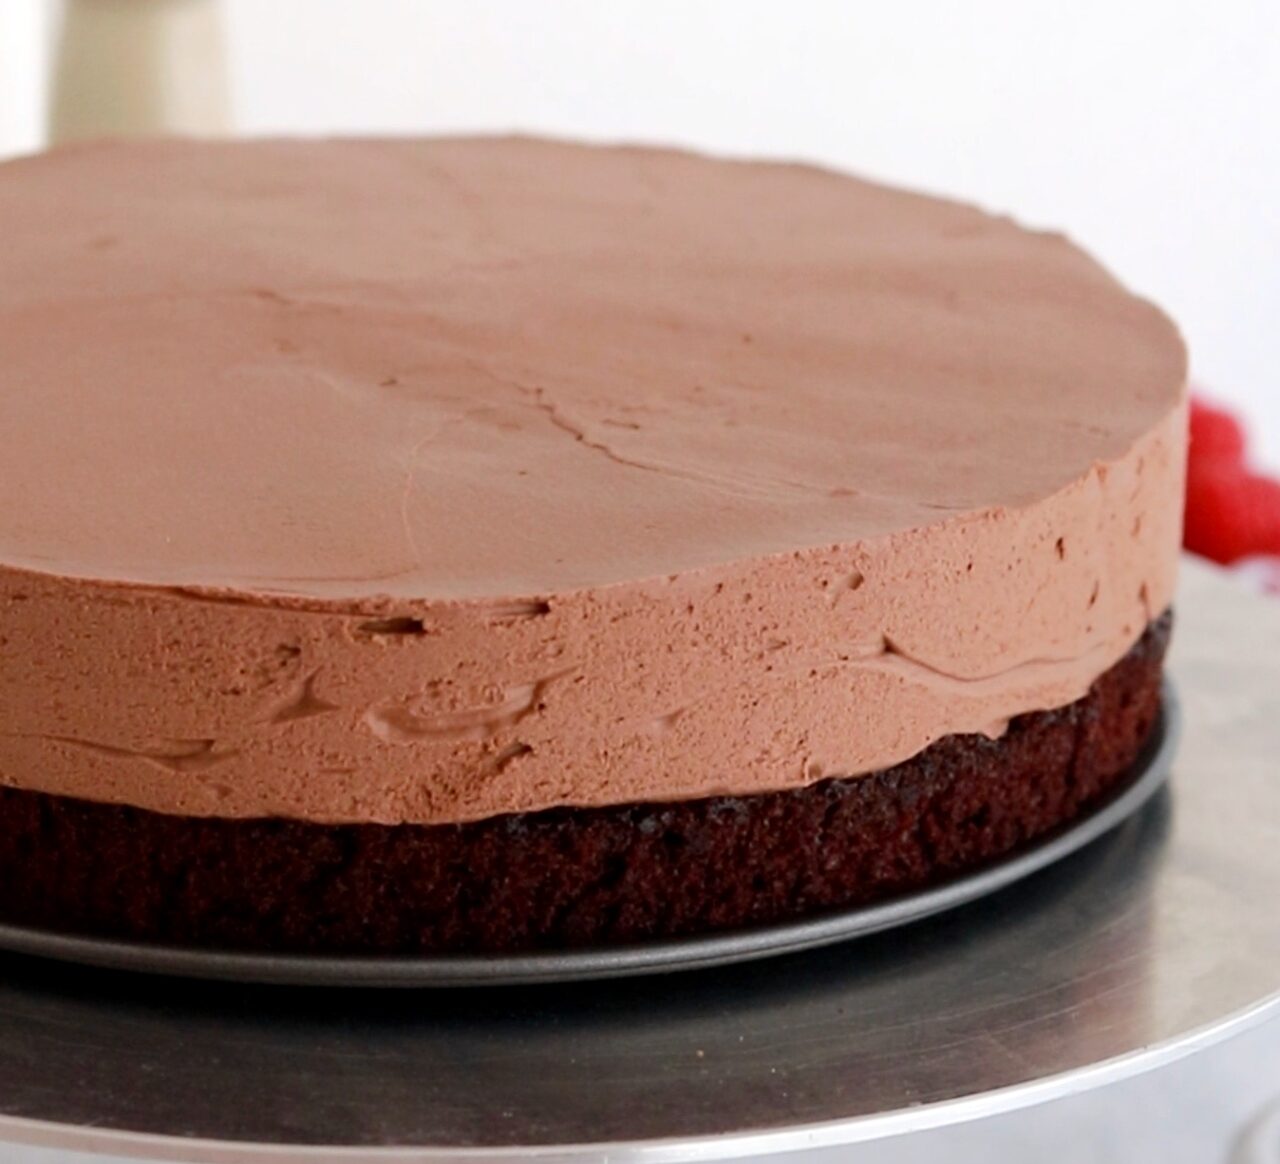
Add the chocolate mousse on top of the cake layer and smooth it down with an angled spatula until it reaches the edges of the acetate and has an even surface. Refrigerate for 6 hours, or overnight.
4. Make the Chocolate Ganache
-
Wait until the chocolate mousse cake is set before making the chocolate ganache unless you’re making it ahead of time (instructions for making ahead and reheating are in the notes section of this recipe).
-
Place 1/2 Cup (93g) of semi-sweet chocolate chips into a medium glass or metal bowl and set aside.
-
Add 1/2 Cup (120ml) of heavy whipping cream into a small saucepan set over medium heat. Bring to a simmer, whisking frequently, then pour it over the bowl of chocolate and whisk until uniform and smooth. Allow the chocolate ganache to cool to room temperature, about 20 minutes.
5. Add the Finishing Touches
- Once the mousse cake is set, unclip the springform collar and remove it. Then, unwrap the acetate from the sides of the mousse cake.
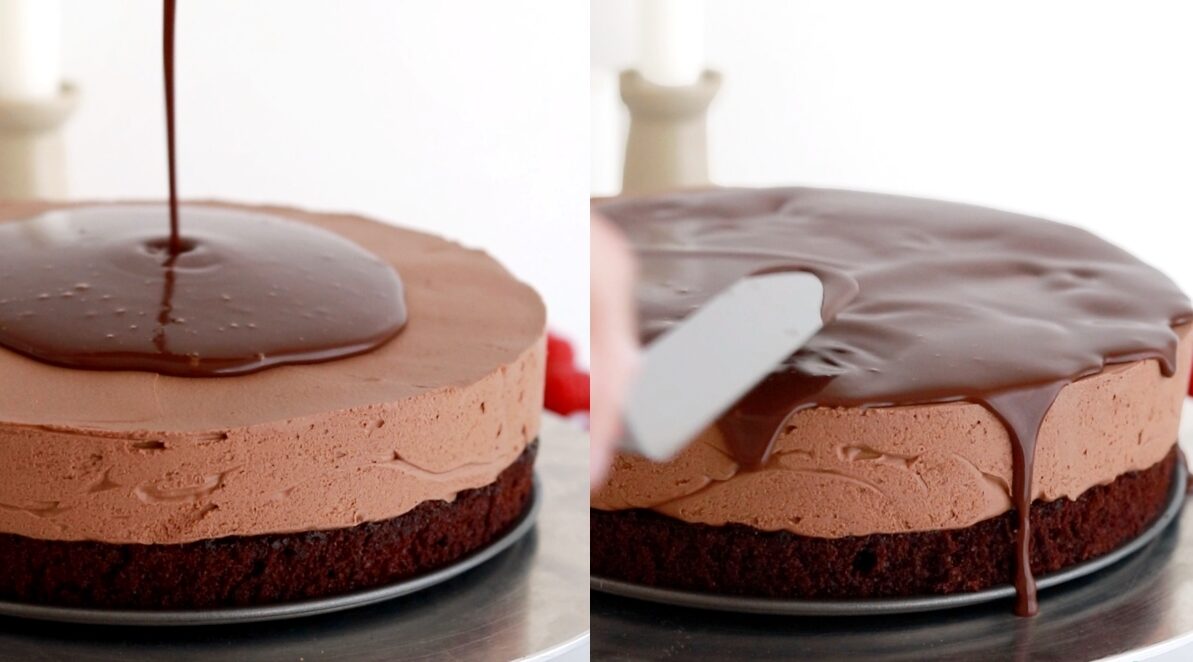
- Pour the cooled chocolate ganache over the top of the cold chocolate mousse cake and spread it with an angled spatula until it runs over the edges. To create the look pictured, garnish with fresh raspberries and chocolate covered espresso beans in a crescent design. Serve immediately, or place back into the refrigerator until you’re ready to serve.
Notes
*DIY Buttermilk recipe: add 2 tsp of white vinegar to a jar and top it with 1/2 Cup of whole milk. Stir and let sit for 15 minutes before using in the recipe.
Acetate Collar: If you don’t have access to an acetate collar, you can make one using a strip of parchment paper. Use the same technique to secure it around the cake layer.
Make Ahead Tips:
- The chocolate cake layer can be made ahead and stored at room temperature, covered tightly in plastic wrap, for up to two days. Alternatively, you can cover with plastic wrap and store in the freezer for up to two months before thawing to room temperature.
- The chocolate ganache can be made ahead and stored in the refrigerator in an airtight container for up to two weeks. When you’re ready to use it as a drip, microwave it in 10 second increments, stirring after every interval until your ganache is room temperature and uniform in consistency.
- The assembled chocolate mousse cake can be stored in the refrigerator in its springform pan, the top covered with plastic wrap or aluminum foil, for up to five days.
Chocolate Mousse Cake Tips for Success
The different components of this chocolate mousse cake are each easy to make, but there are a few things to keep in mind as you navigate this recipe:
- Plan it out. There’s a fair amount of waiting in this recipe, which requires some planning. You’ll need to wait for the cake layer to come to room temperature, wait for the ganache base for the mousse to come to room temperature, wait for the entire mousse cake to set, then wait for the ganache topping to come to room temperature before adding the finishing touches. I recommend reading through the recipe and planning out the elements over the course of a couple days so you don’t feel rushed.
- Make your springform pan leak-proof. Since you’ll be baking the chocolate cake layer in the springform pan, it’s important to make sure it’s leak-proof. Otherwise the batter might leak out in the baking process which is frustrating and messy. If you have a leaky springform pan, one trick is to line the outside with aluminum foil (in addition to lining the inside with parchment). This will catch any batter that tries to escape.
- Level the chocolate cake layer. This isn’t a requirement, but it does make the final slice a little more aesthetically pleasing because all the layers will be so even. Also, it makes the cake layer more porous for the mousse to soak in a little, which makes it even more moist.
- Let the mousse cake set. In order for the chocolate mousse cake to demold perfectly, it’s important to wait at least 6 hours for it to set. This way it won’t budge when you remove the springform collar.
- Let the ganache topping cool. The ganache topping will thicken slightly as it cools, making it perfect for pouring over the mousse cake and gently dripping down the sides. This post has everything you need to know about topping a cake with ganache and it’s worth a read if you haven’t worked with ganache before.