Tired of daily watering chores, especially during those scorching summer days? Do your plants sometimes look a little droopy, even with your best efforts? If you’re nodding along, then it’s time to discover the magic of wicking beds! Imagine a garden system that practically waters itself, saving you time, water, and worry. It’s not too good to be true, and it’s simpler to set up than you might think.
Wicking beds are a fantastic innovation for hobby gardeners, small farmers, and homesteaders alike. They offer a sustainable, efficient way to grow healthy plants with less effort. Let’s dive into how these clever planters work and how you can bring this game-changing technology to your own backyard or patio.
What Exactly is a Wicking Bed?
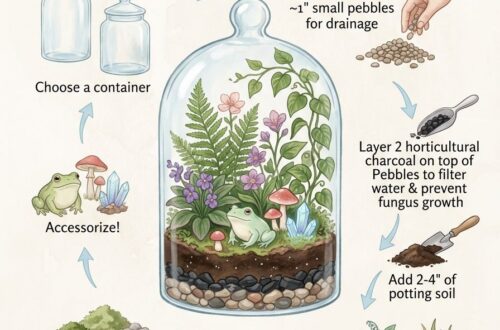
At its heart, a wicking bed is a raised garden bed or container with a built-in water reservoir at the bottom. Instead of watering from the top down, these beds allow plants to draw water up from below, through a process called capillary action. Think of it like a self-watering pot on a much larger, more efficient scale. This constant, consistent moisture supply directly to the roots creates an ideal environment for plant growth, often leading to healthier, more vigorous plants and bountiful harvests.
How Does This Clever System Work Its Magic?
The beauty of a wicking bed lies in its layered design. Let’s break down the essential components that make this self-watering wonder possible:
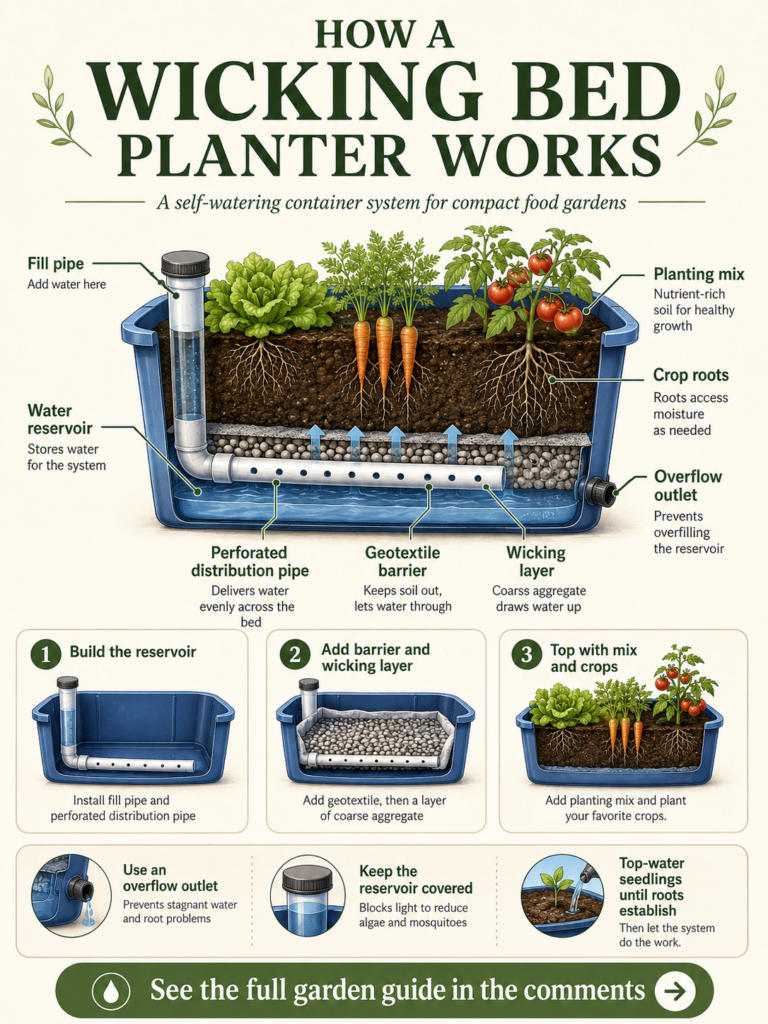 A visual guide to the internal workings of a wicking bed.
- The Water Reservoir: This is the foundation, located at the very bottom of your bed. It holds a significant amount of water, acting as a reserve for your plants. A fill pipe allows you to easily replenish this reservoir.
- Perforated Distribution Pipe: Often nestled within the reservoir, this pipe ensures water is evenly distributed throughout the lower section of the bed when you refill it.
- Geotextile Barrier: A sturdy fabric barrier (like pond liner or heavy-duty landscaping fabric) separates the water reservoir from the soil layers above. This prevents the soil from falling into the water and keeps the system clean.
- Wicking Layer: Immediately above the reservoir, this layer is crucial. It’s usually made of coarse aggregate like scoria, gravel, or even sand. Its job is to draw water up from the reservoir through capillary action, much like a sponge soaking up water.
- Planting Mix: This is your growing medium, a rich, organic soil blend where your plants will thrive. It sits on top of the wicking layer, allowing plant roots to extend down and access the moisture.
- Overflow Outlet: An essential safety feature, this pipe prevents the reservoir from overfilling, especially during heavy rains. It ensures the soil doesn’t become waterlogged, which can be detrimental to plant health.
As the soil in the planting mix dries out slightly, the wicking layer pulls water up from the reservoir, providing a consistent moisture level for your plants. This means less wasted water from evaporation and runoff, and roots that are never left thirsty!
Why Wicking Beds are a Game-Changer for Gardeners
Embracing wicking beds can transform your gardening experience. Here are just a few reasons why so many gardeners are falling in love with them:
- Water Conservation: By drastically reducing evaporation and runoff, wicking beds can use up to 50% less water than traditional top-down watering methods. Your plants get exactly what they need, and less precious water is wasted.
- Less Frequent Watering: Depending on the size of your reservoir and the weather, you might only need to top up your wicking bed every few days, or even every few weeks! This is a huge time-saver, especially for busy individuals or during vacation periods.
- Healthier Plants: Plants in wicking beds often exhibit more robust growth because they have a consistent supply of moisture. This reduces stress on the plants, making them more resistant to pests and diseases.
- Reduced Weeding: Since the top layer of soil tends to stay drier, weed seeds find it harder to germinate and establish themselves, leading to less time spent weeding.
- Nutrient Retention: Because water moves upwards, nutrients in the soil are less likely to leach away with excess watering.
Ready to Build Your Own Wicking Bed? Here’s How!
Creating your own wicking bed isn’t as daunting as it might sound. You can convert an existing raised bed, use a large container, or even build one from scratch. Here’s a simplified breakdown of the process:
Step 1: Build the Reservoir
First, you’ll need a water-tight container. This could be a sturdy plastic tub, a lined raised garden bed, or a purpose-built wicking bed kit. The bottom 6-12 inches of your container will form the reservoir. Install a perforated pipe along the bottom for water distribution and a vertical fill pipe extending from the reservoir to the top of your planting mix. Don’t forget that crucial overflow outlet—position it just above the top of your planned wicking layer to prevent overfilling.
 Starting with a watertight reservoir is key to a successful wicking bed.
Step 2: Add Barrier and Wicking Layer
Once your reservoir is ready, lay down your geotextile barrier. This could be a sheet of pond liner or heavy-duty fabric, carefully cut and draped to create a complete separation between the water reservoir and the soil above. Then, fill the space above the barrier (and around your fill pipe) with your wicking material – gravel, scoria, or coarse sand works well. This layer should be about 4-6 inches deep, ensuring good contact with the water below and the soil above.
Step 3: Top with Mix and Crops
Now, it’s time for the good stuff! Fill the rest of your bed with a high-quality organic planting mix. Aim for a mix that’s rich in compost and holds moisture well, but also drains adequately. Once your soil is in place, you’re ready to plant your chosen vegetables, herbs, or flowers. Give your newly planted seedlings a good initial top-watering to help them settle in and establish their roots.
Essential Tips for Wicking Bed Success
To get the most out of your wicking bed and ensure your plants thrive, keep these friendly tips in mind:
- Always Use an Overflow Outlet: This is non-negotiable! An overflow ensures your reservoir doesn’t overfill during heavy rain, preventing your soil from becoming waterlogged and potentially drowning your plant roots.
- Keep the Reservoir Covered: Once your wicking bed is established, try to keep the top of your reservoir fill pipe covered. This minimizes evaporation from the reservoir itself and helps deter mosquitoes from laying eggs.
- Top-Water Seedlings Until Roots Establish: When you first plant seeds or small seedlings, their roots might not yet reach the wicking layer. Continue to water them gently from the top for the first week or two until their root systems are strong enough to draw water from below.
- Choose the Right Plants: Most vegetables, herbs, and many flowers do wonderfully in wicking beds. Leafy greens (lettuce, spinach), root vegetables (carrots, radishes), and fruiting plants (tomatoes, peppers, strawberries) are excellent choices.
- Quality Soil Matters: Invest in a good quality, well-draining organic potting mix. Healthy soil is the foundation for healthy plants.
- Monitor Water Levels: While wicking beds are low maintenance, occasionally check your fill pipe to see if the reservoir needs topping up, especially during hot, dry spells.
Ready to Grow?
Wicking beds truly simplify the gardening process, making it more enjoyable and less demanding. They are a smart, sustainable solution for growing food in small spaces or for anyone looking to reduce their water usage and watering schedule. By understanding how they work and following these practical steps, you’ll be well on your way to a thriving, self-watering garden that brings you joy and delicious harvests. Give it a try – your plants (and your back) will thank you!