Grow Straighter, Healthier Carrots with This Clever Egg Carton Planting Hack
There’s nothing quite like pulling a vibrant, sweet carrot from your garden – especially when it’s perfectly straight and unblemished. Yet, many home gardeners find growing beautiful, un-forked carrots to be a persistent challenge. The dream of those long, tapered roots often turns into a harvest of short, crooked, or bumpy specimens. What if there was a simple, everyday item that could revolutionize your carrot planting, giving you better spacing and encouraging those prized straight roots? There is, and it’s likely sitting in your recycling bin right now: an egg carton.
This ingenious method isn’t just a garden trick; it’s a practical approach to addressing some of the most common issues in carrot cultivation. By using a biodegradable egg carton, you can ensure ideal spacing from day one, minimize root disturbance, and give your carrots a head start towards growing long and true. Let’s dig into how this simple hack can transform your carrot patch and lead to your most bountiful, beautiful harvest yet.
The Core Challenge: Why Carrots Fork and Twist
Carrots are root vegetables, meaning the part we eat develops entirely underground. Their success hinges on an environment that allows this taproot to grow unimpeded. The most common reasons carrots grow misshapen include:
- Compacted or Rocky Soil: Any resistance, such as stones, clods of heavy clay, or hardpan, will cause the delicate root tip to split or grow around the obstruction, resulting in forking or twisting.
- Overcrowding: When carrot seeds are sown too thickly, the emerging seedlings compete fiercely for space, nutrients, and moisture. This intense competition often leads to small, stunted, or intertwined roots.
- Inconsistent Moisture: Fluctuations between very wet and very dry soil can stress the developing roots, sometimes leading to splitting or cracking.
- Pests: Certain soil-dwelling pests, like root nematodes, can damage roots, causing abnormal growth or bumps.
While the egg carton hack primarily addresses the issue of overcrowding, it also indirectly supports better root development by providing a structured, ideal starting point.
Understanding the Egg Carton Advantage for Carrots
The beauty of using an egg carton lies in its simplicity and inherent design. Here’s how it helps your carrot growing efforts:
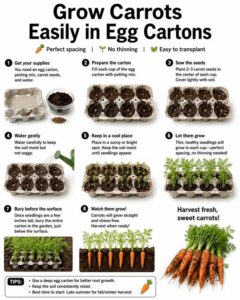
Perfect Spacing: Each cell in a standard egg carton offers approximately 2 to 3 inches of space. This is precisely the spacing carrots need to grow to their full potential without competing with neighbors. You eliminate the tedious task of thinning later, which can disturb adjacent roots.
Minimized Root Disturbance: Carrots dislike transplanting. Their sensitive taproot can easily be damaged, leading to forking. By sowing directly into the carton which then gets buried, you avoid transplant shock entirely.
Biodegradable Container: Crucially, this method works only with pulp or paper-based egg cartons that will naturally break down in the soil. As the carton decomposes, it adds a small amount of organic matter to your garden bed, and the carrot roots can easily grow through it.
Easy to Plant: This method makes seed placement simple and organized, especially for tiny carrot seeds that are often difficult to handle and space correctly.
Step-by-Step Guide: The Egg Carton Carrot Hack
1. Choose the Right Egg Carton
Select only unbleached, paper or pulp egg cartons. Avoid plastic, styrofoam, or waxed cartons, as these will not decompose in the soil and will hinder root growth. You’ll want a 12-cell carton for a good planting grid.
2. Prepare Your Garden Bed
This is arguably the most critical step for straight carrots, egg carton or not. Carrots need deep, loose, well-draining soil free of rocks, roots, and compacted areas. Dig down at least 12-18 inches, amending heavy clay or sandy soils with plenty of well-rotted compost. Break up any large soil clumps. A fine, crumbly texture is ideal. Ensure your bed is level.
3. Fill the Carton Cells with Fine Soil
Place your egg carton directly onto the prepared garden bed. Gently fill each cell with a light, fine-textured seed-starting mix or your prepared garden soil. Don’t compact it; keep it loose. This gives the seeds an ideal medium for germination and initial root development.
4. Plant Your Carrot Seeds
In each cell, plant 1-2 carrot seeds. Carrot seeds are tiny, so try not to plant them too deeply. A depth of about 1/4 inch is perfect. You can lightly press them onto the surface and then sprinkle a thin layer of fine soil or vermiculite over them. If planting two seeds, you can thin to the strongest seedling later if needed, but often one will naturally outcompete the other.
5. Water Gently
Mist the planted seeds in the carton gently. The carton itself will absorb some moisture. Keep the soil consistently moist but not waterlogged. You can even pre-moisten the soil in the carton cells before planting for better seed-to-soil contact.
6. Bury the Carton
Once the seeds are planted and lightly watered, gently cover the entire egg carton with about 1/2 to 1 inch of your fine garden soil. Again, avoid compacting it. The goal is to encase the carton, allowing it to decompose and blend into the garden bed as the carrots grow.
7. Mark Your Rows
It’s easy to forget where those tiny seeds are! Use stakes or labels to mark the beginning and end of your carrot rows, especially since germination can take 10-21 days.
Ongoing Care for a Bountiful Carrot Harvest
Sunlight and Watering
Carrots require full sun, meaning at least 6-8 hours of direct sunlight per day. Consistent moisture is crucial for uniform root development. Water deeply and regularly, especially during dry spells. Aim for about 1 inch of water per week, either from rain or irrigation. As the carrots mature, avoid letting the soil completely dry out and then re-wetting, as this can cause roots to crack.
Soil and Nutrients
Continue to ensure the soil remains loose. If any part of the carrot’s ‘shoulder’ emerges from the soil, hill up a little more soil around it to prevent greening (which makes the top bitter). While carrots don’t need excessive fertilization, a balanced compost amendment at planting time is usually sufficient. Avoid high-nitrogen fertilizers, which promote leafy growth at the expense of root development.
Pest Management
The most common carrot pest is the carrot rust fly, which lays eggs near the base of the plant, and its larvae tunnel into the roots. Covering your carrot bed with a fine insect mesh (row cover) immediately after planting can effectively deter this pest. Crop rotation also helps. Check for signs of aphids or other foliage pests and address them with organic solutions like insecticidal soap if necessary.
Harvesting Your Carrots
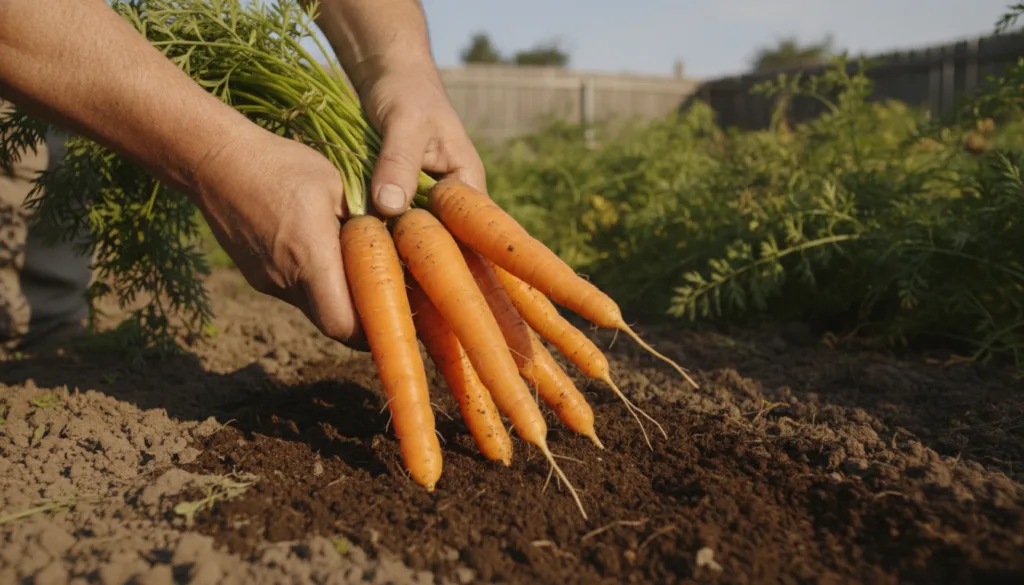
Carrots are typically ready for harvest in 60-80 days, depending on the variety. You can gently feel the shoulder of the carrot just below the soil line to gauge its size. Harvest by gently loosening the soil around the carrot and pulling straight up. For continuous harvest, plant small batches every 2-3 weeks (succession planting) from early spring until mid-summer.
Common Mistakes to Avoid
- Using Non-Biodegradable Cartons: This is a critical error. Plastic, styrofoam, or waxed cartons will not break down and will restrict root growth.
- Skipping Soil Preparation: The egg carton aids spacing, but it cannot overcome rocky, heavy, or compacted soil. Thorough soil amendment is non-negotiable for straight carrots.
- Planting Too Deep: Even with the carton, carrot seeds should only be lightly covered.
- Inconsistent Watering: Fluctuating moisture leads to tough, cracked, or split roots. Maintain steady soil moisture.
- Thinning Neglect: While the egg carton greatly reduces the need, if you planted multiple seeds per cell and more than one strong seedling emerges, a careful thinning to the strongest seedling will prevent competition.
Regional Planting Considerations Across the USA
Carrots are generally grown as annuals and thrive in cooler temperatures, making them suitable for many climates across the United States. Timing your planting relies more on soil temperature and frost dates than USDA hardiness zones.
- Northern Climates (Zones 3-6): Plant carrots as soon as the soil can be worked in early spring, usually 2-3 weeks before your last expected frost date. Soil temperature should be at least 45°F (7°C). You can often get a second planting in mid-summer for a fall harvest.
- Mid-Atlantic and Midwest (Zones 6-7): Similar to northern climates, plant in early spring. These regions often have ideal conditions for successive plantings through spring and early summer, and another planting in late summer for fall harvest.
- Southern Climates (Zones 8-11): In warmer regions, carrots are best grown as a fall, winter, or early spring crop. Plant in late summer or early fall (September-October) for a winter harvest, avoiding the intense summer heat which can make carrots woody and bitter. Some regions might allow for an early spring planting before temperatures get too high.
Always check your local extension service for precise planting dates and recommended varieties for your specific microclimate. Soil temperature is a more reliable indicator than calendar dates alone.
Harvesting the Rewards
With the egg carton hack, coupled with meticulous soil preparation and consistent care, you’ll be well on your way to harvesting rows of perfectly straight, sweet carrots. This simple trick makes seed starting less daunting and sets the stage for a truly satisfying harvest. Embrace this practical approach, and enjoy the delicious results of your well-tended garden!