Master Orchid Propagation: Grow New Plants from Flower Spikes
Orchids, with their ethereal blooms and elegant form, captivate gardeners around the world. While they might seem exotic and challenging to propagate, the truth is that many common orchid varieties, especially the beloved Phalaenopsis or Moth Orchid, can be successfully multiplied right in your home. Imagine transforming a single orchid into a thriving collection, sharing your passion, or simply enjoying the satisfaction of nurturing new life from your existing plants.
This guide will demystify the process of propagating orchids from their flower spikes, a rewarding technique that allows you to create new plants from a mature one. We’ll walk through each step, from selecting the right spike to caring for your new orchid babies, ensuring you gain the confidence and practical skills to expand your orchid family.
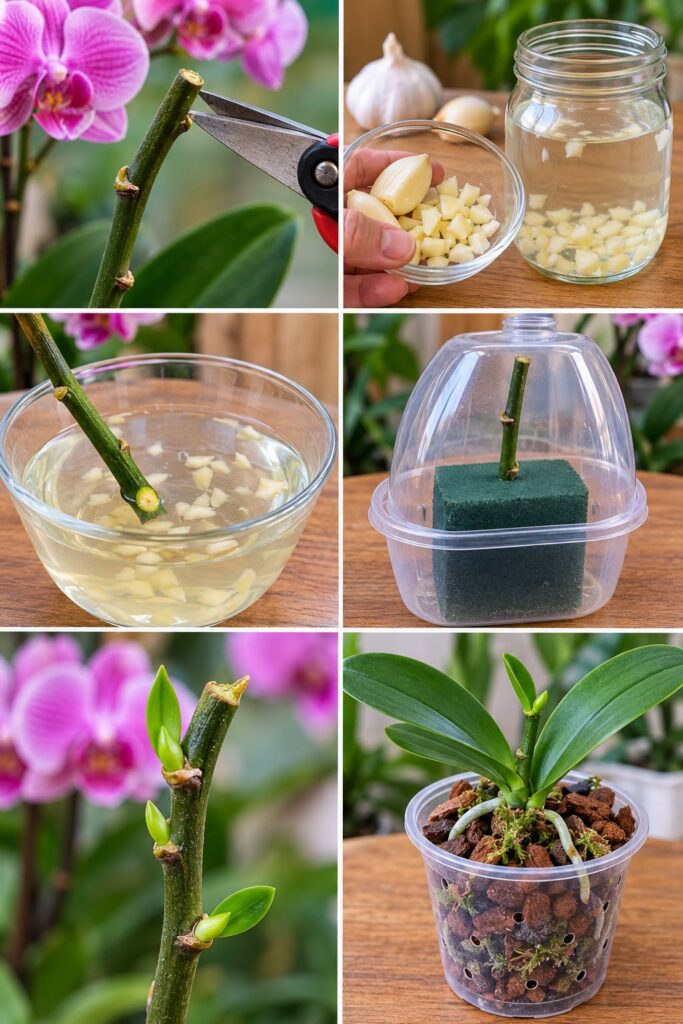 Learn how to propagate your orchids from flower spikes with these step-by-step instructions.
The Art of Orchid Propagation
Orchid propagation is essentially encouraging a part of a mature plant to develop into a new, independent plant. For Phalaenopsis orchids, one of the most effective and accessible methods is using their flower spikes. These spikes contain ‘nodes’ – small bumps along the stem – which, under the right conditions, can be stimulated to produce new plantlets, known as ‘keikis’ (a Hawaiian word for ‘baby’).
This method allows you to extend the life of a spent flower spike and multiply your collection without needing specialized equipment like tissue culture labs. It’s a wonderful way to understand the life cycle of your orchids more deeply and participate actively in their growth.
Preparing Your Orchid for Propagation
Success begins with careful preparation. Choosing the right flower spike and making a clean cut are crucial for a healthy start.
Selecting and Cutting Your Flower Spike
After your orchid has finished blooming, its flower spike still holds potential. Look for a healthy, green spike with at least 2-3 nodes remaining below where the last flower bloomed. Avoid spikes that are yellowing or shriveling, as they are less likely to produce viable keikis.
- Sterilize Your Tools: Always use clean, sharp pruning shears or a razor blade. Sterilize them with rubbing alcohol or a flame before each cut to prevent the spread of diseases.
- Make the Cut: Identify a node about halfway down the spike, or just below the lowest spent flower if you’re keeping the upper part for potential re-blooming. Make a clean, diagonal cut about 1/2 to 1 inch above this node. You can then cut the remaining section of the spike into smaller pieces, each containing at least one node, for propagation. Aim for sections roughly 4-6 inches long.
- Seal the Wounds: Some gardeners choose to seal the cut ends of the spike with cinnamon powder (a natural fungicide) or melted wax to prevent infection and excessive moisture loss, though this step is optional if your environment is clean.
Crafting the Ideal Rooting Environment
Once you have your flower spike cuttings, the next step is to create a nurturing environment that encourages rooting and new growth.
The Garlic Water Method (and Alternatives)
The use of garlic water in plant propagation is a traditional method, believed by some to act as a mild rooting stimulant and an antimicrobial agent, helping to prevent fungal and bacterial infections. While scientific evidence specifically for orchids is limited, it’s a practice many home growers experiment with.
- To Prepare Garlic Water: Finely chop 2-3 cloves of garlic and steep them in about 1-2 cups of warm water for a few hours or overnight. Strain the mixture to remove the garlic pieces before use.
- Using Garlic Water: Submerge the bottom 1-2 inches of your orchid spike cuttings in the strained garlic water for 30 minutes to an hour.
- Alternative: Rooting Hormone: For more reliable results, consider using a commercial orchid-specific rooting hormone. These products contain auxins, plant hormones that actively stimulate root development. You can find them in powder, liquid, or gel form. Follow the product instructions for dipping the cut end of your spike.
Setting Up Your Cuttings for Success
After treatment, your spike cuttings need a suitable medium to encourage keiki formation and root growth, along with controlled humidity.
- Choosing Your Medium: While floral foam can be used, many orchid enthusiasts prefer materials that offer better aeration and moisture control. Consider:Sphagnum Moss: Lightly moisten long-fibered sphagnum moss and gently wrap it around each node, or place the entire spike section on a bed of moss.
- Fine Orchid Bark Mix: A mix of fine bark, perlite, and charcoal can also work, providing excellent drainage.
- Providing Humidity: High humidity is crucial for keiki development. Place your cuttings in a propagation dome or a clear plastic container with a lid. This creates a miniature greenhouse effect.
- Ensuring Air Circulation: While humidity is important, stagnant air can lead to fungal issues. Open the dome or container for 15-30 minutes daily to allow for air exchange. This prevents mold and rot.
- Ideal Placement: Position your propagation setup in a warm spot with bright, indirect light. Avoid direct sunlight, which can cook the delicate cuttings.
Nurturing New Growth: From Keikis to Potted Plants
Patience is a virtue in orchid propagation. It can take several weeks to many months for keikis to appear and grow.
Observing Keiki Development
Keep a close eye on the nodes along your flower spike cuttings. Small green bumps will eventually emerge, developing into tiny leaves and then roots. These are your keikis!
- What are Keikis? Keikis are genetically identical clones of the mother plant. They will develop their own leaves and, eventually, roots.
- Ideal Conditions: Continue to maintain consistent humidity, warmth (around 70-80°F or 21-27°C), and bright, indirect light. Mist the cuttings gently with water every few days to keep the medium moist but not waterlogged.
Transplanting Your Young Orchid
The most exciting step is potting your new orchid baby!
- When to Transplant: Wait until the keiki has developed at least 2-3 leaves and 2-3 roots that are 1-2 inches long. Attempting to remove them too soon can stress the plant.
- Careful Removal: Gently twist or cut the keiki from the main flower spike, ensuring you don’t damage its tender roots. If cutting, use sterile shears and leave a small piece of the spike attached to the keiki if possible.
- Potting Medium: Choose a small pot (2-3 inches in diameter) designed for orchids, with plenty of drainage holes. Use a high-quality orchid potting mix, typically composed of bark, sphagnum moss, perlite, and charcoal.
- Planting: Place a small amount of potting mix in the bottom of the pot. Carefully position the keiki so its roots are spread out, then gently fill around the roots with more potting mix, ensuring the base of the plant is just at the surface. Avoid burying the leaves.
- Post-Transplant Care: Water thoroughly after potting, allowing excess water to drain completely. Place the new plant in a warm spot with bright, indirect light and maintain good humidity.
Essential Care for Your Growing Orchids
Whether you’re caring for newly propagated keikis or mature plants, consistent and appropriate care is key to their health and blooming success.
- Sunlight: Orchids thrive in bright, indirect light. An east-facing window is often ideal. Avoid direct midday sun, which can scorch leaves. If leaves turn reddish, they are getting too much light; if they are dark green and no blooms, they need more light.
- Watering: Water thoroughly when the potting medium is nearly dry. For Phalaenopsis, this often means every 7-10 days, but it depends on your environment. A good test is to stick a finger 1-2 inches into the medium; if it feels dry, it’s time to water. Avoid letting them sit in standing water, as this leads to root rot.
- Humidity and Air Circulation: Orchids appreciate high humidity (50-70%). You can achieve this with a humidity tray, a room humidifier, or by grouping plants. Good air circulation is equally vital to prevent fungal diseases.
- Fertilization: During active growth (when new leaves or roots are forming), feed your orchids with a balanced orchid-specific fertilizer at half strength every two to four weeks. Reduce frequency during dormancy or when not actively growing.
- Common Mistakes: The most frequent issues stem from overwatering, leading to root rot; insufficient light, which prevents blooming; and a lack of proper air circulation, which invites pests and diseases. Always use sterile tools for pruning to avoid introducing pathogens.
Regional Considerations for Orchid Growers
While most orchid propagation and care happens indoors, understanding your local climate can help optimize conditions.
For gardeners in USDA Zones 9-11 with warm, humid climates, some orchids might thrive outdoors in sheltered, shady spots during favorable seasons. However, for most of the United States, Phalaenopsis orchids are best grown as houseplants where indoor temperatures and humidity can be precisely controlled. Your home’s environment, rather than outdoor USDA zones, will dictate watering frequency and light exposure. Always consider your specific microclimate—the conditions right around your plant—more than broad regional zones when growing indoors.
Conclusion: Your Journey to More Orchids
Propagating orchids from flower spikes is a deeply satisfying aspect of gardening. It connects you more intimately with the plant’s life cycle and rewards your patience with beautiful new additions to your home or garden. By following these practical steps – from making clean cuts and providing the right rooting environment to nurturing your keikis into mature plants – you’ll build both your orchid collection and your confidence as a gardener.
Embrace the journey, observe your plants closely, and enjoy the magical process of growing life. Soon, you’ll be surrounded by the elegant beauty of orchids you’ve propagated yourself, a testament to your green thumb and dedication.