Are you tired of harvesting gnarly, misshapen carrots? While their unique shapes can be charming, sometimes you just want those long, straight, picture-perfect roots that are easy to peel and prepare. The good news is, achieving a bountiful harvest of perfectly straight carrots isn’t a gardening mystery! We’re excited to share a clever, sustainable, and super effective DIY method using something you likely already have at home: egg cartons!
This simple hack helps guide your carrots as they grow, preventing them from hitting obstacles in the soil that cause them to fork or twist. It’s perfect for home gardeners looking for practical, easy-to-understand techniques to improve their harvest.
Why Do Carrots Grow Crooked?
Before we dive into the solution, let’s understand the problem. Carrots are taproots, meaning they grow one main root straight down into the soil. If this taproot encounters a rock, a clump of hard soil, or even another root, it will fork, bend, or twist around the obstacle, resulting in a crooked carrot. Compacted soil, insufficient depth, or even too much nitrogen in the soil can also contribute to misshapen carrots.
The Egg Carton Advantage: Your Secret Weapon
This ingenious method uses the individual compartments of an egg carton to create a clear, unobstructed path for each carrot’s taproot. By planting seeds directly into the bottom of each egg carton cup, you provide a mini-guide that ensures the carrot grows downward without interference. Plus, it’s a fantastic way to repurpose materials and practice sustainable gardening!
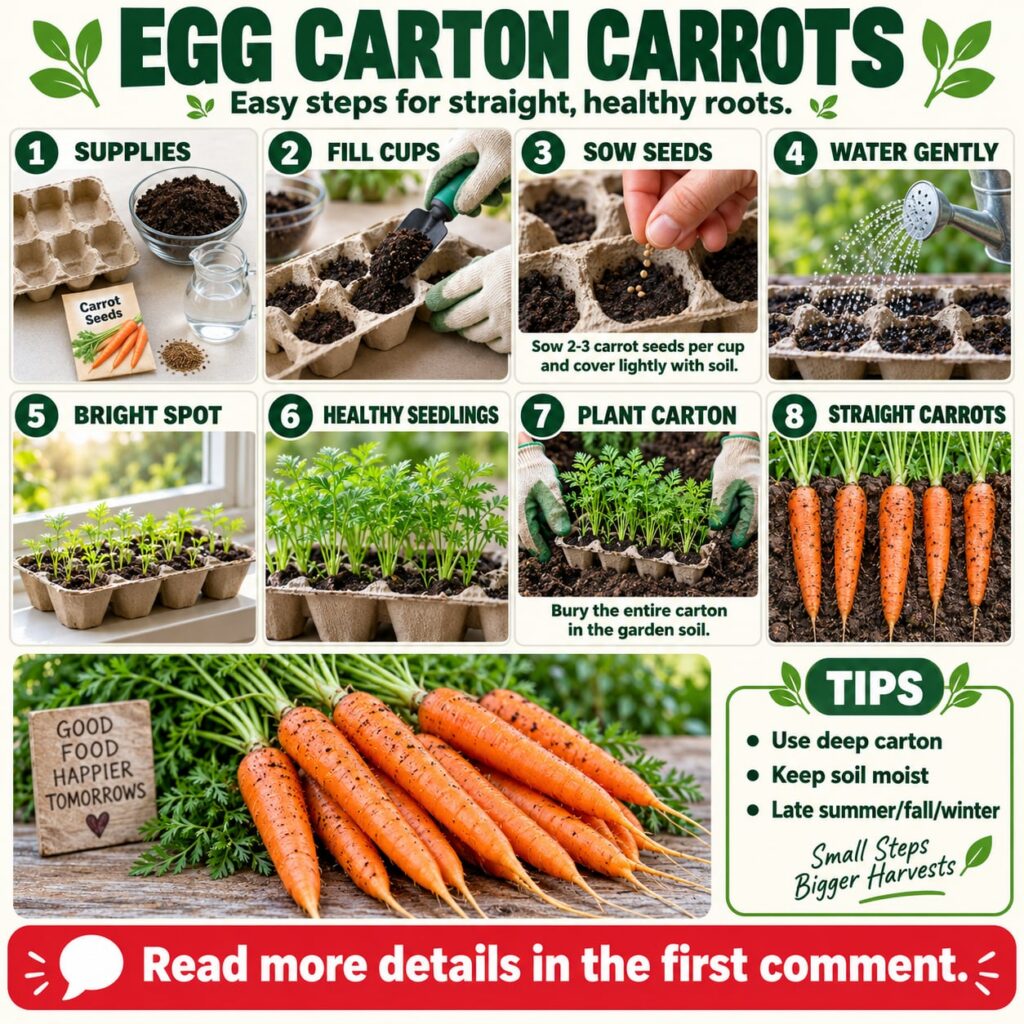
Step-by-Step Guide: DIY Egg Carton Method for Carrots
Ready to get your hands dirty? Here’s how you can achieve that dream harvest of perfectly straight carrots:
1. Gather Your Supplies
- Empty cardboard egg cartons (the compostable kind are best)
- Good quality carrot seeds
- Potting mix or fine garden soil
- A garden spade or trowel
- Your garden bed or a large planter
- Watering can
2. Prepare Your Egg Cartons
Start by making small drainage holes at the very bottom of each egg carton cup. You can use a pen or a small stick for this. If your egg cartons are made of thinner cardboard, you might even consider gently cutting out the bottom of each cup entirely. This ensures proper drainage and allows the carrot root to extend freely into the soil below once planted.
3. Fill with Soil
Fill each cup of the egg carton with a fine, loose potting mix or sieved garden soil. It’s crucial that the soil is free of clumps, rocks, and debris, as these can still hinder growth even with the carton’s guidance.
4. Plant Your Carrot Seeds
Place 2-3 carrot seeds into the center of the soil in each egg carton cup. Carrots prefer to be sown directly, and starting them in these guided cups gives them a great head start. Gently cover the seeds with a thin layer (about 1/4 inch) of fine soil.
5. Water Gently
Water the seeds gently immediately after planting. Use a watering can with a fine rose attachment to avoid dislodging the seeds. Keep the soil consistently moist but not waterlogged.
6. Transplant into Your Garden Bed
Once your carrot seedlings have emerged and are about 1-2 inches tall (this usually takes 1-2 weeks), it’s time to transplant. Prepare your garden bed or large container by ensuring the soil is deeply loosened and free of rocks. Dig a trench or individual holes deep enough to accommodate the egg carton sections. Carefully place each egg carton cup (with the seedling inside) into the prepared soil, ensuring the top of the carton is level with the soil surface. The cardboard will naturally break down over time.
7. Thin Your Seedlings
Once your seedlings are established in the garden and show true leaves, thin them to one strong seedling per cup. This gives each carrot ample space and resources to grow large and straight. Snip the weaker seedlings at the soil line with small scissors to avoid disturbing the roots of the keepers.
8. Care for Your Growing Carrots
- Watering: Keep the soil consistently moist throughout the growing season. Irregular watering can cause carrots to split or become bitter.
- Weeding: Keep the area around your carrots weed-free. Weeds compete for nutrients and water.
- Fertilizing: Carrots generally don’t need heavy fertilization. If your soil is poor, a balanced, slow-release organic fertilizer can be applied early in the season. Avoid high-nitrogen fertilizers, which can promote leafy growth at the expense of root development.
9. Harvest Your Straight Carrots
Depending on the variety, carrots are usually ready for harvest in 60-80 days. Gently loosen the soil around the top of the carrot to check its size. When they reach your desired diameter, carefully pull them from the soil. You’ll be amazed at how straight they are!
Additional Tips for Carrot Success
- Soil is Key: Carrots thrive in loose, well-draining, sandy loam soil. Aim for a soil pH between 6.0 and 6.8.
- Sunlight: Carrots need full sun, at least 6-8 hours daily, to grow well.
- Companion Planting: Plant carrots near rosemary, sage, or marigolds to deter pests.
- Succession Planting: For a continuous harvest, plant small batches of seeds every 2-3 weeks.
Enjoy Your Home Harvest!
With this simple egg carton method, you’re not just growing carrots; you’re cultivating confidence in your gardening skills and enjoying the satisfaction of a successful home harvest. Imagine slicing into those beautiful, perfectly straight carrots for your next meal! Happy gardening!