There’s nothing quite as satisfying as watching a tiny seed transform into a vibrant plant. The anticipation, the planning, the sheer joy of seeing that first sprout emerge from the soil – it’s what makes gardening so rewarding! But let’s be honest, waiting for seeds to germinate can sometimes feel like an eternity. If you’ve ever wished for a faster way to get your garden growing, you’re in luck! Today, we’re diving into the simple yet incredibly effective technique of pre-soaking seeds to unlock faster germination success in your garden.
Pre-soaking seeds is a time-tested method that helps kickstart the germination process, giving your plants a head start and increasing your overall success rate. It’s a game-changer for many gardeners, especially those dealing with stubborn or slow-to-germinate seeds.
Why Pre-Soak Your Seeds?
Before a seed can sprout, it needs to absorb enough moisture to activate the embryo inside. Nature does this through rainfall, but we can give it a little nudge! Here’s why pre-soaking is so beneficial:
- Breaks Dormancy: Some seeds have natural dormancy mechanisms, like hard seed coats, that prevent them from germinating until conditions are just right. Soaking helps soften these coats, signaling to the seed that it’s time to wake up.
- Faster Germination: By providing immediate access to water, pre-soaking significantly reduces the time it takes for seeds to sprout once planted. This means you’ll see those precious seedlings sooner!
- Improved Germination Rate: For many varieties, especially those with naturally tough exteriors, soaking can lead to a higher percentage of seeds successfully germinating.
- Washes Away Inhibitors: Some seeds contain natural inhibitors that prevent early germination. Soaking can help wash these away, making it easier for the seed to sprout.
Which Seeds Benefit Most from Pre-Soaking?
While most seeds can benefit from a little pre-soak, it’s particularly effective for seeds with hard coats or those known for slow germination. Think about plants like:
- Beans and Peas
- Corn
- Squash and Cucumbers
- Okra
- Spinach and Chard
- Beets
- Many flower seeds with tough exteriors
Delicate or very small seeds, like lettuce or carrots, usually don’t need pre-soaking and can sometimes be harmed by it, so always do a quick check specific to your seed type.
How to Pre-Soak Seeds: A Simple Step-by-Step Guide
Step 1: Gather Your Supplies
You’ll need your seeds, a few small bowls or shallow containers, and lukewarm water. Rainwater or distilled water is ideal, but tap water that has sat out for a day to allow chlorine to dissipate will also work.
Step 2: Place Seeds in Water
Gently place your seeds into their respective bowls. Pour lukewarm water over them, ensuring they are fully submerged. Label your bowls if you’re soaking multiple types of seeds!
Step 3: Determine Soaking Times
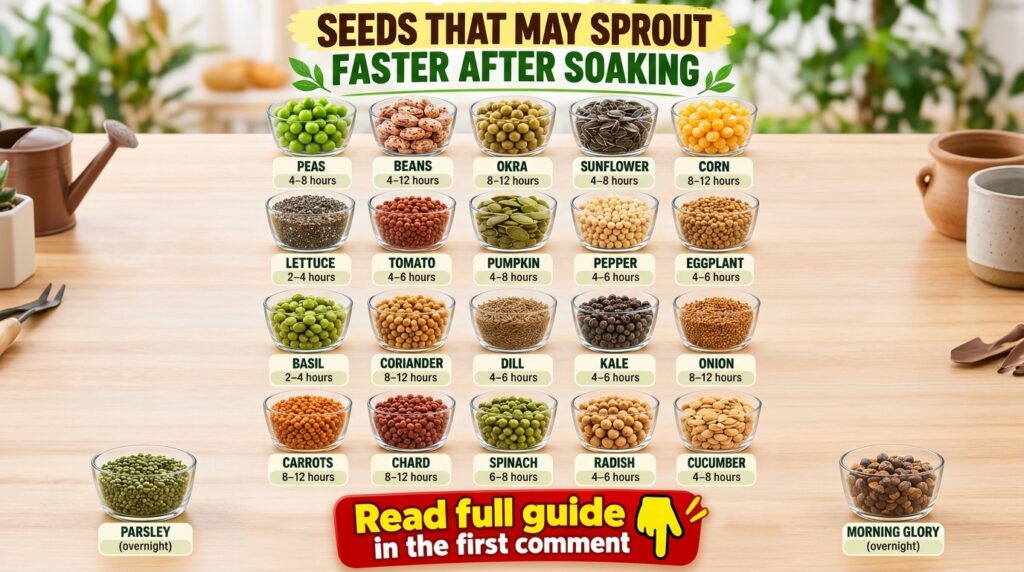
This is crucial! Different seeds require different soaking durations. Most seeds benefit from a soak of 8-24 hours. Over-soaking can actually harm the seeds by depriving them of oxygen or causing them to rot. Always research the specific needs of your seeds. Our helpful guide below shows some common seed types and their recommended soaking times!
Step 4: Plant Immediately
Once the soaking time is up, it’s critical to plant your seeds right away. They are now swollen with water and ready to sprout. Handle them gently to avoid damage, and plant them at the appropriate depth in your chosen seed-starting mix.
Important Tips for Success
- Don’t Over-Soak: As mentioned, too much soaking can lead to seeds drowning or rotting. Stick to the recommended times.
- Lukewarm Water is Best: Cold water can shock the seeds, while hot water can cook them. Lukewarm water mimics natural conditions.
- Change Water for Longer Soaks: If a seed requires a soak longer than 24 hours (rare, but some do), change the water every 12-24 hours to keep it fresh and oxygenated.
- Avoid Direct Sunlight: Keep your soaking seeds in a warm, dark place away from direct sunlight.
- Check for Swelling: You’ll notice many seeds swell significantly after soaking. This is a good sign they’ve absorbed enough water.
Pre-soaking seeds is a simple technique that can make a big difference in your gardening journey. It’s an easy way to boost germination rates, speed up sprouting, and get your plants off to a stronger start. Give it a try with your next batch of seeds and prepare to be amazed by the results!
Happy gardening!