There’s nothing quite like the satisfaction of harvesting your own bounty from the garden. You’ve nurtured your plants from tiny seeds to flourishing vegetables, and now your baskets are overflowing with fresh, homegrown goodness. But the joy of harvest can sometimes be fleeting if you don’t know how to properly preserve your hard-earned crops. That’s where the magic of ‘curing’ comes in!
Curing is a simple yet vital step that can significantly extend the shelf life of many root vegetables and gourds, allowing you to enjoy your fresh produce for weeks, even months, after harvest. Today, we’re diving deep into the art of curing, focusing on two garden staples: garlic and potatoes. Get ready to unlock longer freshness for your home harvest!
What is Curing and Why is it Important?
Curing isn’t a complex process; it’s simply a period of controlled drying and conditioning that helps toughen the outer skin of certain vegetables. Think of it as allowing your produce to heal and prepare for long-term storage. Here’s why it’s so crucial:
- Heals Wounds: Minor cuts and bruises that occur during harvest can be entry points for diseases and rot. Curing allows these wounds to dry and heal, forming a protective barrier.
- Dries Outer Layers: It removes excess moisture from the skin or outer layers, preventing mold and bacterial growth that thrive in damp conditions.
- Enhances Flavor & Sweetness: For some vegetables like sweet potatoes and winter squash, curing actually converts starches to sugars, improving their flavor and sweetness.
- Extends Shelf Life: By strengthening the skin and reducing moisture, curing dramatically increases how long your vegetables will last in storage.
Curing Your Garlic Harvest
Garlic is a fantastic crop to grow, and curing it properly is key to enjoying those pungent cloves for many months. Here’s how to do it:
Step-by-Step Garlic Curing:
- Timing is Everything: Harvest your garlic when the bottom few leaves have started to turn yellow and dry, but there are still 5-6 green leaves remaining. Don’t wait until all the leaves are brown, or the wrappers might split.
- Gentle Harvest: Loosen the soil around the bulbs with a garden fork and carefully lift them out. Try not to bruise the bulbs.
- Keep the Stems On: Do NOT wash the bulbs or remove the leaves/stems. The leaves will continue to transfer nutrients to the bulb during curing.
- Brush Off Dirt: Gently brush off any large clumps of soil from the roots, but avoid rubbing the papery skin.
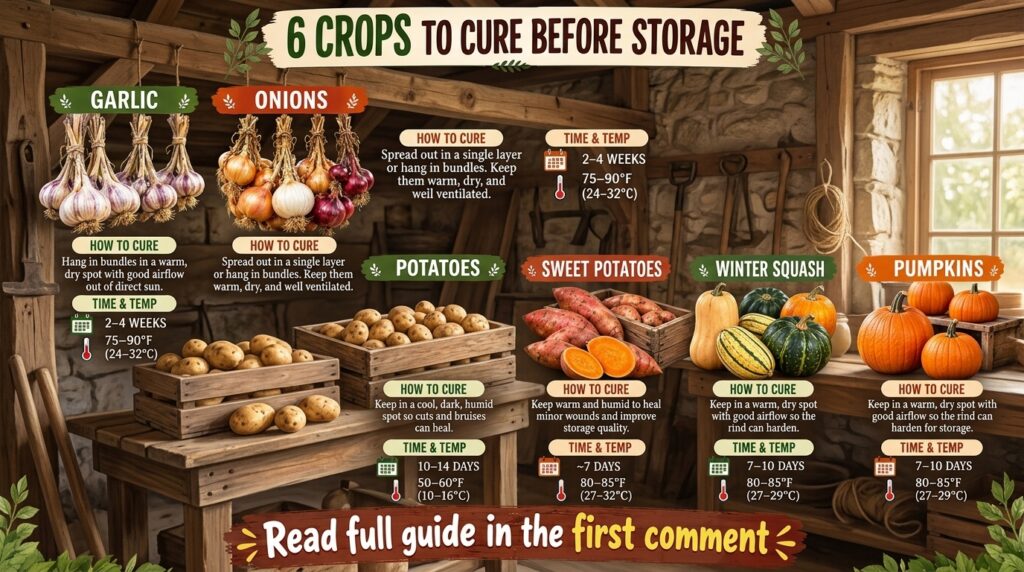
- The Curing Environment: Find a warm (75-85°F / 24-29°C), dry, and well-ventilated spot. This could be a shaded porch, a garage with good airflow, or a shed. Humidity should be around 60-70%.
- Hang or Lay Out: You can braid the garlic stalks together and hang them, or spread individual bulbs in a single layer on screens or racks. Ensure good air circulation around each bulb.
- Be Patient: Garlic typically takes 2-4 weeks to cure. You’ll know it’s ready when the outer wrappers are papery and dry, the roots are brittle, and the neck (where the stem meets the bulb) is completely dry and tight.
- Trim and Store: Once cured, trim the roots to about 1/4 inch and cut the stems back to about 1 inch (or leave them long if you want to braid them). Store your cured garlic in a cool (50-60°F / 10-15°C), dark, and dry place with good air circulation. Baskets, mesh bags, or hanging braids work perfectly!
Curing Your Potato Harvest
Potatoes are another rewarding crop that benefits immensely from proper curing. This process helps thicken their skins and heal any minor scrapes, making them resistant to rot and disease during storage.
Step-by-Step Potato Curing:
- Careful Digging: Harvest potatoes on a dry day, digging carefully to avoid piercing or bruising the tubers. Use a pitchfork or garden fork, starting a good distance from the plant’s center.
- No Washing: Do NOT wash your freshly dug potatoes. The dampness can encourage rot. Gently brush off any excess soil with your hands.
- The Curing Environment: For potatoes, you need a different environment than garlic. Find a dark, humid (80-90% relative humidity), and relatively warm (50-60°F / 10-15°C) spot. A basement corner, a root cellar, or even a covered area in a garage can work.
- Spread Them Out: Lay the potatoes in a single layer on newspaper, burlap sacks, or screens. Ensure they are not touching each other too much to allow for some air circulation.
- Curing Time: Potatoes typically need 10-14 days to cure. During this time, their skins will toughen, and any small wounds will heal.
- Inspect and Store: After curing, inspect each potato. Discard any that show signs of damage, disease, or rot. Only store healthy, blemish-free potatoes. Store the cured potatoes in a cool (40-45°F / 4-7°C), dark, and humid environment. Never store them in the refrigerator, as the cold can convert starches to sugars, affecting their taste and texture. Burlap sacks, wooden crates, or cardboard boxes allow for good air circulation and are ideal for storage.
Other Crops That Benefit from Curing
While garlic and potatoes are popular choices, many other garden treasures also benefit from a good cure before long-term storage:
- Sweet Potatoes: Similar to potatoes, they need warmth and humidity to convert starches to sugars.
- Winter Squash & Pumpkins: A few weeks in a warm, sunny spot (like a porch) helps harden their skins, making them last for months.
- Onions: Similar to garlic, they need warm, dry, and well-ventilated conditions to dry their outer skins and necks.
Enjoy Your Long-Lasting Harvest!
Curing is a testament to the simple yet effective ways we can extend the life of our garden’s bounty. By investing a little time and care after harvest, you’ll be able to enjoy your delicious, homegrown garlic and potatoes for much longer, savoring the flavors of your hard work throughout the seasons. Happy gardening and happy preserving!