There’s nothing quite like the taste of a fresh, sun-ripened tomato picked straight from your own garden. For many gardeners, growing tomatoes is a highlight of the season. But to achieve that bountiful harvest, getting the planting right from the start is absolutely key. Don’t worry if you’re new to this; we’re here to guide you through the essential steps to ensure your tomato seedlings thrive and produce delicious fruit!
Why Proper Tomato Planting Matters
Tomatoes are unique in that they can grow roots along their stems. This incredible ability means that when you plant them deeper than many other plants, they develop a stronger, more extensive root system. A robust root system leads to healthier plants, better nutrient absorption, and ultimately, a more abundant harvest. It also makes your plants more resilient to drought and stress.
Step-by-Step Guide to Planting Tomato Seedlings
1. Choose the Right Location and Prepare Your Soil
- Sunlight: Tomatoes are sun-lovers! Choose a spot in your garden that receives at least 6-8 hours of direct sunlight per day.
- Soil Quality: Good soil is foundational. Tomatoes prefer well-draining, fertile soil rich in organic matter. Amend your garden beds with compost or well-rotted manure to improve soil structure and nutrient content. A slightly acidic to neutral pH (6.0-6.8) is ideal.
2. Prepare Your Tomato Seedling
Before planting, gently remove your tomato seedling from its nursery pot. If it’s a bit leggy or tall, that’s perfectly fine for tomatoes!
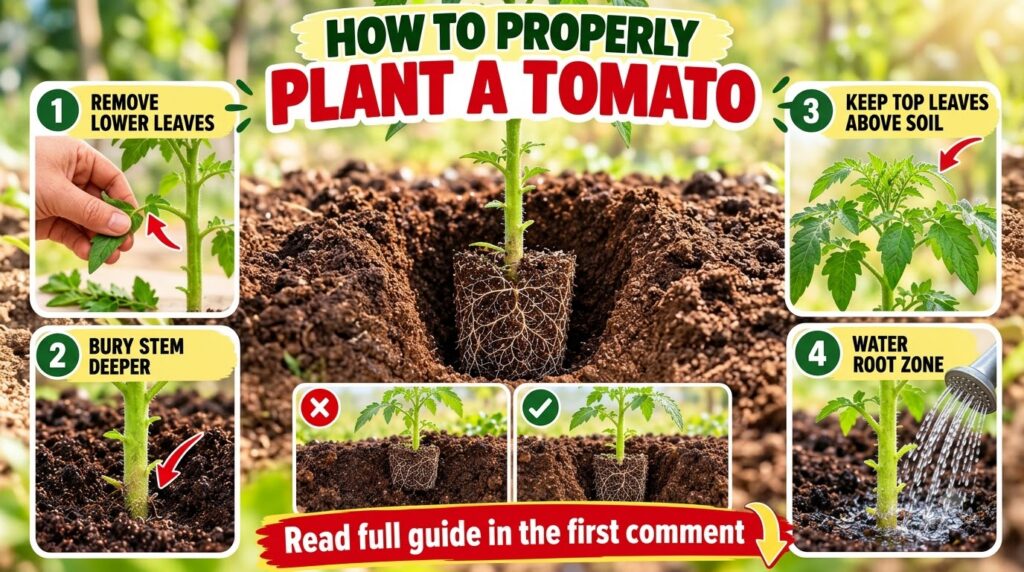
- Remove Lower Leaves: Pinch off any leaves that would be buried underground once planted. This prevents them from rotting and potentially introducing diseases to your plant.
3. Dig a Deep Hole
Unlike most plants, tomatoes benefit from being planted deeply. Dig a hole that is deep enough to bury about two-thirds of the plant’s stem. For very tall or leggy seedlings, you might even consider digging a trench and laying the plant on its side, gently curving the top portion upwards.
4. Bury the Stem
Carefully place your tomato seedling into the prepared hole. Ensure that most of the stem is covered with soil, leaving only the top few sets of leaves above ground. As mentioned, new roots will form along the buried stem, leading to a much stronger plant.
5. Gentle Backfill and Firming
Gently backfill the hole with your prepared soil, lightly firming it around the base of the plant to remove any large air pockets. Be careful not to compact the soil too much, as roots need air to breathe.
6. Water Thoroughly
After planting, give your newly planted tomato seedling a generous drink of water. Focus on watering the root zone to help settle the soil and encourage immediate root development. This initial watering is crucial for reducing transplant shock.
7. Provide Support (Optional, but Recommended)
Tomatoes can become quite heavy with fruit, so providing support early is a good idea. Install stakes, cages, or trellises at the time of planting to avoid disturbing the roots later on. This will help keep your plants upright, prevent diseases by improving air circulation, and make harvesting easier.
Ongoing Care for a Bountiful Harvest
- Consistent Watering: Keep the soil consistently moist, especially during flowering and fruiting. Avoid erratic watering, which can lead to problems like blossom end rot.
- Mulching: Apply a layer of organic mulch (like straw or shredded leaves) around your tomato plants. This helps retain soil moisture, suppress weeds, and regulate soil temperature.
- Fertilization: Once your plants start setting fruit, you can begin feeding them with a balanced organic fertilizer, following product instructions.
- Pest and Disease Management: Regularly inspect your plants for any signs of pests or diseases. Address issues promptly using organic and natural solutions.
By following these simple yet effective planting techniques, you’ll be well on your way to enjoying a spectacular harvest of delicious, homegrown tomatoes. Happy gardening!