Orchids, with their delicate beauty and exotic charm, are a beloved addition to many homes. They bring a touch of elegance and a burst of color, but like all living things, they need proper care to thrive. One of the most critical steps in ensuring your orchid’s long-term health and consistent blooming is timely and correct repotting. Many gardeners feel intimidated by this task, but with a few expert tips, you can give your orchid the fresh start it needs to flourish!
Why Repotting is Crucial for Orchid Health
Unlike most potted plants that grow in soil, orchids are epiphytes (or lithophytes) in their natural habitats, meaning they grow on other plants or rocks, not in soil. Their roots are adapted to cling to surfaces and absorb moisture and nutrients from the air and rain. In pots, they need a specialized, airy medium that mimics these conditions, allowing for excellent drainage and air circulation.
- Prevents Root Rot: Over time, orchid potting mix breaks down, becoming compacted. This traps moisture and cuts off air circulation, creating an environment ripe for root rot – the silent killer of many orchids.
- Replenishes Nutrients: Fresh potting mix provides essential nutrients and a healthy environment for roots to absorb what they need.
- Addresses Pests and Diseases: Repotting offers a chance to inspect roots for any signs of pests or disease and treat them before they spread.
- Accommodates Growth: As orchids grow, they can become root-bound, signaling it’s time for a larger home or fresh medium.
When is the Best Time to Repot Your Orchid?
Timing is everything when it comes to repotting. Repotting at the wrong time can stress your orchid and delay blooming. Here’s what to look for:
- After Blooming: The ideal time is usually right after your orchid has finished flowering. This is when the plant is not expending energy on blooms and can focus on root and leaf growth in its new environment.
- New Growth: If you notice new roots or leaves emerging, especially from the base of the plant, it’s a good indicator that your orchid is actively growing and will recover well from repotting.
- Broken Down Medium: If the potting mix looks decomposed, compacted, or smells musty, it’s definitely time to repot, regardless of bloom cycle.
- Root-Bound: Roots spilling out of the pot or circling the inside excessively are a clear sign it needs more space.
What You’ll Need: Gathering Your Repotting Essentials
Preparation is key for a smooth repotting process. Gather these items before you start:
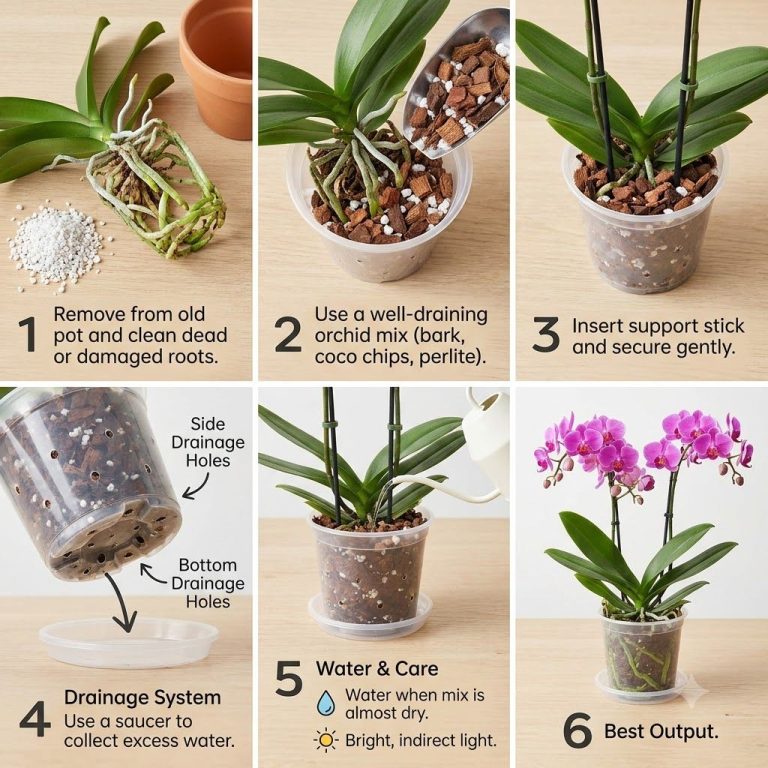
- New Pot: Choose a pot that is only slightly larger (1-2 inches in diameter) than the old one, or the same size if the plant isn’t growing much but just needs fresh medium. Clear plastic pots are excellent for orchids as they allow you to monitor root health and moisture levels. Ensure it has drainage holes!
- Orchid Potting Mix: This is crucial. Use a specialized mix for orchids, typically composed of bark, sphagnum moss, perlite, and charcoal. Avoid regular potting soil.
- Sterile Pruning Shears or Razor Blade: Essential for trimming old or unhealthy roots. Sterilize them with rubbing alcohol or a flame to prevent disease transmission.
- Gloves: To protect your hands.
- Fungicide/Cinnamon Powder: Optional, but useful for dusting cut roots to prevent fungal infections.
Step-by-Step Guide to Repotting Your Orchid
1. Prepare Your Workspace
Lay down newspaper or a plastic sheet to keep your area clean. Have all your tools and materials within reach.
2. Gently Remove the Orchid
Carefully grasp the base of the orchid and gently pull it out of its old pot. If it’s stubborn, you might need to squeeze the sides of a plastic pot or carefully tap the pot. Be gentle to avoid damaging healthy roots.
3. Inspect and Trim Roots
Once out of the pot, carefully remove all the old potting mix from the roots. You can gently rinse the roots under lukewarm water. Inspect the roots thoroughly:
- Healthy Roots: Should be firm and plump, typically white or green (if wet).
- Unhealthy Roots: Soft, mushy, papery, brown, or black roots are dead or dying. Use your sterile shears to cut these away. If you make any cuts, you can lightly dust them with cinnamon powder to act as a natural antifungal.
4. Place in the New Pot
Add a small layer of fresh orchid mix to the bottom of the new pot. Center the orchid in the pot, making sure the base of the plant (where roots and leaves meet) is level with the pot’s rim. The goal is to bury the roots, not the crown of the plant.
5. Add Fresh Potting Medium
Gently fill the pot with new orchid mix, working it around the roots. Tap the sides of the pot lightly to help the mix settle. Don’t pack it too tightly; remember, orchids need air circulation around their roots. Ensure all roots are covered but the base of the plant is not buried.
6. Initial Watering (Optional)
Some experts recommend waiting a few days to water after repotting to allow any root cuts to heal. Others suggest a light watering immediately after. Observe your specific orchid’s needs and the humidity in your home. If you do water, ensure excellent drainage.
Post-Repotting Care for Blooming Success
Your orchid needs a little extra love after repotting to recover and prepare for future blooms:
- Watering: For the first few weeks, water slightly less frequently than usual to encourage new root growth. Once established, return to your regular watering schedule, which typically involves watering when the medium feels dry.
- Light: Place your repotted orchid in a spot with bright, indirect light. Avoid direct, harsh sunlight, especially after repotting, as it can stress the plant.
- Humidity: Orchids love humidity. Consider placing the pot on a pebble tray with water or using a humidifier nearby, particularly during recovery.
- Fertilization: Wait at least 3-4 weeks after repotting before resuming fertilization. Use a balanced orchid-specific fertilizer at half strength.
Common Repotting Mistakes to Avoid
- Repotting Too Often: Only repot when necessary, typically every 1-2 years, or when the medium breaks down.
- Using the Wrong Potting Mix: Never use regular soil. Always opt for specialized orchid mixes.
- Burying the Crown: The base of the plant (crown) should not be buried, as this can lead to rot.
- Overwatering Immediately After: Give the orchid a little time to adjust before resuming a full watering schedule.
Repotting your orchid might seem daunting at first, but it’s a vital part of its care routine. By following these expert tips, you’re not just moving your plant to a new home; you’re investing in its health, vitality, and ensuring it continues to grace your home with its stunning blooms for many years to come. Happy gardening!