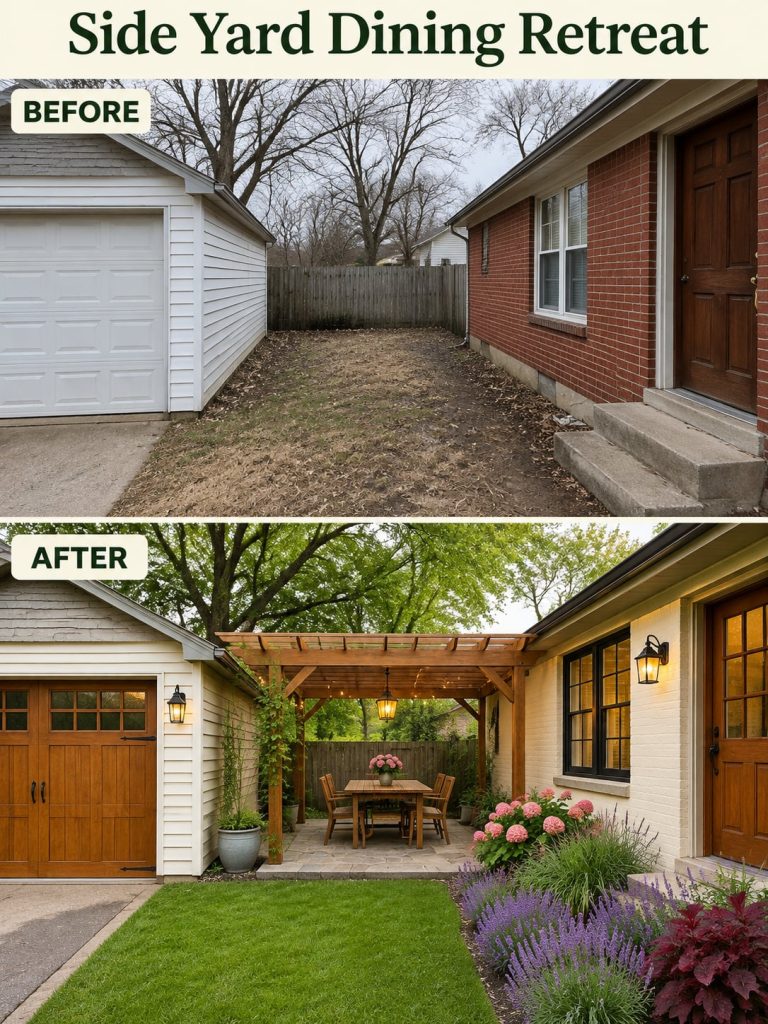
That awkward strip between the house and the garage is easy to overlook. It collects mud after every rain, catches runoff from the roofline, and feels like wasted ground. With the right planning, though, it can become one of the most useful spots on your property: a sheltered place to eat breakfast, read, or enjoy an evening drink without crossing the whole yard. This guide walks through the steps that matter most, starting with water control and ending with lighting and furniture layout, so your narrow space works as hard as the rest of your home.
Why Narrow Side Spaces Deserve a Plan
Gaps like this often sit in shade for part of the day and act as a funnel for wind and water. Because they are narrow, small mistakes show up quickly. A chair that is pushed a few inches too far can block the walkway, and a downspout that dumps water in the wrong place can turn a patio into a puddle. The good news is that these constraints also make the project manageable. You are working with a clear, defined footprint, and most decisions can be tested with tape measures, a garden hose, and a few weekends of observation.
Start With Drainage, Because Mud Is the Real Problem
Before you buy a single paver, watch the space during a heavy rain. Note where water pools, where it runs, and whether it drains toward the house foundation. The ground beside a home should slope away from the foundation. A common guideline is a drop of about 6 inches over the first 10 feet, but local conditions and soil type can change what works. If the slope is wrong, regrade the soil or add a shallow swale to direct water to a safe outlet.
Check the gutters too. A downspout that empties into a narrow gap will keep the ground soft no matter how well the surface is built. Extend the downspout with a rigid or flexible pipe that carries water well beyond the paved area, or connect it to a rain barrel or a drainage line. In heavy clay soils, a gravel trench or a French drain may be necessary. Dig down far enough to get below the surface layer and slope the pipe gently toward an outlet.
Choose a Surface That Handles Chairs and Foot Traffic
Stone paving works well here because it stays firm and looks at home next to a house. Flagstone or concrete pavers are both good choices. The base matters more than the stone itself. Excavate the area, lay down several inches of compacted crushed gravel, and then add a thin layer of sand or stone dust as bedding, usually about 1 inch. Compact the base in layers and check that it is level before setting pavers.
Textured stone is safer than polished stone, especially in shade where moss and algae can form. Fill the joints with polymer sand, which hardens and resists weeds better than plain sand. If you prefer a softer look, gravel is less expensive and drains well, but chairs and tables can wobble on it, so a flat surface such as a paver border or a concrete edge will help keep furniture stable.
Build a Roof That Shelters Without Trapping Heat or Moisture
A roof transforms the space from a walkway into a room. In a narrow gap, you have tall walls on both sides, so the structure can be lightweight. A slatted pergola, a polycarbonate panel roof, or a simple sloped canopy will keep rain off the table while letting light and air through. Avoid solid, heavy coverings that trap humidity against the house siding.
Attach any ledger board to solid framing, not just to siding. Use flashing where the structure meets the house so water does not run behind it. Make sure the roof slopes away from the wall and that water is directed to a gutter or drainage path. Before you build, check local permit rules, setback requirements, and any homeowners association guidelines, because some areas regulate structures near property lines.
Light It in Layers for Evening Use
Warm lighting makes a narrow dining space feel inviting after dark. Use three simple layers. First, add low path lights along the walkway for safety. Second, hang string lights or a line of small pendant fixtures about 7 to 8 feet above the floor so they do not hit heads. Third, add a wall sconce or a small table lamp for reading and conversation. Look for fixtures rated for outdoor use and choose warm white bulbs around 2700K for a cozy glow.
Plan your electrical work carefully. Use outlets protected by ground-fault circuit interrupters, and keep cords out of the walkway. For hardwired fixtures, hire a licensed electrician. Low-voltage lighting can be a safer option for path lights and accent lights, since it is easier to install and less demanding on wiring.
Plan Furniture Around Walking Space
Measure the space before buying furniture. Keep at least 36 inches of clearance for people to walk past the back of a chair, and aim for a dining table that is about 24 to 30 inches square for two people. A bench along one wall often works better than two separate chairs, because it saves room and lets you slide the table out of the way when you need to pass through. Choose lightweight, weather-resistant pieces that you can move easily for cleaning or storage.
Soften the Walls With Containers and Shade-Tolerant Plants
Because a narrow gap often receives limited sunlight, check how much light reaches the space at different times of day before choosing plants. Watch the area in the morning, at midday, and in the late afternoon. Plants in containers give you flexibility, since you can move them to brighter spots or closer to the house during the season. Use pots with drainage holes and set them on feet or pot risers so water can escape and the containers do not sit in mud.
Vertical planters on a fence or wall can add greenery without taking up floor space. Keep plants at a distance from gutters and downspouts so they do not block water flow, and leave enough room for airflow to reduce mold and mildew on damp walls.
Common Mistakes to Avoid
- Installing paving before fixing drainage, which traps water under the surface and leads to heaving or settling.
- Building a solid roof with no airflow, which can encourage dampness on the house siding.
- Leaving downspouts pointed into the gap, so every storm refills the space with runoff.
- Choosing furniture that is too large, leaving no room to walk past the table.
- Relying on one overhead light, which makes the space feel harsh rather than cozy.
- Skipping permit checks and setback rules before building a permanent structure.
Adjust the Plan for Your Climate
In colder regions, roughly USDA zones 3 to 6, freezing and thawing can push stones out of place if the base is too shallow. Use a deeper gravel base, frost-resistant pavers, and proper drainage to reduce movement. Remove loose items such as cushions before winter storms. In warmer regions, roughly USDA zones 9 to 11, shade, airflow, and light-colored surfaces matter more, because a covered gap can heat up quickly in summer. USDA zones describe winter cold tolerance, so they do not tell you everything about rain, humidity, or wind in your yard. Your local extension office and building department can give you guidance on frost depth, soil conditions, and permit requirements.
Your Next Steps
Start small. Spend a rainy afternoon watching how water moves through the gap, measure the walkway, and sketch the layout on paper. Then fix the drainage first, add the base and paving, and build the roof and lighting in stages. Each step makes the next one easier and keeps the budget under control. Save this guide for your next weekend project, and share your progress with a neighbor or friend who has the same awkward strip. With a little planning, that muddy gap can become the quiet, sheltered spot you use every day.