Unlock the Flavor: Your Simple Guide to Growing Healthy Garlic at Home
There’s nothing quite like the pungent, aromatic flavor of freshly harvested garlic. If you’ve ever dreamt of adding this culinary staple to your home garden, you’re in for a treat! Growing your own garlic is surprisingly easy and incredibly rewarding. Not only do you get to enjoy superior flavor, but you also save money and gain a deeper connection to your food. Let’s dig into everything you need to know to cultivate a thriving garlic patch.
Why Grow Your Own Garlic?
Beyond the sheer satisfaction, home-grown garlic offers several benefits:
- Superior Flavor: Store-bought garlic often lacks the nuanced flavors of fresh, local varieties.
- Cost-Effective: A single bulb can yield dozens of cloves, leading to a bountiful harvest for a small initial investment.
- Organic Control: You dictate what goes into your soil, ensuring your garlic is grown without harmful chemicals.
- Variety: Explore diverse garlic types not typically found in supermarkets.
Choosing the Right Garlic for Your Climate
Garlic comes in two main types:
- Hardneck Garlic: Known for its strong, complex flavors and a woody central stalk (scape). It’s generally better suited for colder climates as it requires a period of cold to form bulbs.
- Softneck Garlic: Often has a milder flavor and no hard central stalk, making it ideal for braiding. It thrives in warmer climates and is more commonly found in grocery stores.
Research varieties that do well in your specific region. Popular choices include ‘Music’ (hardneck) for colder areas and ‘Inchelium Red’ (softneck) for milder climates.
When to Plant Your Garlic
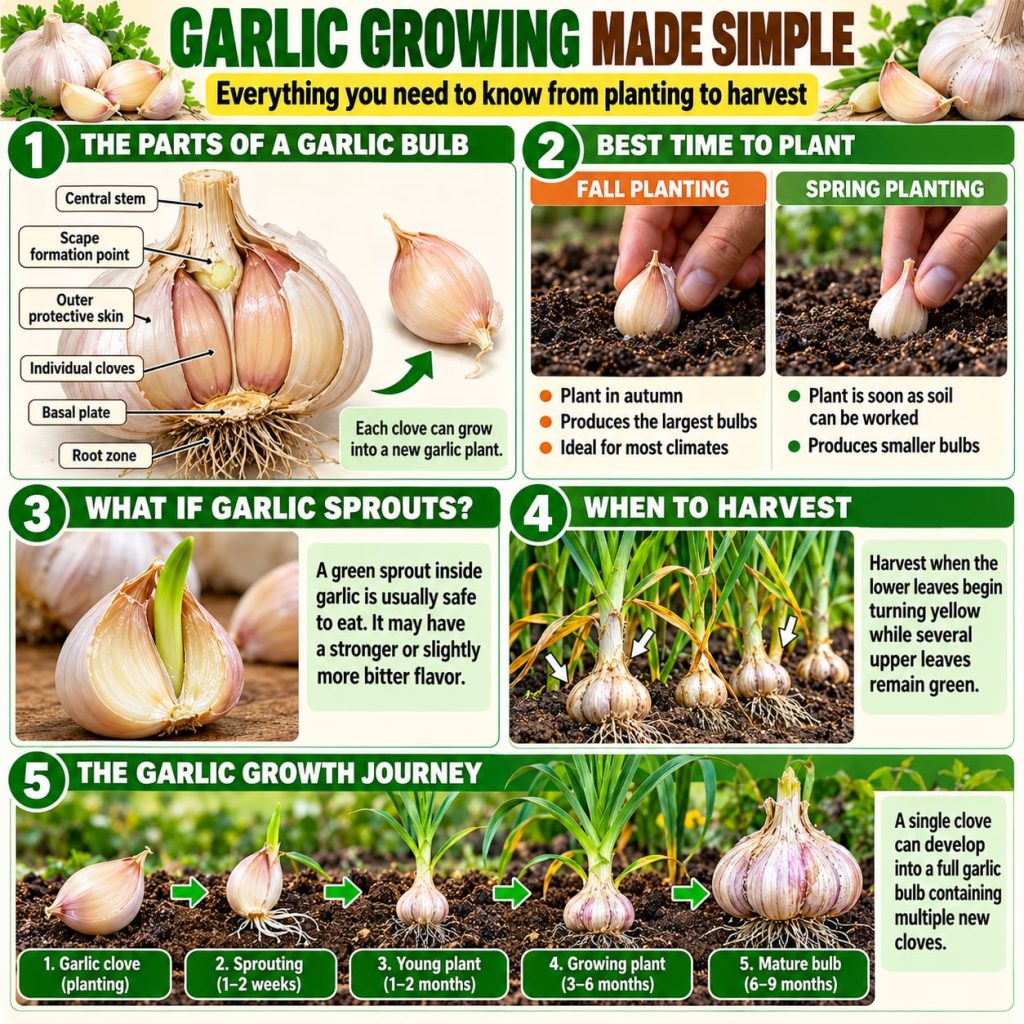
The best time to plant garlic is in the fall, typically 4-6 weeks before the ground freezes solid. This allows the roots to establish before winter, giving the plants a head start in spring. In warmer climates, you can plant in late fall or early winter.
Site Selection and Soil Preparation
Garlic needs a sunny spot with at least 6-8 hours of direct sunlight per day. Good drainage is crucial to prevent bulb rot. If your soil is heavy clay, consider planting in raised beds or amending it heavily.
- Soil pH: Aim for a pH between 6.0 and 7.0.
- Enrich the Soil: Mix in plenty of organic matter like compost, aged manure, or peat moss to improve fertility and drainage. Garlic is a heavy feeder!
Planting Your Garlic Cloves
Ready to plant? Here’s how:
- Separate Cloves: Gently break apart a healthy garlic bulb into individual cloves. Use the largest, healthiest cloves for planting, as they tend to produce bigger bulbs.
- Don’t Peel: Leave the papery skin on each clove.
- Orient Correctly: Plant each clove pointed-side up, with the flat, root-end facing down.
- Depth and Spacing: Plant cloves 2-4 inches deep and 4-6 inches apart. If planting in rows, space rows 12-18 inches apart.
- Water In: After planting, water thoroughly to settle the soil around the cloves.
- Mulch: Apply a 4-6 inch layer of straw or leaves over your planted garlic. This insulates the soil, suppresses weeds, and retains moisture.
Care and Maintenance for a Bountiful Harvest
Watering
Garlic needs consistent moisture, especially during spring growth. Aim for about 1 inch of water per week, either from rain or irrigation. Reduce watering as the bulbs mature (usually a few weeks before harvest) to prevent rot and encourage curing.
Weeding
Keep your garlic bed free of weeds. Weeds compete for nutrients and water, hindering bulb development. Hand-weeding is best to avoid damaging shallow roots.
Fertilizing
Garlic benefits from a balanced fertilizer in early spring as new growth emerges, and again about a month later. A good compost tea or a balanced organic granular fertilizer works well. Stop fertilizing about 4-6 weeks before harvest.
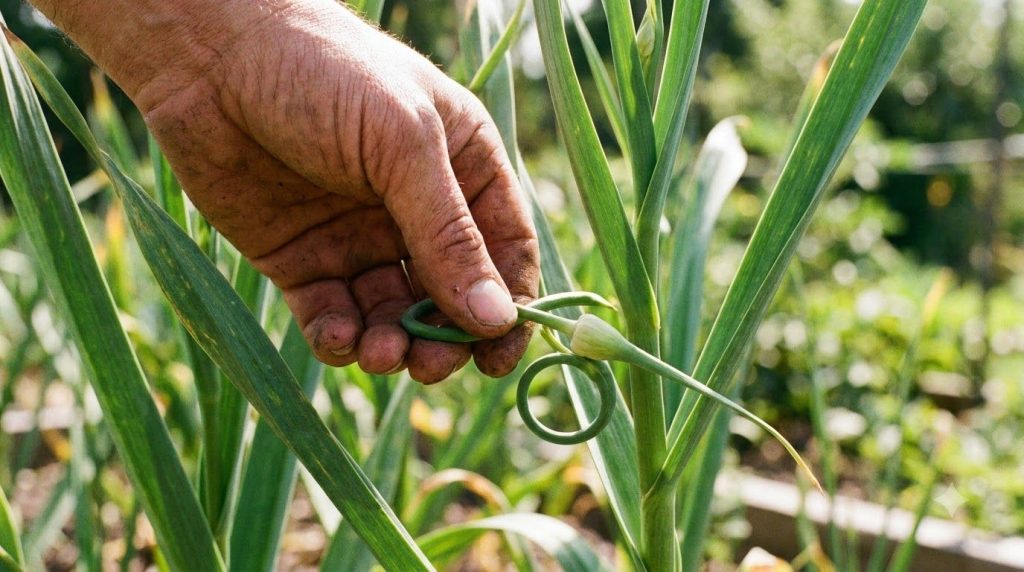
Scapes (Hardneck Garlic Only)
Hardneck garlic will produce a flower stalk called a ‘scape’. Pinch or cut these off when they form a curl, directing the plant’s energy into bulb development instead of flower production. Bonus: garlic scapes are delicious in stir-fries or pesto!
Pest and Disease Watch
Garlic is generally robust, but keep an eye out for common issues:
- Fungal Diseases: Ensure good air circulation and avoid overwatering.
- Pests: Thrips or onion maggots can sometimes be an issue. Healthy soil and companion planting can help deter them.
Harvesting Your Garlic
Garlic is typically ready for harvest in early to mid-summer. You’ll know it’s time when the lower leaves start to yellow and dry, but there are still 4-5 green leaves remaining. Don’t wait until all the leaves are brown, as this can lead to diminished storage quality.
- Loosen the Soil: Gently loosen the soil around the bulbs with a fork or spade.
- Pull Carefully: Pull the plants out of the ground, being careful not to bruise the bulbs.
- Brush Off Dirt: Gently brush off any excess dirt, but do not wash the bulbs.
Curing and Storing Your Harvest
Curing is essential for long-term storage.
- Curing: Hang your harvested garlic (with stalks and roots still attached) in a cool, dark, well-ventilated area for 2-4 weeks. Garages, sheds, or covered porches work well. The skins will dry and tighten, protecting the cloves.
- Storage: Once cured, trim the roots and cut the stalks to about an inch above the bulb. Store your garlic in a cool (50-60°F or 10-15°C), dry, dark place with good air circulation. Braid softneck garlic for beautiful storage.
Growing your own garlic is a deeply satisfying experience that brings fresh, flavorful ingredients right to your kitchen. With a little planning and care, you can enjoy a bountiful harvest year after year. Happy gardening!