Tired of store-bought cream cheese? Imagine a spread so fresh, so creamy, and so utterly delicious that you’ll wonder why you ever bought it from a carton. This easy homemade cream cheese recipe is a game-changer, turning simple ingredients into a rich, tangy delight perfect for all your favorite dishes.
Making your own cream cheese at home is surprisingly simple and incredibly rewarding. With just a few basic ingredients and a little patience, you’ll create a spread that’s superior in flavor and texture to anything you can find at the grocery store. It’s perfect slathered on bagels, as a base for dips, or even incorporated into your favorite baked goods. Get ready to elevate your breakfast and snack time with this truly delightful homemade treat!

Why You’ll Love This Homemade Cream Cheese Recipe
- Surprisingly Simple: Don’t be intimidated! This recipe uses basic culinary techniques anyone can master.
- Fewer Ingredients: You’ll love knowing exactly what goes into your food with this short, natural ingredient list.
- Superior Flavor & Texture: Experience a richer, tangier flavor and an incredibly smooth, spreadable texture that store-bought just can’t match.
- Customizable: Easily adapt it with herbs, spices, or sweet additions to suit your cravings.
- Cost-Effective: Making your own can be more economical than regularly buying specialty cream cheese.
- Freshness You Can Taste: Nothing beats the taste of freshly made dairy products!
Ingredients
For the Cream Cheese Base:
- 4 cups (960 ml) whole milk (not ultra-pasteurized)
- 2 cups (480 ml) heavy cream
- ¼ cup (60 ml) fresh lemon juice or white vinegar
- ½ teaspoon fine sea salt (or to taste)
Ingredient Notes
- Whole Milk & Heavy Cream: Using both whole milk and heavy cream gives the cream cheese its signature richness and creamy texture. Avoid ultra-pasteurized milk as it often doesn’t curdle as effectively.
- Lemon Juice or White Vinegar: These acidic ingredients are essential for curdling the milk, separating the solids from the whey. Fresh lemon juice offers a slightly brighter flavor, while white vinegar is a neutral option.
- Salt: Essential for flavor. Adjust to your preference.
Equipment You’ll Need
- Large non-reactive pot (stainless steel or enamel)
- Heat-safe whisk or spoon
- Fine-mesh sieve
- Cheesecloth (at least 2-3 layers, or a nut milk bag)
- Large bowl (to place under the sieve for whey collection)
- Airtight container for storage
How to Make Homemade Cream Cheese
-
Heat the Milk and Cream
Pour the whole milk and heavy cream into a large non-reactive pot. Place the pot over medium heat, stirring occasionally to prevent scorching. Heat the mixture until it reaches about 180°F (82°C), or until small bubbles begin to form around the edges and steam rises, but before it comes to a rolling boil. If you don’t have a thermometer, simply look for the edges to simmer gently.
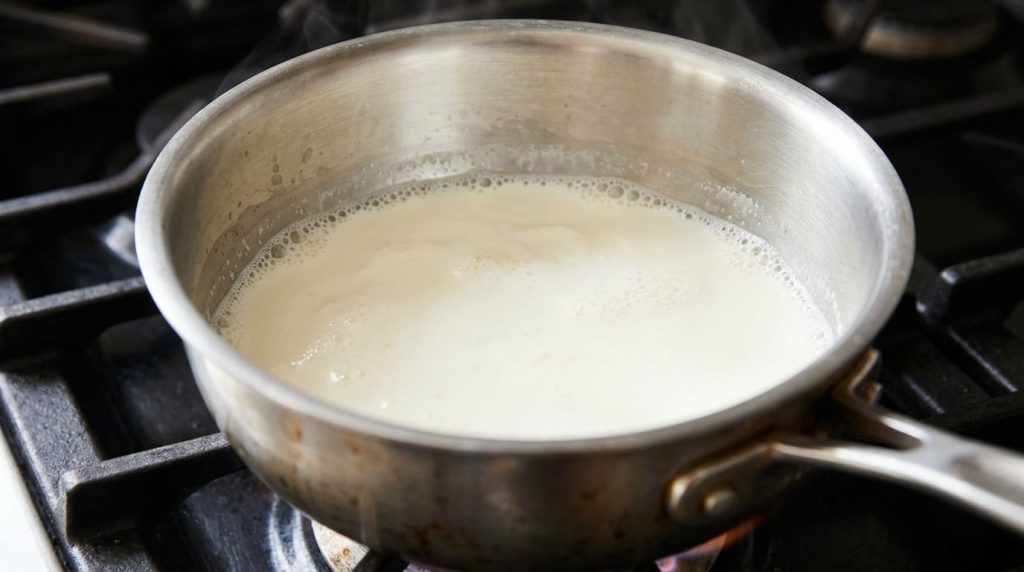
Gently heat the milk and cream until simmering. -
Add Acid and Curdle
Remove the pot from the heat. Slowly pour in the lemon juice or white vinegar, stirring gently once or twice. Do not stir excessively, as this can break up the curds too much. Let the mixture sit undisturbed for 10-15 minutes. During this time, you’ll notice the milk beginning to separate into solid white curds and yellowish, watery whey. The longer it sits, the more defined the separation will be.
-
Prepare for Straining
While the milk mixture rests, prepare your straining setup. Line a fine-mesh sieve with 2-3 layers of cheesecloth or use a clean nut milk bag. Place the lined sieve over a large bowl, ensuring there’s enough space between the bottom of the sieve and the bowl to collect the whey.
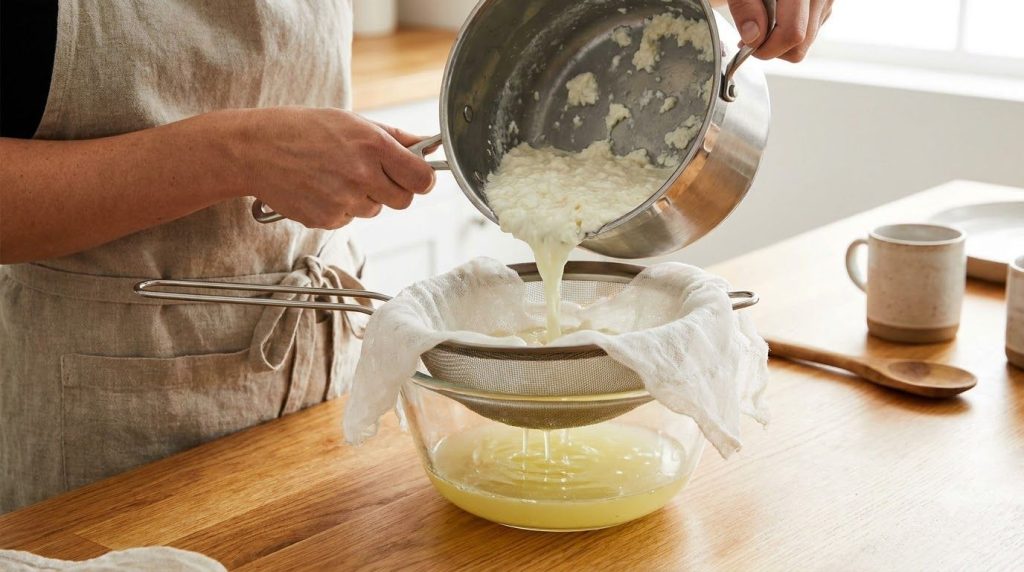
Pour the curdled mixture into the prepared cheesecloth to separate the whey. -
Strain the Curds
Carefully pour the curdled milk mixture into the prepared sieve. Allow it to drain at room temperature for at least 30 minutes to an hour. For a firmer cream cheese, you can tie the corners of the cheesecloth together to form a bag, hang it over the bowl, and let it drain in the refrigerator for 2-4 hours, or even overnight. The longer it drains, the thicker and drier your cream cheese will be.
-
Season and Blend
Once the curds have reached your desired consistency, transfer them from the cheesecloth into a clean bowl. Add the ½ teaspoon of fine sea salt and mix well. For an extra smooth and creamy texture, you can use a hand mixer or a food processor to whip the curds until light and fluffy. Taste and adjust salt if needed.
-
Chill and Serve
Transfer the homemade cream cheese to an airtight container and refrigerate for at least 1 hour to allow the flavors to meld and the texture to firm up further. Your fresh, creamy homemade cream cheese is now ready to enjoy!
Pro Tips for the Best Results
- Use Fresh, High-Quality Dairy: The better your milk and cream, the better your cream cheese will taste. Avoid ultra-pasteurized dairy if possible, as it may not curdle as effectively.
- Don’t Over-Stir: Once you add the acid, stir just enough to combine. Excessive stirring can break up the delicate curds, making straining more difficult.
- Adjust Draining Time for Texture: For a softer, spreadable cream cheese, drain for a shorter period (1-2 hours). For a firmer, denser cream cheese, drain longer (4+ hours or overnight).
- Don’t Discard the Whey: The drained whey is nutritious! You can use it in smoothies, for baking, to cook rice, or to water plants.
- Season Gradually: Start with the suggested amount of salt, then taste and add more if desired. You can also add other flavorings at this stage.
- Whip for Smoothness: A quick whip with a hand mixer or in a food processor will give your cream cheese that ultra-smooth, light, and airy texture similar to store-bought varieties.
Common Mistakes to Avoid
- Using Ultra-Pasteurized Milk: This type of milk is heavily processed and often resists curdling, leading to poor results.
- Heating Dairy Too High: Boiling the milk can scald it and affect the final flavor and curdling process. Gentle simmering is key.
- Not Draining Enough (or Too Much): If not drained enough, your cream cheese will be too watery. If drained too much, it can become overly dry and crumbly. Experiment with draining times to find your preferred consistency.
- Skipping the Chill Time: Chilling allows the cream cheese to firm up and the flavors to fully develop. Don’t rush this step.
- Under-Salting: Cream cheese needs a good touch of salt to balance its richness and tang. Don’t be shy, but always taste as you go.
Variations & Substitutions
- Garlic & Herb: Mix in 1-2 cloves minced garlic, 1 tablespoon chopped fresh chives, and 1 tablespoon chopped fresh parsley.
- Sweet Honey Vanilla: Add 1-2 tablespoons honey or maple syrup and ½ teaspoon vanilla extract for a sweet spread.
- Spicy Jalapeño: Finely dice 1-2 jalapeños (seeds removed for less heat) and fold them in.
- Smoked Paprika & Onion: Add ½ teaspoon smoked paprika and ½ teaspoon onion powder.
- Dairy-Free Option: While this recipe is for dairy cream cheese, you can find recipes for cashew or almond-based cream cheese, which follow a similar straining principle.
Serving Suggestions
This homemade cream cheese is incredibly versatile!
- Classic Bagel Topping: Spread generously on a toasted bagel, English muffin, or toast.
- Crackers & Veggies: Serve with your favorite crackers, celery sticks, or bell pepper slices for a healthy snack.
- Dips & Spreads: Use it as a base for savory dips by mixing with cooked spinach, artichoke hearts, or sun-dried tomatoes.
- Sandwich Spreads: Elevate your sandwiches and wraps with a layer of homemade cream cheese.
- Baking: Incorporate it into frostings, cheesecakes, or other baked goods where cream cheese is called for.
Storage & Reheating
Store your homemade cream cheese in an airtight container in the refrigerator for up to 5-7 days. Because it lacks the preservatives found in commercial cream cheese, its shelf life is shorter. Freezing is not recommended as it can alter the texture, making it grainy and watery upon thawing.
FAQ
Can I use low-fat milk or cream?
While technically possible, using low-fat dairy will result in a less creamy and richer cream cheese. For the best texture and flavor, whole milk and heavy cream are highly recommended.
Why didn’t my milk curdle?
The most common reasons for milk not curdling are using ultra-pasteurized milk, not heating the milk enough, or not using enough acid. Ensure your milk is fresh, heat it to the right temperature, and use fresh lemon juice or good quality white vinegar.
What can I do with the leftover whey?
Whey is a byproduct packed with protein and nutrients! You can use it in smoothies, as a liquid in baking (breads, pancakes), to cook pasta or rice, or even as a fertilizer for plants.
How long does homemade cream cheese last?
Due to the lack of preservatives, homemade cream cheese should be stored in an airtight container in the refrigerator and consumed within 5-7 days.
Can I make this recipe sweeter?
Absolutely! After draining and before chilling, you can mix in a tablespoon or two of honey, maple syrup, or powdered sugar for a sweeter version. A dash of vanilla extract also works wonderfully.
Is this recipe suitable for baking?
Yes, homemade cream cheese can be used in most baking applications. However, if your recipe requires a very firm cream cheese (like some cheesecakes), you may want to drain it for a longer period to achieve a denser consistency.
What kind of cheesecloth should I use?
Opt for a high-quality, fine-weave cheesecloth (like Grade 90) or a clean nut milk bag. This will ensure that all the fine curds are strained, leaving you with a smooth product.
Recipe Card
Recipe Name: Easy Homemade Cream Cheese
Short Description: Make fresh, creamy, and delicious cream cheese at home with just a few simple ingredients and steps. Perfect for bagels, dips, and baking!
Prep Time: 15 minutes
Cook Time: 10 minutes
Total Time: 25 minutes (plus 2-12 hours draining & chilling)
Servings: Approximately 1.5 cups (360g)
Course: Breakfast, Snack, Condiment
Cuisine: American
Cooking Method: Straining, No-Bake
Ingredients:
- 4 cups (960 ml) whole milk (not ultra-pasteurized)
- 2 cups (480 ml) heavy cream
- ¼ cup (60 ml) fresh lemon juice or white vinegar
- ½ teaspoon fine sea salt (or to taste)
Instructions:
- Heat the Milk and Cream: Pour whole milk and heavy cream into a large non-reactive pot. Heat over medium heat, stirring occasionally, until it reaches about 180°F (82°C) or just before boiling.
- Add Acid and Curdle: Remove from heat. Slowly stir in lemon juice or white vinegar once or twice. Let sit undisturbed for 10-15 minutes until curds and whey separate.
- Prepare for Straining: Line a fine-mesh sieve with 2-3 layers of cheesecloth or a nut milk bag. Place over a large bowl to collect whey.
- Strain the Curds: Carefully pour the curdled mixture into the prepared sieve. Drain at room temperature for 30-60 minutes for a softer consistency, or refrigerate for 2-4 hours (or overnight) for a firmer cream cheese.
- Season and Blend: Transfer drained curds to a clean bowl. Add salt and mix well. For extra smoothness, whip with a hand mixer or food processor. Taste and adjust seasoning.
- Chill and Serve: Transfer to an airtight container and refrigerate for at least 1 hour before serving to allow flavors to meld and texture to firm up.
Notes:
Adjust draining time to achieve your preferred cream cheese consistency. For flavored cream cheese, add herbs, spices, or sweeteners after the salt and before chilling.
Storage:
Store in an airtight container in the refrigerator for up to 5-7 days. Not suitable for freezing.
Nutrition:
Nutrition information is an estimate and may vary depending on the ingredients and brands used.