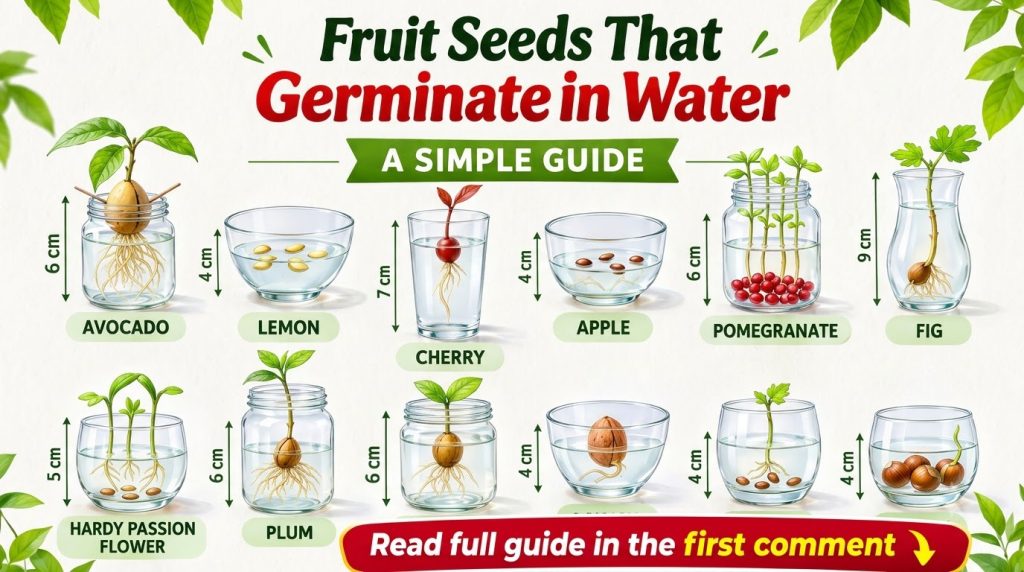
Imagine plucking a fresh, ripe fruit from a plant you nurtured yourself, right in your own home! It’s a wonderfully rewarding experience, and it’s easier than you might think. One of the simplest and most fascinating ways to start your fruit-growing journey is through water germination. It’s a fantastic method for beginners and a delightful way to observe the magic of life unfolding.
Many fruit seeds respond beautifully to water germination, allowing you to watch the roots emerge and the first sprouts appear before you even introduce them to soil. This guide will walk you through everything you need to know to turn those fruit seeds into thriving plants!
Why Choose Water Germination?
Water germination offers several compelling benefits, especially for fruit seeds:
- Visibility: You can literally watch the seed come to life! Seeing the roots and sprouts develop is incredibly satisfying and a great learning experience.
- Control: It’s easier to maintain consistent moisture and monitor the health of the seed.
- Simplicity: No special equipment or soil is needed initially, just a seed, water, and a container.
- Higher Success Rate (for certain seeds): Some seeds, particularly those that benefit from a constant moisture level, thrive in a water-based environment.
Step-by-Step Guide to Water Germination
1. Choosing and Preparing Your Seeds
Not all fruit seeds are created equal when it comes to water germination, but many common ones are perfect candidates! Good choices include avocado, lemons, limes, oranges, and even mangoes. Always choose seeds from fresh, ripe fruit.
- Avocado: Carefully remove the pit and wash off any fruit residue. You might need to gently peel off the brown outer skin.
- Citrus (Lemon, Lime, Orange): Wash seeds thoroughly to remove any pulp. They often germinate best if left to dry for a day or two before soaking, but some people skip this step.
- Mango: Remove the large inner seed from its fibrous husk. You’ll need to carefully cut open the tough outer husk to get to the actual seed inside.
2. Setting Up Your Germination Station
- The Container: A clear glass jar, cup, or even a small bottle works perfectly. Transparency allows you to monitor root growth and water clarity.
- The Water: Use room temperature water. Filtered water or rainwater is often preferred over chlorinated tap water, but tap water can work if allowed to sit out for 24 hours to let chlorine dissipate.
- Seed Placement:
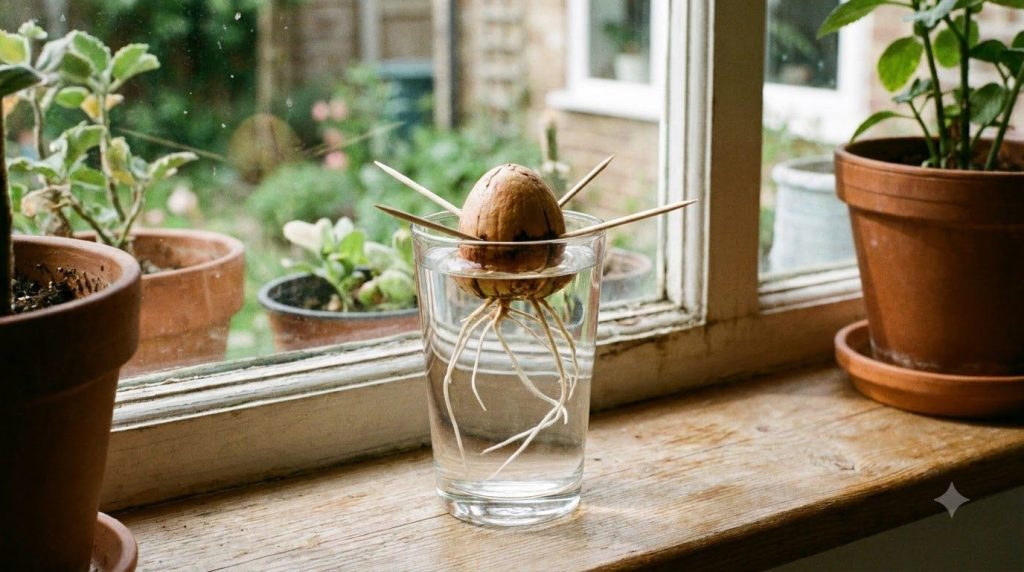
- Avocado: Insert three or four toothpicks evenly around the middle of the seed. Suspend the avocado pit over the rim of your container with the broad, flat end pointing down into the water. About half of the pit should be submerged.
- Other Seeds (Citrus, Mango, etc.): Simply place them directly into the water, ensuring they are fully submerged. You might want to use a small tray or shallow dish for multiple smaller seeds.
3. Placement and Ongoing Care
- Location: Place your germination container in a warm spot with indirect sunlight. A bright window sill is usually ideal. Avoid direct, harsh sunlight, which can overheat the water.
- Water Changes: This is crucial! Change the water every 2-3 days to prevent mold and bacterial growth. Fresh water keeps oxygen levels high, which is vital for germination.
- Patience: Germination times vary greatly. Avocado pits can take anywhere from 2-6 weeks (or even longer!) to split and show roots. Citrus seeds might sprout in a week or two. Don’t lose hope if nothing happens immediately!
When to Transplant Your Seedlings
Once your seedling has developed a strong root system (usually several inches long) and has started to grow a stem with a few leaves, it’s ready for soil. This is a critical transition, so handle your delicate seedling with care.
- Prepare Your Pot: Choose a small pot (4-6 inches in diameter) with good drainage.
- Soil Mix: Use a high-quality potting mix that drains well. A mix designed for seedlings or general houseplants is usually suitable.
- Transplanting: Gently remove the seedling from the water. Make a small hole in the center of your prepared pot. Carefully place the seedling’s roots into the hole, ensuring the stem is upright and the roots are spread out. Backfill with soil, gently firming it around the roots. Make sure the ‘neck’ of the seedling (where the roots meet the stem) is just at the soil level.
- Initial Watering: Water thoroughly after transplanting.
Tips for Long-Term Success
- Consistent Moisture: Keep the soil consistently moist but not waterlogged.
- Light: Provide plenty of bright, indirect light. As the plant grows, it may tolerate more direct sun, but introduce it gradually.
- Feeding: Once your plant has established itself in the soil and is actively growing (after a few weeks), you can begin feeding it with a balanced liquid fertilizer diluted to half strength, following package instructions.
- Pruning: As your plant grows, consider occasional pruning to encourage bushier growth and a stronger structure.
Start Your Home Harvest Today!
Growing your own fruit from seed, starting with water germination, is an accessible and exciting way to connect with nature and enjoy fresh produce. Whether you dream of a small citrus tree on your patio or a thriving avocado plant in your living room, the journey begins with a simple seed and a glass of water. Give it a try and discover the joy of your very own home harvest!
Have you successfully germinated fruit seeds in water? Share your tips and triumphs in the comments below!